

A sudden leak under your kitchen sink can turn into a plumbing disaster in minutes—unless you know where the shut off valve is and whether it works. Sink shut off valves are small but critical components that let you quickly cut off water to a faucet, dishwasher, or other fixture during repairs or emergencies. Knowing the types of sink shut off valves helps you choose the right one for installation or replacement, especially when upgrading plumbing or tackling a DIY fix.
With so many valve styles—straight, angle, three-way, compression, sweat, IPT, PEX, and push-fit—it’s easy to feel overwhelmed. Each type connects differently, fits specific pipe materials, and suits certain configurations. Installing the wrong valve can lead to leaks, difficult maintenance, or even water damage. This guide breaks down every common sink shut off valve type, explains how they work, and helps you pick the best option based on your plumbing setup. You’ll learn what to look for, how to identify your current valve, and which ones save time during repairs.
Whether you’re a homeowner, renter, or DIYer, understanding these valves puts you in control of your water supply—without calling a plumber for every drip.
Straight Stop Valves

Used when water supply lines come up from the floor, straight stop valves align inlet and outlet in a straight path. Their compact, linear design makes them ideal for tight vertical runs under sinks where space is limited.
Ideal for Floor Supply Lines
When the pipe rises directly beneath the sink, a straight valve connects seamlessly. The handle sits on top or along the side, rotating 90 degrees to shut off flow. Because the water enters from below and exits straight into the supply line, there’s no need for extra bends—reducing pressure loss and potential leak points.
Visual cue: Look for a vertical pipe with a valve body that looks like a short inline cylinder. If the handle turns horizontally to close, it’s likely a straight stop.
Installation Tips
- Ensure pipe is clean and cut straight before attaching.
- Use an adjustable wrench to tighten connections without cracking the valve body.
- Avoid overtightening compression fittings—snug is enough.
Pro tip: These valves are often used in bathrooms with pedestal sinks or vanities with floor-fed plumbing. Not ideal if your supply comes from the wall.
Angle Stop Valves

The most common type under kitchen and bathroom sinks, angle stop valves feature a 90-degree bend that redirects water from a horizontal wall pipe to a vertical outlet pointing up or down.
Standard Under Sink Choice
When water enters from the wall, an angle valve turns the flow 90 degrees to align with the faucet supply lines. The handle faces forward, making it easy to access. This design saves space and keeps supply lines hidden behind the sink.
Look for: A valve with one end pointing into the wall and the other sticking out toward the sink. The handle runs parallel to the wall when open.
Why They’re Widely Used
- Minimizes visible piping.
- Provides clean, direct connection to faucet tailpieces.
- Easy to operate even in cramped cabinets.
Common issue: Older angle stops may seize up or drip at the stem. Replace with quarter-turn ball valves for longer life and reliability.
Three-Way Stop Valves
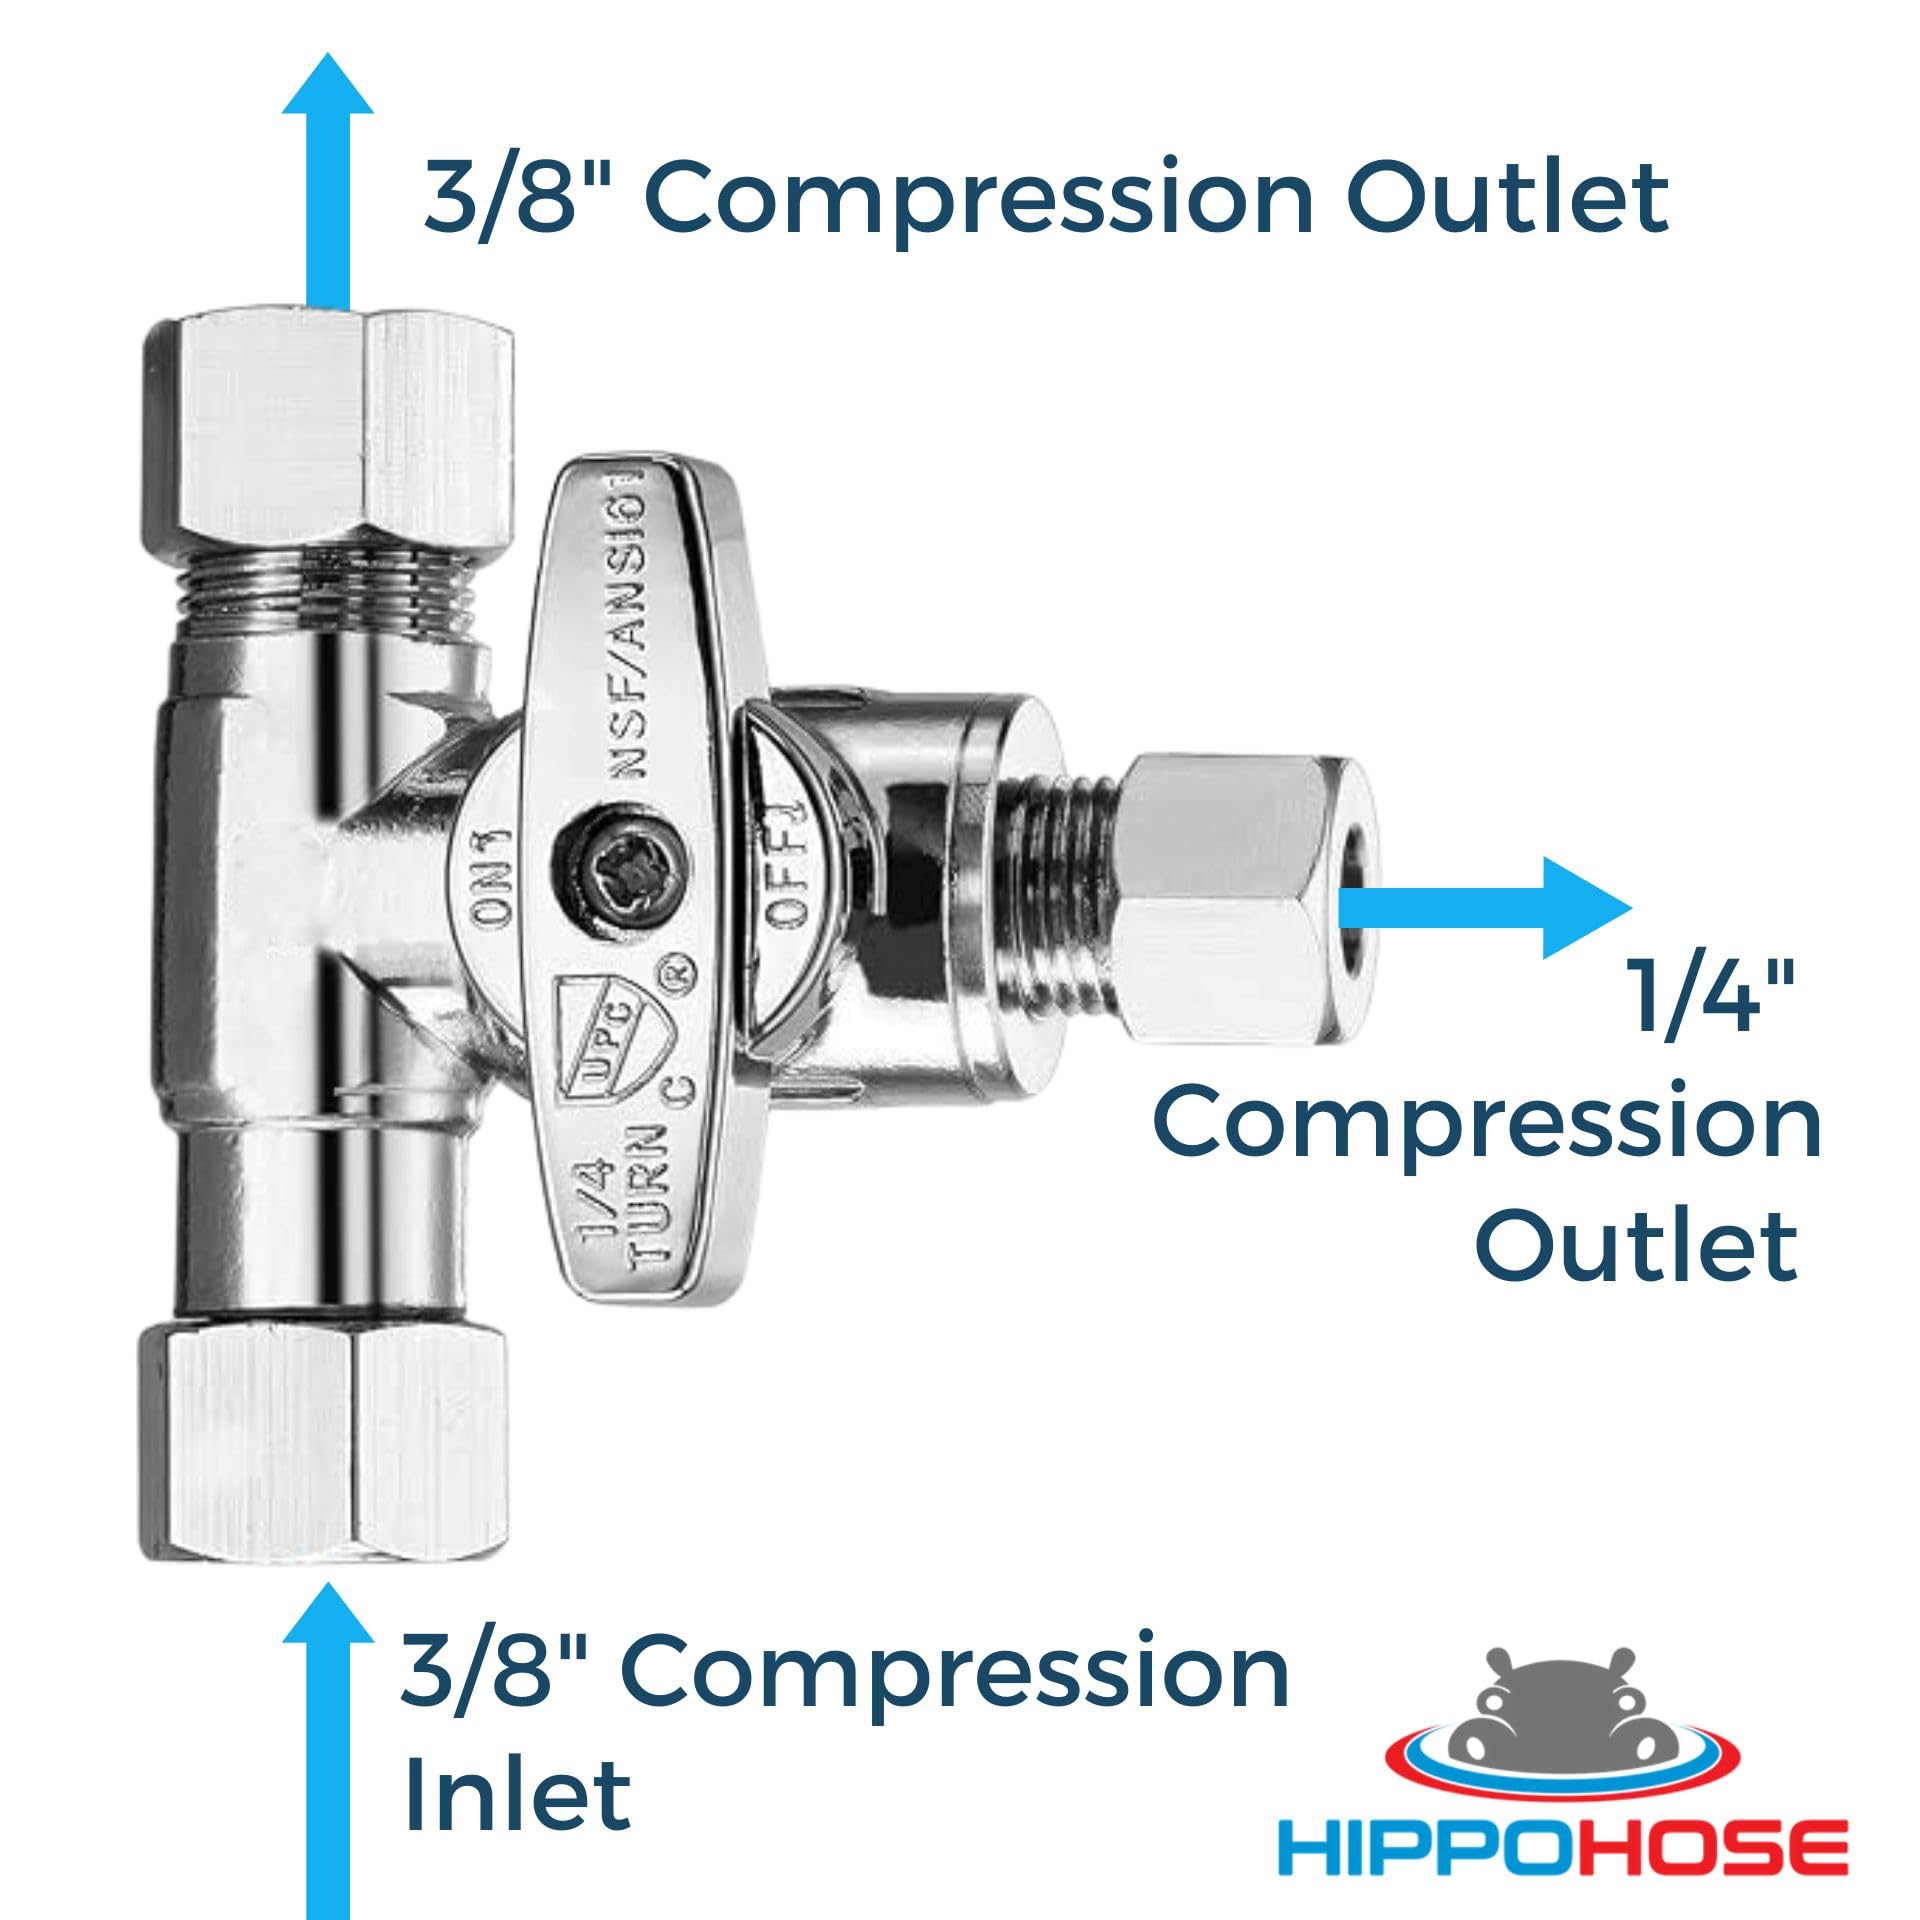
When one water line needs to feed multiple fixtures—like a kitchen faucet and dishwasher—a three-way stop valve splits the flow efficiently from a single supply.
Feeds Faucet and Dishwasher
Installed on the hot water line, these valves allow both the sink faucet and dishwasher to draw water from the same source. This eliminates the need for separate shut offs and reduces clutter under the sink.
Configurations include:
- Cross-shaped: Two outlets face opposite directions (front and back), ideal for tight spaces.
- L-shaped: One outlet continues straight, the other turns 90 degrees—good for side-mounted dishwashers.
- Y-shaped: Outlets branch at an angle, offering smooth flow distribution with minimal turbulence.
Installation Considerations
- Always install with the main inlet at the bottom or back.
- Label outlets to avoid confusion during servicing.
- Use Teflon tape on threaded connections to prevent leaks.
Expert note: Some local codes require a dedicated dishwasher shut off. Check regulations before relying solely on a three-way valve.
Compression Stop Valves
A go-to for copper pipe systems, compression stop valves use a nut and ferrule to create a secure, reusable connection without soldering.
Works With Rigid Copper Pipes
These valves slide over the end of a copper pipe. When the compression nut is tightened, it compresses a brass ferrule against the pipe, forming a watertight seal. No special tools beyond wrenches are needed.
Key benefits:
- Reusable—can be disconnected and reinstalled.
- No open flame or solder required.
- Reliable when installed correctly.
How to Install
- Cut copper pipe cleanly and deburr the edge.
- Slide nut and then ferrule onto the pipe (in order).
- Insert pipe into valve body.
- Tighten nut until snug—about 1.5 turns past hand-tight.
Warning: Reusing old ferrules often causes leaks. Always use new ones for each connection.
Tip: If the old nut or ferrule is stuck, use a compression sleeve puller to safely remove it.
Sweat (Soldered) Valves
For permanent installations on copper piping, sweat valves are soldered directly into the system using heat and molten metal to form a solid, leak-proof joint.
Permanent Copper Connections
Also called “sweated” valves, these require a propane or MAPP gas torch, flux, and solder. Once installed, they’re extremely durable and resistant to vibration or loosening over time.
Best for: New construction or full plumbing overhauls where long-term reliability is key.
Installation Steps
- Clean pipe and valve interior with emery cloth.
- Apply flux to pipe and inside fitting.
- Assemble and heat evenly with torch.
- Touch solder to joint—it should wick in completely.
- Wipe excess with a damp rag.
Caution: Shut off gas lines and remove flammable materials before using a torch. Improper heating can damage nearby wood or cause fires.
Removal Challenges
Unlike compression or push-fit valves, sweat valves can’t be unscrewed. You must cut them out with a tubing cutter or hacksaw, then resolder a new one—making repairs slower and more complex.
Iron Pipe Thread (IPT) Valves
Common in older homes with galvanized steel or brass piping, IPT valves have female threaded inlets that connect to male iron pipe threads.
For Threaded Metal Systems
These valves screw directly onto threaded steel or brass pipes. The connection is tight and durable, especially in high-pressure systems.
Identify by: A thick, threaded female end (usually 1/2″ IPS) that twists onto a matching male pipe thread.
Adaptable to Modern Pipes
Even if your main system uses copper or PEX, you can connect IPT valves using adapters:
- Male iron pipe (MIP) to compression for copper.
- MIP to PEX adapter with crimp or clamp ring.
Note: Older galvanized pipes may have corroded threads. If the valve won’t tighten, replace the pipe section or use a die to clean threads.
PEX-Compatible Shutoff Valves
When your plumbing uses PEX tubing, PEX-compatible shutoff valves provide a secure, code-compliant connection designed specifically for flexible plastic pipe.
Designed for PEX Tubing
These valves have a ribbed or barbed inlet that fits inside the PEX tube. A clamp—either ring-type (crimp) or pinch-type (clamp)—secures the connection.
Installation requires:
- PEX crimping tool or clamp tool.
- Properly sized ring or clamp.
- Deburred pipe cutter for clean cuts.
Types of PEX Connections
| Type | Tool Required | Reusability |
|---|---|---|
| Crimp Ring | Crimper | No |
| Clamp (Pinch) | Clamp tool | No |
| Expansion | Expander tool | No |
Pro tip: Use stainless steel clamps in high-heat areas (like near water heaters) for better durability.
Push-Fit (Push-In) Shutoff Valves
The fastest and easiest to install, push-fit valves connect to copper, PEX, or CPVC with no tools—just push the pipe in until it clicks.
Tool-Free Installation
Internal grab rings and a rubber O-ring create a watertight seal when the pipe is fully inserted. To remove, use a manufacturer-specific release tool to depress the collet and pull the pipe out.
Best for:
- DIY repairs.
- Retrofitting old systems.
- Emergency shut off replacements.
Why DIYers Love Them
- No soldering, crimping, or threading.
- Works with multiple pipe types.
- Reusable (most brands allow 2–3 reconnections).
- Color-coded (blue for cold, red for hot).
Limitation: More expensive than compression valves. Not always code-approved in all jurisdictions—check local plumbing codes.
How to Choose the Right Valve
Picking the correct sink shut off valve type depends on several factors: your pipe material, space constraints, and whether you’re doing a temporary fix or permanent upgrade.
Match Valve to Pipe Material
| Pipe Type | Recommended Valve |
|---|---|
| Copper (rigid) | Compression or sweat |
| Galvanized steel | IPT (threaded) |
| PEX | PEX-compatible or push-fit |
| CPVC | Push-fit or solvent-weld |
| Mixed materials | Push-fit (universal fit) |
Consider Accessibility and Future Maintenance
- In tight cabinets, angle or straight valves with front-facing handles work best.
- For frequent access (e.g., under a rental unit sink), use durable quarter-turn ball valves.
- If you plan future upgrades, push-fit or compression valves make changes easier.
Upgrade Old Valves Proactively
Many older homes still use gate-style or globe valves that seize up over time. Replace them with modern quarter-turn ball valves—they last longer, operate smoothly, and reduce the risk of being stuck during an emergency.
Warning: Never rely on a 20+ year-old valve in an emergency. Test it every 6 months by turning it off and on.
Common Mistakes to Avoid
Even experienced DIYers make errors when replacing or installing shut off valves. Avoid these pitfalls to prevent leaks and rework.
Using the Wrong Valve Type
Installing a sweat valve on PEX or an IPT valve on copper without an adapter leads to failure. Always verify compatibility before purchase.
Overtightening Connections
Especially with plastic or brass fittings, too much force cracks the body or distorts seals. Hand-tight plus 1/4 to 1/2 turn with a wrench is usually sufficient.
Skipping Pipe Prep
Burrs, debris, or uneven cuts prevent proper sealing. Always:
- Cut pipe square.
- Deburr interior and exterior.
- Wipe clean before insertion.
Ignoring Valve Orientation
Most valves have flow direction markings (→). Install with the arrow pointing toward the fixture. Reversing flow can damage internal seals.
Frequently Asked Questions About Sink Shut Off Valves
What is the most common type of sink shut off valve?
The most common type under kitchen and bathroom sinks is the angle stop valve. It features a 90-degree bend that redirects water from a wall pipe to a vertical outlet, making it ideal for standard under-sink configurations.
How do I know which shut off valve fits my pipes?
Identify your pipe material first—copper, PEX, CPVC, or galvanized steel. Then match the valve type to that material. For copper, use compression or sweat valves. For PEX, choose PEX-compatible or push-fit valves. For galvanized steel, use IPT valves.
Can I replace a sink shut off valve without a plumber?
Yes, if you have basic tools and the right replacement valve. Push-fit valves are the easiest for beginners because they require no soldering or crimping. Always shut off the main water supply before beginning work.
Are push-fit shut off valves reliable?
Push-fit valves are reliable when installed correctly on compatible pipes. They are reusable, code-compliant in many areas, and ideal for quick repairs or retrofits. Always check local plumbing codes before installation.
What is the difference between a stop valve and a ball valve?
A stop valve (like an angle or straight stop) uses a multi-turn handle to compress an internal seat. A ball valve uses a quarter-turn handle with a rotating ball that controls flow. Ball valves are more durable and less likely to seize over time.
When should I replace an old shut off valve?
Replace any valve that drips, won’t turn fully, shows corrosion, or is over 20 years old. Old gate and globe valves are especially prone to seizing. Testing every 6 months helps you catch problems before an emergency.
Key Takeaways for Choosing the Right Sink Shut Off Valve
Understanding sink shut off valve types empowers you to make smart plumbing decisions—whether you’re replacing a leaky valve, upgrading old pipes, or installing a new sink. From straight and angle stops to compression, sweat, IPT, PEX, and push-fit models, each type serves a specific purpose based on pipe material and layout.
Choose wisely: use compression or sweat valves for permanent copper setups, IPT valves for threaded metal systems, PEX-compatible for plastic tubing, and push-fit for fast, tool-free repairs. When in doubt, push-fit valves offer the most flexibility across pipe types and skill levels.
Regularly test your valves, replace outdated ones, and keep a few spare shut offs on hand. A working valve under your sink isn’t just convenient—it’s your first line of defense against water damage.







