
If your faucet has weak water flow, sputters, or sprays unevenly, the culprit is likely a clogged faucet filter, commonly called an aerator. This small component screws onto the spout tip or hides inside it, trapping debris, mineral deposits, and sediment over time. Removing and cleaning the faucet filter restores full pressure, improves water quality, and prevents long-term damage to your fixture. This guide walks you through every step, from identifying your filter type to cleaning, reinstalling, and maintaining it properly.
Identify Your Faucet Filter Type
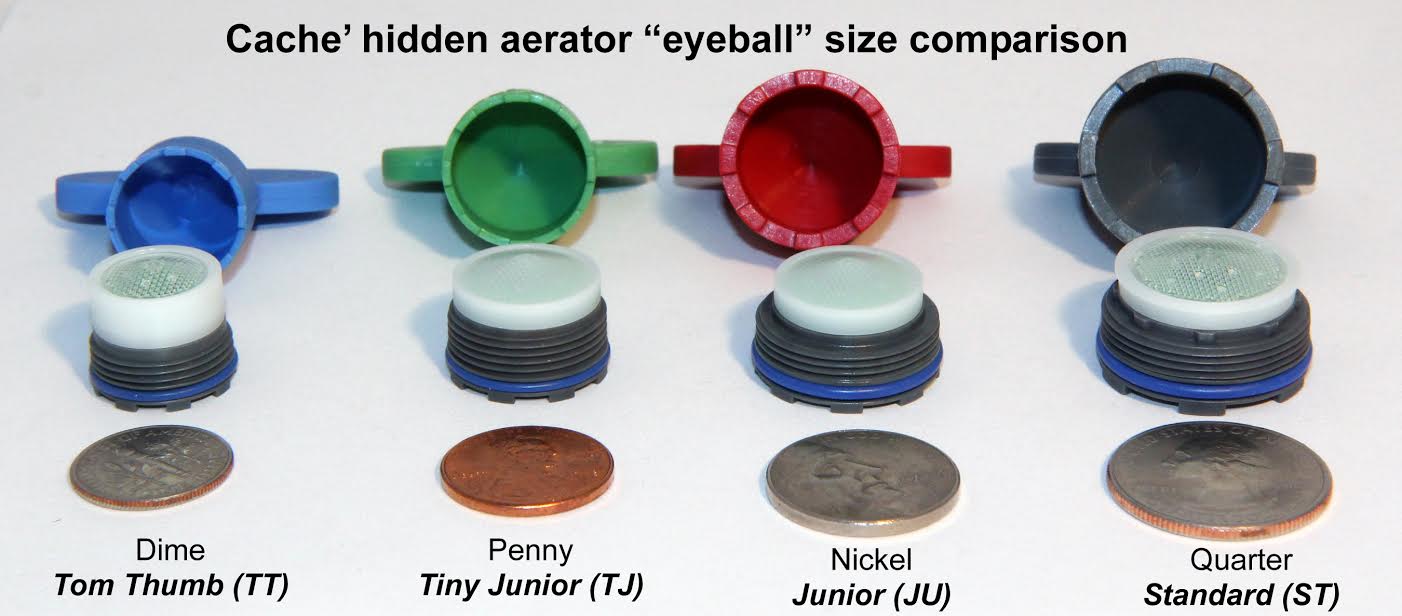
Before attempting removal, determine what kind of faucet filter you are dealing with. The three main types require different approaches, and misidentification can lead to stripped threads or broken parts.
Exposed vs. Concealed vs. In-Line
Exposed aerators are visible at the end of the spout and screw on by hand. Concealed models hide inside the spout and require special tools. In-line filters sit beneath the sink, attached to supply lines. Check your faucet to identify which type you have before proceeding.
Check for Visible Threads
Look at the tip of your faucet. If you see external or internal threads, it is an exposed aerator. Most kitchen and bathroom faucets use this type. Turn it counter-clockwise to remove, and no tools are needed unless it is stuck.
Inspect for Hidden Aerator
No visible threading? Shine a flashlight into the spout. Look for small notches, a tiny hex screw, or a press-fit edge. These indicate a concealed aerator, common in Delta, Kohler, and Pfister models. Use a small mirror for better visibility.
Locate Under-Sink Filters
If water flow is low across multiple faucets, check for in-line filters. Found at the end of supply lines under the sink, these often appear as brass nuts with mesh inserts. Always shut off the water first before disconnecting.
Remove an Exposed Faucet Filter
Most standard faucets use threaded aerators that can be removed quickly with basic tools or even by hand.
Unscrew by Hand First
Start by turning the aerator counter-clockwise. Use your fingers or a rubber grip pad. Many aerators come off easily if maintained regularly. Remember the rule “lefty-loosey,” as all standard aerators unscrew counter-clockwise.
Use Pliers With Protection
If hand removal fails, wrap the aerator in a soft cloth and apply masking tape to pliers jaws. Use channel-type pliers with gentle, steady pressure. Avoid metal-on-metal contact to prevent scratching chrome or nickel finishes.
Prevent Damage to Finish
Never use bare metal wrenches directly on the aerator. Scratches invite corrosion and make future removal harder. If resistance persists, try heat or penetrating oil before applying more force.
Extract a Concealed Aerator
Recessed aerators require precise identification and the correct tools to avoid damaging the spout interior.
Use the Correct Removal Tool
Match the tool to your aerator design. Use a toothed tool for round models with indentations, a dual-prong tool for four-notch designs, or a 1/8″ or 5/64″ hex wrench for models with a center screw. Insert fully before turning to avoid slipping.
Remove Delta Cache Aerators
Some Delta faucets have a flared outer ring around the spout. Unscrew this ring first by turning counter-clockwise, then pull the unthreaded aerator straight out. No special tool is needed for most Delta models.
Extract Kohler Crown-Style Units
Kohler recessed aerators require a unique sequence. Insert the Kohler 1130269 tool, turn clockwise to engage the locking mechanism, then turn counter-clockwise to unscrew and remove. Skipping the clockwise step may break the aerator.
Pry Out Press-Fit Models
For oval press-fit types with no screws, use needle-nose pliers. Gently grip the inner edge and pull straight out. Do not twist, as twisting can crack the spout lining.
Disconnect an In-Line Filter

When the issue is not at the spout, check under the sink for in-line filters affecting multiple faucets.
Shut Off Water Supply
Locate shutoff valves under the sink. Turn both hot and cold handles clockwise until tight. Open the faucet above to relieve pressure before disconnecting any lines.
Label and Disconnect Supply Lines
Place a towel in the sink base to catch drips. Label hot and cold lines with tape. Disconnect them from the faucet tailpieces using a wrench to prevent confusion during reassembly.
Remove Filter from Supply Line
In-line filters attach in two ways. Unscrew threaded brass nuts from the line end, or gently pull apart snap-in designs with pliers. Soak the filter in vinegar or rinse under another faucet to clean.
Disassemble and Clean the Filter

Once removed, take apart the unit for thorough cleaning. Proper disassembly ensures all components get clean.
Lay Out Parts in Order
Place components on a clean surface in the sequence they come out. Typical order includes outer cap, fine mesh screens, flow regulator disc, rubber washers or O-rings, and retention spring if present. Take a photo before cleaning to ensure correct reassembly.
Clean Each Component Separately
Metal parts tolerate soaking, but rubber does not. Separate them immediately to prevent damage. Vinegar dissolves mineral buildup safely on metal components.
Soak Metal Parts in Vinegar
Submerge screens, housing, and flow disc in 5% white vinegar. For heavy limescale, soak overnight. Remove rubber washers after 5-10 minutes, as prolonged vinegar exposure degrades elastomers and causes leaks.
Scrub and Clear Clogged Holes
After soaking, scrub all surfaces with an old toothbrush. Use a toothpick, paperclip, or fine pin to poke through individual screen holes. Rinse under warm water afterward to remove all residue.
Handle Stuck or Corroded Filters
When mineral buildup locks the aerator in place, standard methods fail. Use advanced techniques cautiously.
Apply Heat to Expand Metal
Use a hairdryer for 1-2 minutes on the aerator base. Thermal expansion loosens bonds. Try removal immediately after heating. Do not apply heat to plastic or ceramic spouts, as risk of cracking exists.
Use Penetrating Oil Carefully
Spray WD-40 at the thread junction. Wait 5-10 minutes for capillary action to loosen corrosion. Wipe excess before using pliers, as oil reduces grip. Never combine oil and vinegar, as oil repels water-based cleaners.
Try Improvised Tools
If no aerator key is available, open a caliper to match the inner diameter. Insert upside-down into the aerator, grip, and turn counter-clockwise. This works well for female-threaded units.
Reassemble and Reinstall the Filter
Putting it back together matters as much as removal. Proper reassembly prevents leaks and performance issues.
Reinsert Components in Original Order
Follow your photo or layout from disassembly. Screens must be flat and aligned. Flow regulator must face the correct direction, usually water-in first. Washers must be seated fully and not twisted.
Lubricate Threads Lightly
Apply a small amount of silicone or PTFE grease to threads. This prevents future seizing and eases maintenance. Never use pipe dope or sealant, as these can flake off and clog downstream valves.
Hand-Tighten First
Screw the aerator on clockwise by hand. Stop when snug. Over-tightening crushes seals or strips threads. For a final quarter to half turn, use plastic-jaw pliers or taped metal ones with minimal force.
Test and Troubleshoot Common Issues
After reinstallation, verify proper operation and address any problems that arise.
Check for Leaks and Flow Issues
Turn water back on slowly. Watch for even aerated stream, no dripping at spout base, and full pressure within seconds. A brief sputter is normal as air clears the line.
Fix Sputtering After Reassembly
Likely causes include trapped air or misaligned screen. Disassemble, reseat components, and reinstall. Run water for 30 seconds to purge air from the line.
Stop Leaking at the Base
Causes include damaged or twisted O-ring, over-tightened housing, or debris in spout threads. Replace the washer and clean the seat before reattaching.
Restore Low Flow
If pressure remains weak, re-clean all screens and verify you did not reinstall the flow restrictor backward. Consider replacing the aerator entirely if cleaning does not resolve the issue.
Know When to Replace vs. Clean
Cleaning is not always enough. Knowing when to replace saves time and frustration.
Replace If Cracked or Corroded
Replace the aerator if you notice cracks in housing, worn or warped washers, stripped threads, or persistent clogging after multiple cleanings. Aerators cost $5-$15, and replacement beats repeated frustration.
Upgrade for Better Performance
Swap old 1.2 GPM models for 1.5 GPM versions to get stronger flow while still conserving water. Choose swivel heads, pull-down sprays, or anti-splash designs for added convenience.
Choose the Right Replacement Filter
Getting the correct fit prevents leaks and poor performance. Take the time to match specifications.
Match Thread Type and Size
Common sizes include 15/16″ for standard US kitchen faucets, 13/16″ for common bathroom faucets, and M24×1, M21, or M18 for European or brand-specific models. Use calipers to measure thread diameter accurately.
Consider Flow Rate and Spray Pattern
Options include laminar for solid stream, aerated for soft bubbly flow, or spray for dispersed jets. Pick based on sink use, with spray for cleaning and laminar for filling pots.
Buy Universal Kits for Multiple Faucets
Universal kits include adapters, tools, washers, and various aerators. These are ideal for homes with mixed brands or rental properties. If you find “Delta” or “Kohler” stamped inside, buy OEM to guarantee fit and function.
Maintain Your Faucet Filter Regularly
Prevention beats repair. Regular maintenance keeps your faucet running optimally.
Clean Every 3-6 Months
This is the standard schedule for city water. Use vinegar soak and visual inspection during cleaning. More frequent attention is needed in areas with harder water.
Clean Monthly in Hard Water Areas
Well water or hard water zones require cleaning every 1-2 months. Mineral buildup accumulates faster and can seize components if neglected.
Inspect Gaskets Periodically
Rubber degrades over time. Replace washers every 1-2 years, even if not leaking, to prevent sudden failures.
Avoid Overtightening During Reuse
Tight does not mean better. Hand-tight plus a quarter turn is sufficient. Excess force damages ceramic spouts and strips threads.
Benefits of Proper Filter Maintenance
Routine care delivers real advantages for your plumbing and wallet.
Restore Full Water Pressure
A clean aerator can double flow rate. No need for expensive faucet replacement when simple cleaning restores performance.
Reduce Splashing and Waste
Aerated streams control flow direction and minimize mess. Proper maintenance keeps spray patterns effective.
Conserve Water Efficiently
Most aerators limit flow to 0.5-1.5 GPM, saving thousands of gallons yearly while maintaining adequate pressure for most tasks.
Extend Faucet Lifespan
Preventing internal clogs protects valves and cartridges from strain. This reduces repair costs and delays premature faucet replacement.
Improve Water Quality
Filters trap sand, rust, and particulates before they reach your glass. Clean filters mean cleaner water for drinking and cooking.
Frequently Asked Questions About Removing Faucet Filters
How do I know if my faucet filter is clogged?
Signs include weak or absent water flow, splashing or sputtering, distorted stream shape, and in rare cases, discolored water. If you experience reduced pressure, the aerator is likely clogged with debris or mineral deposits.
Can I remove a faucet filter without tools?
For exposed aerators, yes. Most can be removed by hand by turning counter-clockwise. Concealed aerators require specific tools, while in-line filters need basic plumbing tools to disconnect supply lines.
What if the aerator is stuck and won’t budge?
Apply heat with a hairdryer for 1-2 minutes to expand the metal, then try removal immediately. Alternatively, apply penetrating oil like WD-40, wait 5-10 minutes, then attempt removal with protected pliers.
How often should I clean my faucet filter?
Clean every 3-6 months under normal conditions. In hard water areas or with well water, clean every 1-2 months to prevent mineral buildup from seizing components.
Can I use my faucet without an aerator?
Yes, but with trade-offs. You will experience faster unregulated flow, increased splashing, and higher water usage. Removing the aerator is useful temporarily during cleaning or for filling large containers quickly.
Key Takeaways for Removing Faucet Filters
Removing a faucet filter is a simple, low-cost fix for common flow problems. Identify your filter type first, whether exposed, concealed, or in-line, as each requires different tools and techniques. Use gentle methods like hand removal or protected pliers first, escalating to heat or penetrating oil only when necessary. Clean components thoroughly with vinegar, reassemble in the correct order, and test for leaks. Maintain your filter every few months to prevent future clogs and extend your faucet’s lifespan. With the right approach, you can complete this job in under 15 minutes without calling a plumber.







