

Is your faucet sputtering, spraying unevenly, or losing pressure? The culprit is likely a clogged faucet aerator—a small but vital component that mixes air with water to reduce splashing and conserve flow. Over time, mineral deposits from hard water can glue the aerator in place, making removal tricky, especially if you do not have the right tools.
The good news: you can remove most aerators using household items, simple techniques, and a bit of patience. Whether it is a standard external model or a hidden recessed type from Delta, Moen, or Kohler, this guide reveals proven no-tool methods. You will learn how to identify your aerator, loosen mineral bonds, and safely extract it using just vinegar, rubber bands, scissors, or a toothbrush.
Identify Your Aerator Type Before Attempting Removal
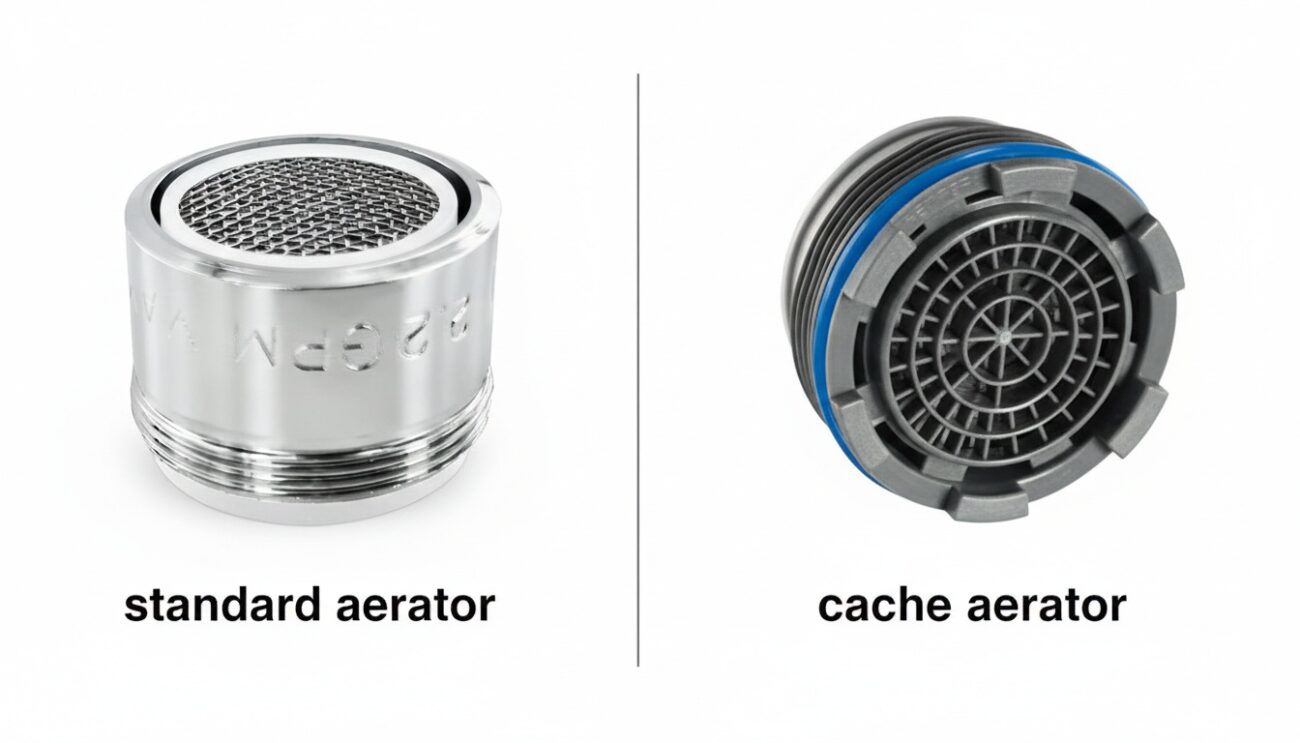
Before applying force, determine what kind of aerator you are dealing with. Using the wrong method can damage internal threads or strip components.
Standard External Aerator
Visible at the spout tip with ridges or knurls for grip. Most common on older sinks.
• Male-threaded: Screws over the spout with threads on the outside
• Female-threaded: Threads onto a male spout with threads on the inside
• Removal: Usually hand-removable as a starting point
Tip: If you can grip it with fingers or a rubber band, it is likely a standard external aerator.
Recessed or Hidden Aerator
No external cap exists. Just a flat or slightly indented spout end. Common in modern fixtures like Delta Cache, Moen, and Kohler Purist models.
• Access: Must engage internal notches, slots, or cross-patterns
• Identification: Shine a flashlight into the tip. Look for a screen deep inside, internal ridges or tabs, or a threaded ring beneath the surface
Pro Insight: These often resist coin methods. Use scissors or needle-nose pliers instead.
Hidden Aerator with Trim Ring
Found on high-end faucets like Kohler Purist models.
• Feature: Decorative outer ring surrounds the spout
• Key Detail: The ring may be reverse-threaded, meaning it tightens counter-clockwise and loosens clockwise
• Removal Sequence: Unscrew the trim ring clockwise first, then access and remove the inner aerator normally
Warning: Forcing it counter-clockwise can tighten it further instead of loosening it.
Manual Removal by Hand
Always start with hand removal. Many aerators are designed to be taken off without tools.
Dry and Grip Properly
• Dry your hands and the spout thoroughly
• Wear rubber gloves or wrap a damp cloth around the aerator for better traction
• Use thumbs or fingertips to apply even pressure
Turn Counter-Clockwise
• Rotate left as viewed from below, following the “lefty-loosey” rule
• Apply steady, smooth force without jerking movements
• For recessed types, insert fingernails into internal notches and twist
Success Tip: On Delta hidden aerators, fingernail leverage often works when coins fail.
Improve Your Grip If Slipping Occurs
• Wrap a wide rubber band around the aerator
• Use electrical tape or a leather belt for extra friction
• Try gripping with rubber-soled shoes as some users report success with this method
Fact: Most aerators are hand-tightened during installation, meaning no tools are needed for removal under normal conditions.
Use Household Items as Tools
When fingers are not enough, improvise with common objects found in your home.
Rubber Band Plus Jar Lid or Socket Method
Best for recessed aerators with internal ridges.
What You Need:
• Wide rubber band
• Wide-mouth jar lid or deep socket like a 1/2-inch drive socket
Steps:
1. Lay the rubber band flat over the spout opening
2. Press the lid or socket firmly onto the rubber band
3. Turn counter-clockwise
Why It Works: The rubber fills gaps and grips internal teeth while the lid acts as a handle.
Real-World Win: A homeowner freed a stuck Delta Cache unit after failing with pliers and vinegar by using this exact method.
Scissors Method for Moen and Delta
Ideal for models with internal slots.
Procedure:
1. Open scissors fully
2. Insert both blades into opposite slots
3. Gently squeeze to grip inner walls
4. Rotate counter-clockwise
Pro Tip: Soak in vinegar first to loosen mineral bonds before attempting this method.
Needle-Nose Pliers Technique
Useful for broken or recessed units.
Steps:
1. Insert plier tips into internal grooves
2. Squeeze slightly to engage the walls
3. Twist slowly counter-clockwise
Caution: Avoid scratching metal finishes. Wrap plier tips in tape if needed to protect the faucet.
Try the Coin or Paperclip Trick
These methods are often recommended, but effectiveness varies by aerator type.
Coin Method Has Limited Use
• Insert the edge of a quarter into notches
• Use as a lever to turn counter-clockwise
Problems with this approach:
• Fails on many modern recessed designs
• Risks scratching chrome or breaking plastic tabs
Safer Version:
• Wrap the coin in cloth or tape before use
• Apply gentle pressure only and stop if resistance is high
Warning: Forcing a coin can deform internal tabs and make future removal much harder.
Improvised Aerator Key
Use when nothing else fits your specific aerator.
Options:
• Paperclip: Unfold into a U-shape and insert into opposing notches
• Bobby pin: Bend straight and insert into a slot
• Flathead screwdriver: Nudge the side gap incrementally
Technique:
• Rotate in small steps and reposition after each turn
• Combine with a vinegar soak for best results
Soak With Vinegar to Loosen Buildup

Mineral deposits are the number one reason aerators get stuck. Vinegar dissolves calcium and lime buildup effectively.
Quick Vinegar Wrap
Steps:
1. Soak a paper towel or cloth in white vinegar
2. Wrap tightly around the spout base, covering the joint
3. Wait 20 to 60 minutes
4. Try removal again
Safe for: Chrome, brass, nickel, and stainless steel
Avoid on: Bronze or antique finishes where prolonged exposure could cause damage
Bag Soak for Deep Treatment
Best for recessed or heavily calcified units.
Steps:
1. Fill a small plastic bag with vinegar
2. Place over the spout so the aerator is submerged
3. Secure with a rubber band or tape
4. Soak for 30 minutes to 2 hours
Bonus: This method often restores flow even without full removal of the aerator.
Apply Penetrating Oil or Heat as Last Resort
For corrosion or seized threads, use these methods carefully.
Penetrating Oil Breaks Down Rust
How To:
1. Apply 1 to 2 drops of WD-40 or PB Blaster at the aerator-spout seam
2. Wait 5 to 10 minutes for capillary action
3. Wipe excess to prevent slipping during removal
4. Attempt removal
Critical Warnings:
• Do not mix with vinegar as this creates dangerous chemical reactions
• Avoid contact with plastic or rubber parts
• Rinse thoroughly after removal
• Use in a well-ventilated area
Best for: Metal-on-metal seizing rather than mineral scale.
Gentle Heat with Hairdryer
Heat expands metal slightly to break the bond.
Steps:
1. Use a hairdryer on low heat
2. Warm the spout base for 30 to 60 seconds
3. Try unscrewing immediately while the metal is still warm
Do NOT:
• Use open flame because of scalding and damage risks
• Apply heat to plastic spouts or aerators as warping can occur
Combine With: A vinegar soak beforehand for stronger effect.
Handle Special Cases Safely
Some situations require unique approaches.
Broken or Sheared-Off Aerator
Common after over-tightening during previous maintenance.
Solutions:
• Needle-nose pliers: Grip inner grooves and twist
• Flathead screwdriver: Lever from side notch in small turns
• Rubber stopper or cork: Cut larger than the opening, jam in, and twist to use friction for removal
• Tweezers or jewelry pliers: Extract remaining fragments
Warning: Metal tools can gouge internal threads. Proceed gently to avoid requiring professional repair.
Reverse-Threaded Trim Ring
Found on Kohler Purist and similar high-end faucets.
How to Know:
• Turns clockwise to loosen instead of the standard counter-clockwise
• Often confused with being stuck when it actually needs opposite direction
Removal:
• Use rubber gloves or tape for grip
• Turn clockwise to remove
• Once removed, access the inner aerator normally
Pro Tip: Mark the correct direction with tape before starting to avoid confusion.
Clean and Reinstall Properly
After successful removal, clean thoroughly and reinstall correctly to prevent future problems.
Deep Clean the Aerator
Steps:
1. Disassemble if multi-part, noting the order of screen, washer, and flow restrictor
2. Soak in white vinegar for 20 to 60 minutes
3. For heavy buildup, use CLR or Lime-Away for 2 to 10 minutes only
4. Scrub with a nylon brush or toothbrush from the upstream side
5. Rinse well and tap dry
Replace If: The screen is torn, pitted, or permanently clogged beyond cleaning.
Inspect Key Components Before Reinstalling
Check the following:
• Screen: Must be clear of all debris
• O-rings and gaskets: No cracks or flattening; replace every 1 to 2 years
• Flow restrictor: Small plastic disc that must be clean or replaced if blocked
Reinstall Without Tools
Procedure:
1. Start threading by hand to prevent cross-threading
2. Use a rag, tape, or rubber band for grip if needed
3. Tighten until snug without over-tightening
4. Test with both hot and cold water
Check For:
• Leaks at the base
• Side spray
• Crooked or spluttering stream
Pro Tip: Apply 1 to 2 wraps of thread seal tape or a tiny dab of anti-seize compound to prevent future sticking.
Prevent Future Clogs
Keep your faucet flowing smoothly with simple maintenance.
Cleaning Schedule by Water Type
| Water Type | Clean Every |
|---|---|
| Soft water | 3 to 6 months |
| Hard water | 1 to 3 months |
| After plumbing work | Immediately |
Source: USGS data shows hard water significantly accelerates scale buildup.
Pre-Soak Before Removal
• Wrap with a vinegar-soaked rag before attempting removal
• This prevents seizing and eases the cleaning process significantly
Improve Water Quality
• Install a point-of-use filter or whole-house softener
• Test water hardness with strips or consult local water reports
Avoid Common Mistakes
Steer clear of these pitfalls to protect your faucet.
| Mistake | Consequence | Fix |
|---|---|---|
| Over-tightening | Cracked housing, stripped threads | Hand-tighten only |
| Using pliers bare | Scratched finish, rounded edges | Wrap with tape or cloth |
| Ignoring O-rings | Leaks, side spray | Replace every 1 to 2 years |
| Heating plastic | Warping, leaks | Use heat only on metal |
| No drain protection | Lost parts in trap | Use sink stopper or rag |
Diagnose Low Flow After Removal
If water still runs slowly after aerator removal, check these areas.
Upstream Issues
• Angle stop valves: Ensure fully open under the sink
• Supply lines: Look for kinks or twists
• Faucet cartridge: May be clogged; flush or replace per manufacturer manual
Flush the Faucet
• With aerator off, run water for 30 to 60 seconds
• Pulse hot and cold to dislodge debris
• Catch particles in a cup for inspection
Choose the Right Replacement
Need a new aerator? Match these specifications.
Thread Size and Gender
| Size | Type | Common Use |
|---|---|---|
| M24 x 1 | Male metric | Bathroom faucets |
| M22 x 1 | Female metric | Bathroom faucets |
| 15/16″-27 | Male SAE | Kitchen faucets |
| 13/16″-27 | Female SAE | Some bathroom faucets |
Measure Without Tools
• Coin Test: A dime covering the opening with rim visible suggests M22; a nickel fitting better suggests M24
• Ruler Method: Measure outer thread diameter in millimeters
Flow Rate Guidelines
• Bathroom: 0.5 to 1.2 gpm for laminar flow
• Kitchen: 1.8 to 2.2 gpm for aerated or spray
Tip: Bring the old unit to the store for an exact match.
Frequently Asked Questions About Removing Faucet Aerators Without Tools
Are Aerators Reverse-Threaded?
No. All standard aerators use right-hand threads. The confusion comes from viewing the spout from below. Always turn counter-clockwise to loosen.
Can I Use the Faucet Without an Aerator?
Yes. Water will flow faster but with more splashing and higher usage. This is safe for short-term use like filling pots.
How Often Should I Clean My Aerator?
• Normal water: Every 3 to 6 months
• Hard water: Every 1 to 3 months
• After plumbing work: Immediately
Are All Aerators the Same Size?
No. Sizes vary by brand, model, and region. Always measure or test-fit before purchasing a replacement.
What If the Aerator Breaks During Removal?
• Use tweezers or pliers to extract remaining pieces
• Flush the faucet thoroughly before reinstalling
• Seek professional help if internal threads are damaged
Key Takeaways for Removing Faucet Aerators Without Tools
Removing a faucet aerator without tools is not only possible, it is often faster and safer than using pliers or aerator keys. Start with manual grip methods using rubber gloves or a damp cloth. Move to vinegar soaks for stuck units, allowing 20 to 60 minutes for mineral deposits to dissolve. Use scissors or improvised tools like rubber bands with jar lids for recessed Delta and Moen models. Avoid common mistakes like over-tightening or forcing reverse-threaded trim rings in the wrong direction. With regular cleaning every 1 to 6 months depending on your water hardness and proper hand-tightened reinstallation, you will keep your faucet flowing smoothly for years without needing any special tools.







