
Replacing a kitchen faucet can transform your sink’s look and function without needing a plumber. Whether you’re upgrading to a pull-down sprayer or replacing a leaky fixture, how to install a kitchen faucet is a DIY project most homeowners can complete in under an hour. With the right tools, clear steps, and attention to detail, you’ll have running water and a professional finish in no time.
This guide walks you through every phase: from shutting off the water and removing the old faucet, to mounting the new unit, connecting supply lines, testing for leaks, and troubleshooting common issues. You’ll learn how to avoid costly mistakes like cross-threading, over-tightening, or misaligned hoses.
Prepare Your Workspace
Clear and Protect the Area
Start by removing all items stored under the sink. Clutter limits access and increases the risk of knocking over tools or containers. Place a drip pan or shallow bucket directly beneath the shut-off valves to catch residual water. Lay down old towels or rags inside the cabinet to absorb spills and protect flooring.
If you’ll be lying on your back, use a small pillow or cushion for back support. Working in tight spaces is easier with a headlamp or flashlight, as it frees both hands and improves visibility.
Shut Off Power and Water
For safety, turn off electricity at the circuit breaker if there’s an outlet under the sink, especially if it powers a garbage disposal or dishwasher. Then locate the hot and cold shut-off valves beneath the sink. Turn both clockwise until fully closed.
If valves are missing, corroded, or won’t close, shut off the main water supply to the house. Label each valve with tape to prevent mix-ups later.
Relieve System Pressure
Open both handles on the old faucet to drain residual water and relieve pressure. Let water run until it stops. This prevents unexpected drips when disconnecting lines.
Remove the Old Faucet
Disconnect Supply Lines
Place a towel in the sink basin to protect the finish. Use an adjustable wrench to loosen the compression nuts connecting the supply lines to the shut-off valves. Turn nuts counter-clockwise.
Hold the valve body steady with a second wrench to prevent twisting hidden pipes behind the wall. Once loose, disconnect both lines and let any remaining water drain into the drip pan.
Handle Corroded Nuts
If nuts are stuck, apply penetrating oil and wait 5 to 10 minutes before reattempting. Wrap the wrench jaws with a cloth to avoid scratching chrome finishes.
Disconnect Sprayer Hose
For pull-out or pull-down faucets, locate the diverter connection under the sink. For quick-connect fittings, press the release button or slide the collar back. For threaded connections, unscrew manually or with a wrench. Allow trapped water to drain before removal.
Remove Mounting Hardware
Locate the mounting nuts securing the faucet to the sink from below. Use a basin wrench, as its long handle and pivoting head are ideal for tight spaces. Loosen and remove the nut.
If the nut is rusted or seized, reapply penetrating oil and wait. Never force it, as excessive torque can damage the sink or countertop.
Extract the Old Faucet
Gently rock the faucet back and forth to break the seal from old silicone, putty, or mineral deposits. Lift straight up and remove.
Clean the mounting area thoroughly by scraping off old sealant with a plastic scraper and wiping the surface clean. Smooth any sharp edges around the hole to prevent gasket damage.
Check Sink Compatibility

Match Faucet to Sink Holes
Verify your sink’s hole configuration matches the new faucet. One-hole sinks work with single-hole faucets. Three-hole sinks fit centerset, widespread, or single-hole with escutcheon. Four-hole sinks allow faucet plus sprayer or soap dispenser.
Measure the spread, which is the distance between outer hole centers, for widespread models. The standard is 8 inches.
Choose the Right Faucet Type
Different faucet types serve different purposes. Single-hole faucets work best for modern sinks with a minimalist look. Centerset faucets suit older kitchens with a 4-inch spread. Widespread faucets offer custom spacing between 6 and 16 inches. Pull-down faucets are ideal for deep or double bowls with vertical retraction and magnetic docking. Pull-out faucets extend horizontally for better reach on large sinks.
Use an escutcheon plate to cover unused holes on three or four-hole sinks. It includes a gasket to seal against water infiltration.
Mount the New Faucet
Pre-Assemble Components
For pull-down or pull-out models, feed the sprayer hose through the spout from above before mounting. Ensure the quick-connect tip protrudes slightly. Temporarily remove it if needed for easier installation.
Loosely attach the handle if required. Confirm the handle will be on the right side for standard single-handle models.
Install Based on Sink Type
For one-hole installation, use only the round rubber gasket. Align gasket cutouts with supply lines and hose, facing front. No escutcheon is needed.
For three or four-hole installation, slide the escutcheon plate over the faucet base before insertion. Position it to cover outer holes while centering the spout. The integrated gasket seals against the sink.
Secure the Faucet
Insert the faucet shank and lines through the sink hole from above. From below, slide the lock plate with bump side up or U-bracket onto the shank. Thread the mounting nut onto the shank and hand-tighten first.
Use a basin wrench, Allen wrench, or quick-install tool to finish tightening. Tighten until the nut sits half an inch below the countertop surface. Evenly tighten three mounting screws if applicable until the faucet is flush.
Have a helper hold the faucet steady from above to prevent rotation during tightening. Do not overtighten, as excessive force can crack porcelain, granite, or quartz sinks. Apply only hand-tight plus a quarter to half turn with a tool.
Connect Water and Sprayer Lines
Attach Supply Lines
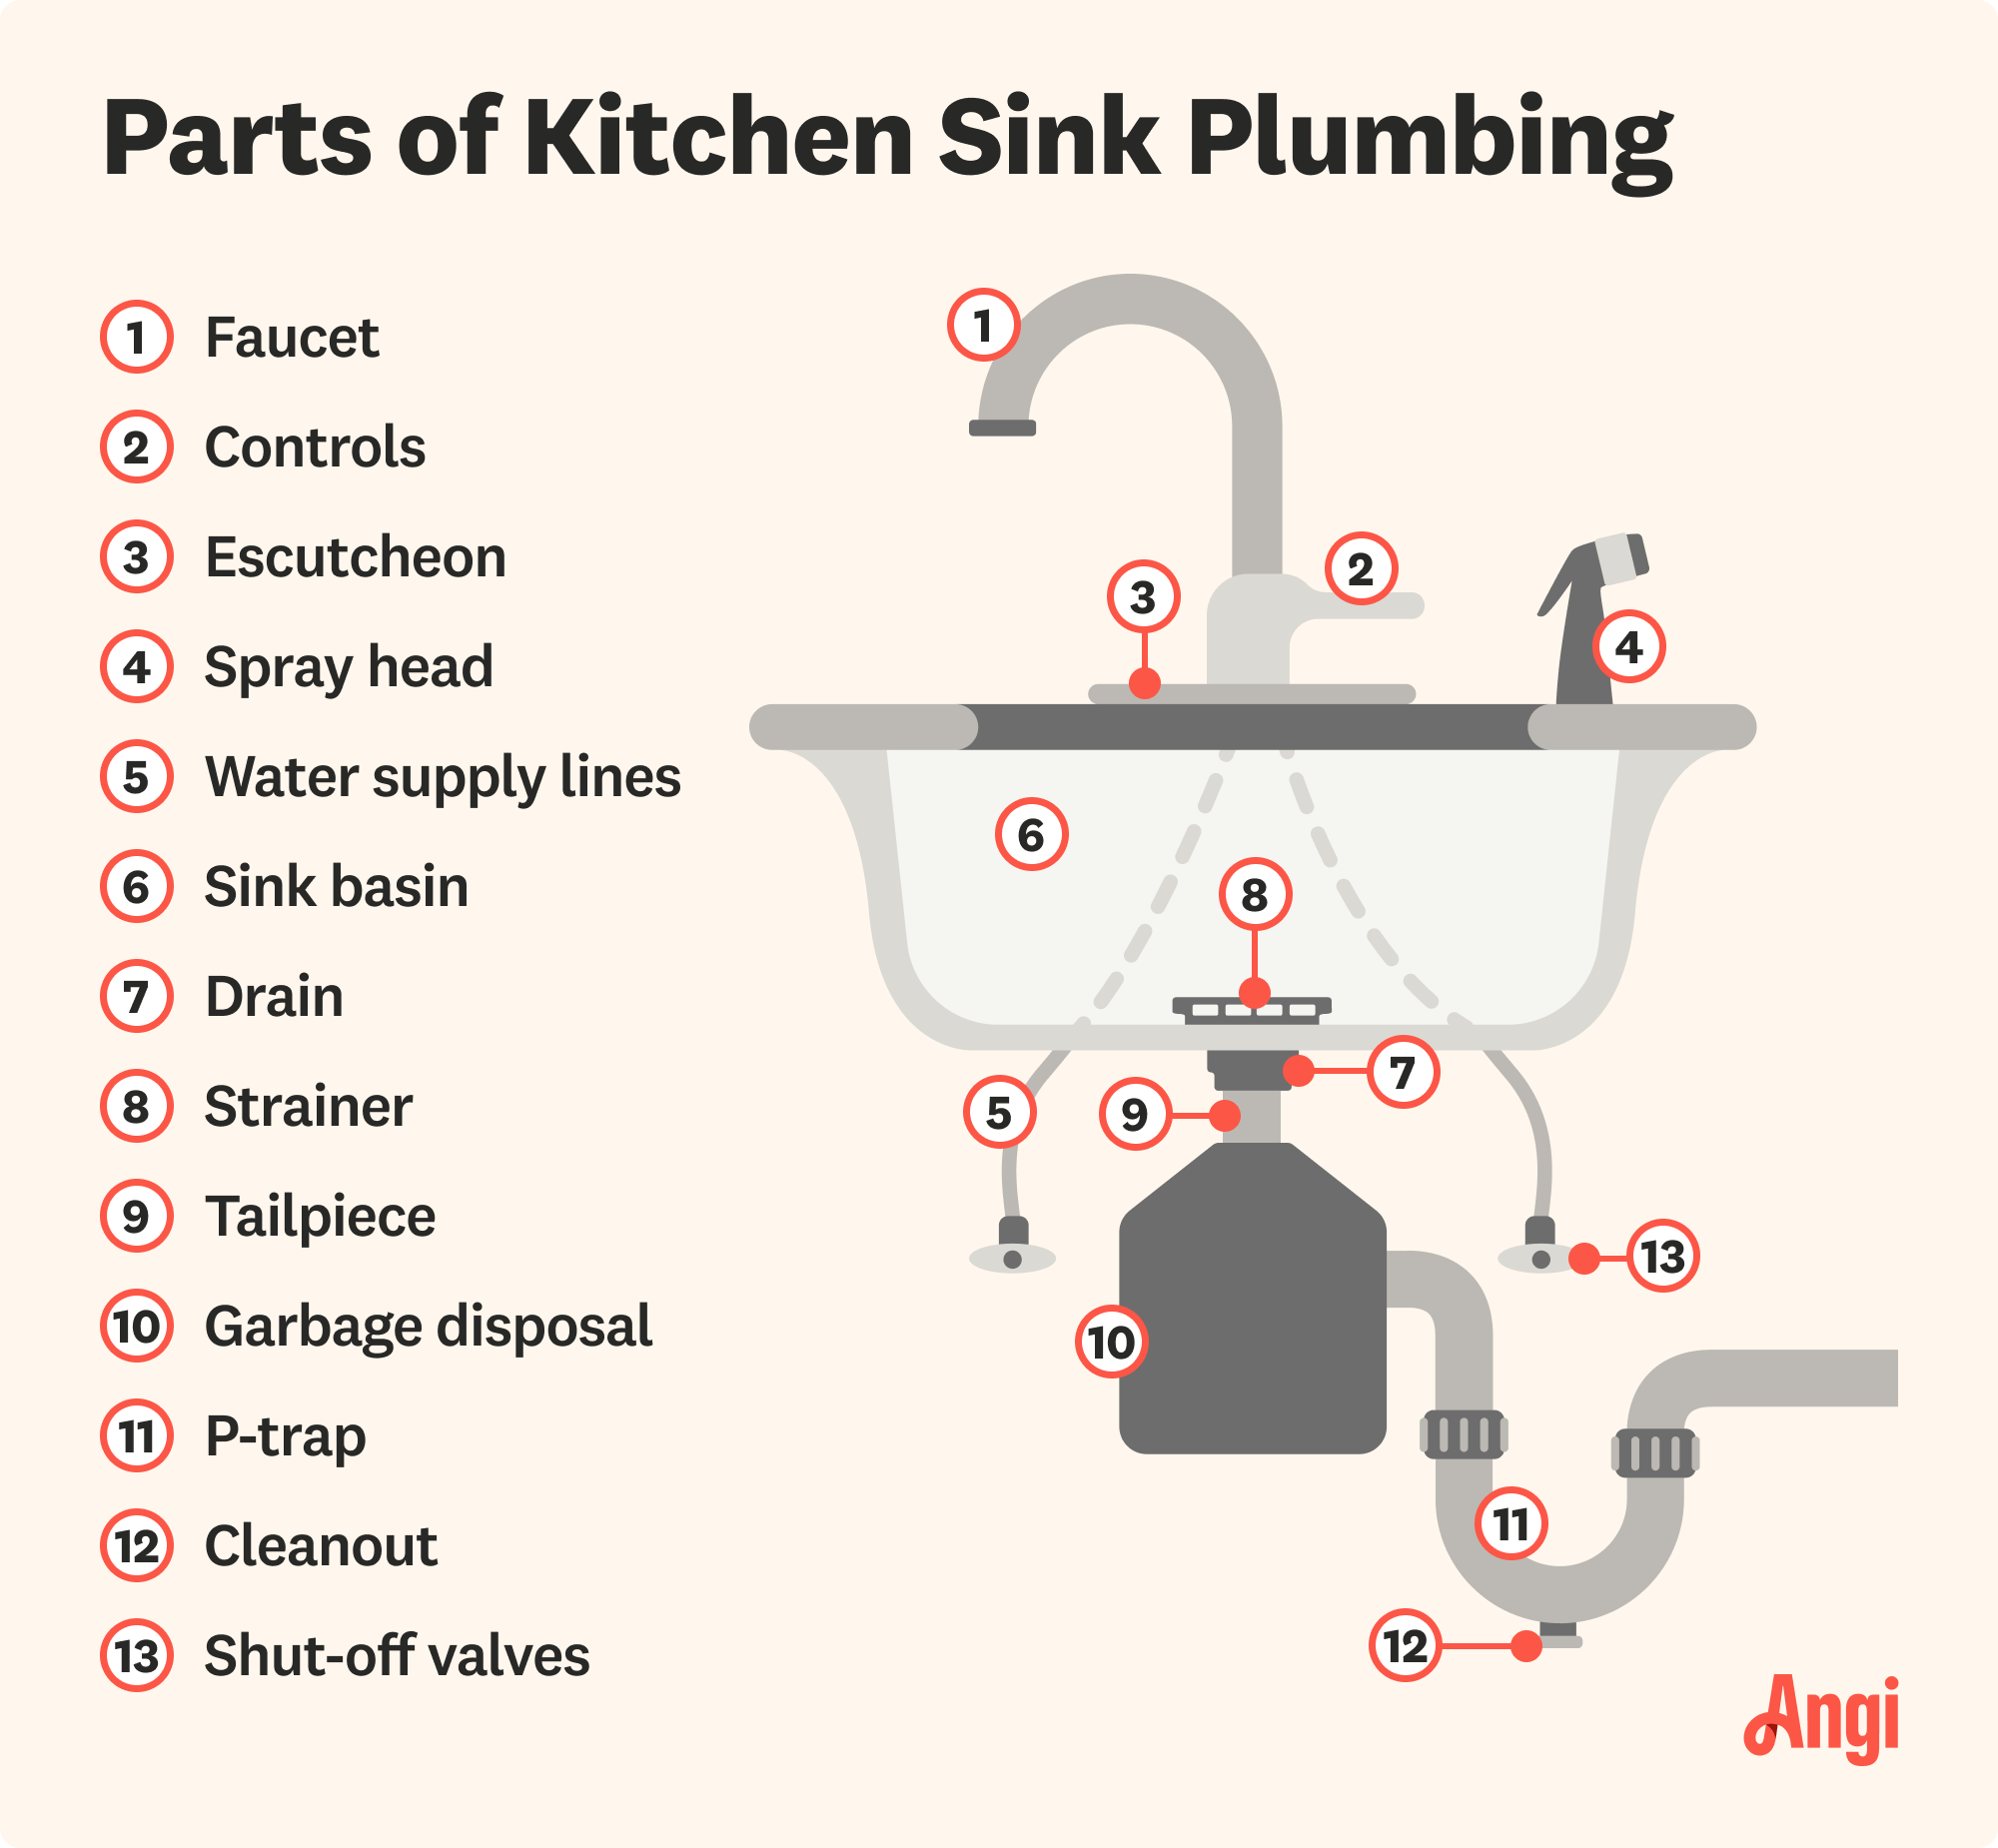
Identify the lines by color: red equals hot, blue equals cold. Match to valves with left being hot and right being cold.
Wrap Teflon tape clockwise, two to three wraps, on male threads of compression fittings. This ensures a watertight seal without overuse. Hand-tighten each connection first. Then use an adjustable wrench to give one full turn past finger-tight. Avoid over-torquing, as it can strip threads or damage seals.
Secure Vertical Piping
Use a pipe clamp or strap to secure the vertical supply line to a wall stud. This prevents movement-induced stress on connections.
Install Sprayer System
Slide the hose weight onto the sprayer hose 12 to 18 inches from the base. For Delta MagnaTite models, ensure the yellow orientation mark faces forward. Route the hose to avoid kinks or interference with cabinet doors.
Connect to the diverter port on the faucet body. For quick-connect fittings, push until you hear a click and secure with the clip. For threaded connections, screw on and tighten gently.
Ensure the hose moves freely when extended and retracts smoothly.
Final Assembly
Attach Spray Head
Remove the protective cap from the hose end. Push the white connector into the spray head until it snaps securely. Hand-tighten the locking collar.
Secure Handle
Insert a screwdriver through the hole in the handle. Twist to engage the internal set screw. Tighten until snug, but do not overtighten.
Reinstall Aerator
After flushing, screw the aerator back onto the spout tip. Use fingers or the provided tool, but do not overtighten.
Restore Water and Test
Turn On Water Supply
Slowly open the hot and cold shut-off valves counter-clockwise. Watch for drips at the valve-to-supply-line connections, faucet base, diverter and sprayer connections, and handle base.
Address Leaks Immediately
If a leak occurs, turn the water off. Disconnect the fitting. Add one to two more wraps of Teflon tape. Reconnect and retest. Retighten connections slightly if needed, but avoid stripping threads.
Flush the System
Remove the aerator. Open both hot and cold water fully. Let run for 30 to 40 seconds to flush out debris, solder particles, or manufacturing residue. Once flow runs clear, reinstall the aerator.
A clean installation not only looks professional but prevents future clogs.
Test Function and Performance
Check All Features
Test smooth handle movement and even water flow. Activate spray mode and confirm button responsiveness. Verify automatic hose retraction if equipped. Check for dripping after shut-off, as this may indicate a cartridge issue.
Final Inspection
Ensure no kinks exist in supply or sprayer lines. Confirm the hose weight hangs freely. Verify the escutcheon is flush and covers all unused holes.
Troubleshoot Common Issues
Leaking at the base typically means a loose mounting nut or damaged gasket. Retighten the nut or replace the gasket. Ensure the lock plate applies even pressure.
Low water pressure usually results from debris in the aerator or cartridge. Remove and flush the aerator. Soak in vinegar or replace if clogged.
The spray head won’t lock if the connector is misaligned or the O-ring is worn. Re-seat the connector or replace the O-ring.
The hose doesn’t retract if the weight is missing, positioned too high, or tangled. Reposition the weight lower and ensure free movement.
A dripping spout indicates a worn ceramic cartridge. Replace the cartridge per manufacturer instructions.
Cross-threaded connections occur when a fitting is misaligned during installation. Disconnect, realign by hand, and reconnect. Never force it.
The sprayer leaks at the diverter if the O-ring is faulty or improperly seated. Replace the O-ring or reconnect securely.
Maintenance and Long-Term Care
Routine Maintenance
Clean the aerator every three to six months to remove mineral buildup. Wipe down the spray head and hose weekly to prevent grime. Inspect connections annually for wear, seepage, or corrosion. Replace rubber gaskets or O-rings if leaks develop.
Warranty and Support
Most major brands offer lifetime limited warranties. Register your faucet online for warranty validation. Keep the instruction manual and receipt for service claims. Contact support via brand websites.
Key Takeaways for Installing Your Kitchen Faucet
Installing a kitchen faucet is a manageable DIY task that takes 20 to 75 minutes depending on experience and setup. Success comes from preparation, using the right tools, especially a basin wrench, and following a clear sequence. Modern faucets from top brands include color-coded lines, quick-connect fittings, and tool-assisted mounting, making installation faster and error-resistant.
When done right, your new faucet delivers strong water flow, reliable spray function, and a clean, leak-free finish on any countertop from laminate to quartz. With routine maintenance and proper care, it can last a decade or more.
Now that you know how to install a kitchen faucet, you’re ready to upgrade your kitchen with confidence. No plumber needed.
Frequently Asked Questions About Installing a Kitchen Faucet
How long does it take to install a kitchen faucet?
Most homeowners complete the installation in 20 to 75 minutes. Experienced DIYers typically finish in 20 to 45 minutes, while first-time installers may need 45 to 75 minutes, especially with tight spaces or corroded hardware.
Do I need special tools to install a kitchen faucet?
You need an adjustable wrench, basin wrench, screwdriver, and possibly an Allen wrench. A flashlight or headlamp improves visibility. Penetrating oil helps with stuck nuts.
Can I install any faucet on any sink?
You must match the faucet type to your sink’s hole configuration. One-hole sinks require single-hole faucets. Three-hole sinks work with centerset or widespread models. Use an escutcheon plate to cover unused holes.
Why is my new faucet leaking after installation?
Leaks usually occur from loose connections, missing Teflon tape, or damaged gaskets. Turn off water, disconnect the fitting, add more Teflon tape, and reconnect. Retighten slightly if needed.
Should I use plumber’s putty on the new faucet?
No. Modern faucets use rubber gaskets that create a proper seal. Plumber’s putty is not required and can damage some finishes.
How do I know if my faucet is properly secured?
The faucet should not rotate when pressure is applied. The mounting nut should sit about half an inch below the countertop surface. Check for stability before restoring water flow.







