
A dripping, outdated, or wobbly bathroom faucet can ruin both the look and function of your sink. Replacing it might seem like a job for a plumber, but installing a bathroom faucet is a manageable DIY project that saves hundreds of dollars and takes less than two hours with the right tools and steps. Whether you’re upgrading to a sleek modern design or replacing a leaky fixture, this guide walks you through every critical phase.
You will learn how to match your faucet to your sink configuration, shut off water safely, remove the old unit without damage, install the new faucet securely, connect supply lines correctly, and fine-tune the pop-up drain mechanism. Most importantly, you will avoid the top mistakes that lead to leaks, misalignment, and rework.
Confirm Faucet and Sink Compatibility

Before buying or installing any faucet, ensure it fits your sink’s configuration. Mismatched hole counts or spacing are the most common reasons for failed installations.
Match Faucet Type to Sink Holes
Your sink likely has one, three, or four holes. Choose a faucet based on this layout:
- Single-hole faucet fits one 1.5″ hole and includes a base plate to cover extra holes.
- Centerset faucet uses three holes spaced four inches apart on-center with all components in one unit.
- Widespread faucet consists of three separate pieces requiring at least eight inches between outer holes.
- Mini-widespread features three-hole design with eight-inch spacing for wider modern sinks.
- Wall-mounted faucets require in-wall plumbing access and are not recommended for first-time DIYers.
Pro Tip: Measure from center to center of the hot and cold holes. Most standard sinks are four inches on-center.
Verify Drain Compatibility
Check if your sink uses a pop-up drain, push-button, or clicker waste. Most new faucets include a pop-up mechanism, but only if they have a rear lever hole. If your faucet lacks this, you may need a separate drain kit.
Check Clearance and Fit
- Neck height must be under seven inches to fit under most vanities.
- Standard faucets fit decks up to 1.5 inches thick.
- Spout reach should extend four to five inches into the bowl.
- Leave two to three inches between handle and backsplash for clearance.
Gather Tools and Supplies
Having the right tools prevents frustration and ensures a tight, leak-free installation.
Essential Tools
- Adjustable wrench for supply lines and nuts
- Basin wrench for reaching tight mounting nuts under the sink
- Channellock pliers for stubborn connections
- Flathead and Phillips screwdrivers for linkage parts
- Flashlight for visibility under the sink
- Tape measure to confirm hole spacing
- Plastic putty knife to remove old sealant safely
Required Materials
- New faucet kit including spout, handles, gaskets, and O-rings
- Flexible supply lines with braided stainless steel and 3/8″ fittings
- Plumber’s putty for metal, porcelain, or ceramic drains
- Silicone sealant for stone, acrylic, or plastic sinks
- Teflon tape for threaded metal connections
- Pop-up drain assembly if not included with faucet
Pro Tip: Color-code supply lines using red for hot and blue for cold to avoid mix-ups during reconnection.
Shut Off Water and Prepare
Skipping this step risks flooding. Take time to isolate the water supply safely.
Turn Off Supply Valves
Locate hot and cold shut-off valves under the sink. Turn both clockwise until tight. Valves are off when perpendicular to the pipe. If no valves exist, shut off the main water supply to the house.
Drain Remaining Water
Open both faucet handles to release pressure and drain leftover water. Close handles once flow stops completely.
Protect the Workspace
Place a bucket or towel under connections to catch drips. Remove all items stored under the sink. Use a work light for better visibility in dark areas.
Remove the Old Faucet
Work methodically to avoid damaging pipes or the sink surface.
Disconnect Supply Lines
Use an adjustable wrench to loosen compression nuts at the shut-off valves. Disconnect both hot and cold lines from the faucet tailpieces. Have a container ready since residual water will spill.
Detach Pop-Up Drain Linkage
Find the clevis screw connecting the lift rod to the pivot ball on the tailpiece. Loosen and remove the screw. Pull the lift rod out of the faucet body. Unscrew the pivot nut from the back of the tailpiece.
Remove Mounting Nuts
Under the sink, locate the mounting nuts securing the faucet. Loosen with a basin wrench or adjustable wrench. Some models have retaining clips or washers that must also be removed. Lift the faucet up and off the sink.
Clean the Mounting Surface
Scrape off old putty, caulk, or gasket material with a plastic scraper. Wipe with soapy water, then dry completely. Never use metal tools as they can scratch porcelain or stone finishes.
Install the New Faucet
Precision here prevents leaks and alignment issues down the line.
Prepare Gaskets and Alignment
Inspect the new faucet for rubber gaskets, foam seals, or O-rings. Place the gasket over the base, aligning any front or top mark with the sink orientation. For centerset models, ensure hot (left) and cold (right) valves are correctly oriented.
Insert Faucet into Sink
Lower the spout into the center hole for centerset models or position all components for widespread faucets. For single-hole faucets, install the base plate first, then insert the faucet. Make sure it sits evenly and lines up with the backsplash.
Secure from Below
From under the sink, slide mounting washers and nuts onto each tailpiece. Hand-tighten first, then use a wrench for a quarter to half turn more. Alternate tightening if there are multiple points to prevent warping. Do not overtighten as this can crack porcelain or deform plastic components.
Install the Pop-Up Drain
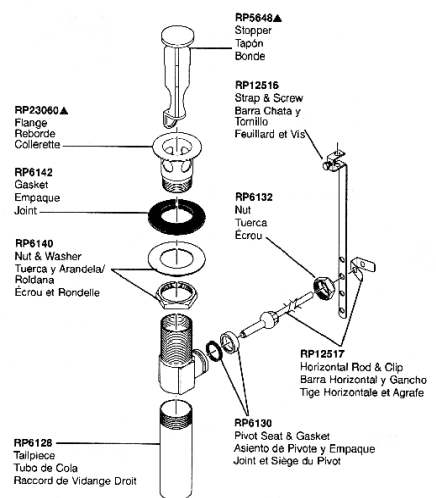
A properly installed pop-up ensures smooth operation and a watertight seal.
Apply Sealant to Waste Seat
For metal, porcelain, or ceramic sinks, roll a half-inch rope of plumber’s putty around the underside of the waste seat flange. For stone, acrylic, or plastic sinks, use silicone sealant instead since putty can damage these surfaces.
Assemble Drain Body Under Sink
Slide the tapered rubber gasket (wider side up) and friction ring over the tailpiece. Thread the locknut onto the tailpiece and hand-tighten. Use pliers for a quarter-turn more to create a watertight seal. Wipe off excess sealant around the flange.
Attach Pivot Ball and Lift Rod
Connect the pivot ball rod to the horizontal slot on the tailpiece. Insert the lift rod through the faucet’s rear lever. Attach the clevis strap to the pivot ball using the clevis screw. Adjust the clevis hole position so the plug opens fully when the lever is raised and seals tightly when lowered. Tighten the clevis screw once aligned.
Test: Push the pivot rod down and the stopper should drop. Pull up and the stopper should rise.
Connect Water Supply Lines
Correct connections prevent leaks and ensure full water flow.
Use Teflon Tape on Threads
Wrap three to five layers of Teflon tape clockwise around male threads of shut-off valve outlets and faucet tailpiece threads. Do not use tape on compression fittings as they rely on rubber gaskets.
Attach Lines to Faucet
Most kits have pre-attached hoses with rubber seals. If not, connect the blue (cold) line to the right valve and red (hot) to the left. Hand-tighten, then a quarter to half turn with a wrench. Avoid over-tightening brass fittings.
Connect to Shut-Off Valves
Attach line ends to hot and cold valves. Hand-tighten first, then a quarter to half turn with a wrench. Label lines if not color-coded.
Test and Inspect for Leaks
This step confirms your work is watertight and functional.
Turn On Water Supply
Slowly open hot and cold valves counterclockwise. Allow water to flow gradually to prevent water hammer.
Check for Leaks
Inspect supply line connections, faucet base, drain locknut, and P-trap joints using a dry paper towel. If leaking, tighten the connection a quarter turn at a time. If it persists, disassemble, check the gasket, and reseal.
Test Faucet and Pop-Up Operation
Turn on both handles and verify flow is smooth and balanced. Check temperature control and ensure no drip when off. For the pop-up, pull the lever up and the stopper should rise fully. Push down and the plug should seal tightly.
Avoid Common Mistakes
Even experienced DIYers make these errors. Do not let them ruin your installation.
Overtightening Connections
This is the leading cause of cracked fittings, stripped threads, and leaks. The rule is hand-tight plus a quarter to half turn is enough.
Using Wrong Sealant
Plumber’s putty on stone or plastic causes damage. Use silicone for sensitive materials instead.
Skipping Leak Test
Never assume a connection is dry. Test every joint before declaring success.
When to Call a Pro
While most installations are DIY-friendly, seek help if no shut-off valves exist, pipes are corroded, you are installing a wall-mounted faucet, or leaks persist after re-tightening.
Key Takeaways for Installing Your Bathroom Faucet
Installing a bathroom faucet isn’t just about function. It is a quick way to modernize your bathroom, improve water efficiency, and save $250 to $450 over professional installation. By following these steps, you ensure a leak-free, professional-quality result that lasts for years.
The key success factors are matching your faucet to sink holes and drain type, shutting off water and draining lines properly, cleaning the mounting surface thoroughly, using correct sealants, never over-tightening connections, testing slowly and inspecting every joint, and fine-tuning the pop-up for full range of motion. With the right preparation and attention to detail, you will finish with a faucet that works perfectly and looks like it was installed by a pro.
Frequently Asked Questions About Installing a Bathroom Faucet
How long does it take to install a bathroom faucet?
Most DIYers complete the job in 45 minutes to two hours. First-time installers typically need around 90 minutes with instructional guidance.
What tools do I need to install a bathroom faucet?
You will need an adjustable wrench, basin wrench, screwdrivers, flashlight, tape measure, plastic scraper, and pliers. Materials include the new faucet kit, flexible supply lines, plumber’s putty or silicone sealant, and Teflon tape.
Do I need to replace the supply lines when installing a new faucet?
Yes, replacing old supply lines is recommended since they often come with the new faucet kit. Braided stainless steel lines with 3/8″ fittings provide the best durability and leak resistance.
How do I know which faucet type fits my sink?
Count the holes in your sink deck. One hole requires a single-hole faucet. Three holes spaced four inches apart need a centerset. Three holes with eight-inch spacing or more require a widespread or mini-widespread faucet.
What should I do if my new faucet leaks after installation?
First, identify the leak location. Tighten the connection a quarter turn at a time. If leaking persists, turn off water, disassemble the connection, check that gaskets are properly seated, and reapply sealant if needed.
Can I install a bathroom faucet myself or do I need a plumber?
Installing a bathroom faucet is a highly achievable DIY project for most homeowners. With basic tools and this guide, you can complete the installation in under two hours and save $250 to $450 in professional fees.







