
A stiff faucet handle is one of the most frustrating plumbing problems in any home. If you have to yank and pull just to get hot or cold water, you are dealing with a common issue that affects millions of homeowners. The good news is that over 90% of stiff faucet handles can be fixed in under an hour using basic tools, white vinegar, and silicone grease. This guide covers every step from diagnosing the problem to restoring smooth operation, whether you have a Moen, Delta, or standard single-handle faucet.
Identify Your Faucet Type Before Starting
Faucet repair methods vary significantly depending on the mechanism inside your fixture. Knowing your faucet type helps you target the right fix and avoid unnecessary disassembly.
Single-Handle vs Double-Handle Systems
Single-handle faucets use a cartridge, ball valve, or ceramic disk to control both temperature and flow. These are most prone to stiffness because mineral deposits accumulate directly on the internal mechanism. Double-handle faucets typically use compression stems or ceramic disks, and stiffness here usually stems from corroded stems or dried washers. Check for brand markings on the faucet body or look up your model online if you are unsure which type you have.
Behavioral Clues That Reveal the Cause
How your handle behaves tells you exactly what is wrong. If the base rotates with the handle, you likely have a Delta-style faucet with calcified retention tabs. If the spout will not swivel, the shank may be dry, which is common in Moen kitchen faucets. If the handle feels gritty, sediment or debris is trapped inside. Stiffness that occurs only when the water is hot indicates thermal expansion is increasing friction in dried seals.
Prepare the Workspace Properly
Never skip this critical preparation step. Working on live plumbing risks flooding and water damage to your cabinets and flooring.
Shut Off Water Supply Under the Sink
Locate the two shutoff valves beneath your sink. Turn both valves clockwise until they are fully closed. Then open the faucet to release pressure and drain any remaining water. Place a towel in the sink basin to catch small screws or washers that might fall during repair.
Gather Essential Tools and Materials
You will need these items before beginning. An Allen wrench set with a 3/32″ size is required for most set screws. A flathead screwdriver helps pry off decorative caps. An adjustable wrench or strap wrench loosens stuck components without scratching finishes. A soft-bristle toothbrush scrubs internal grooves. White vinegar dissolves mineral buildup. Silicone-based plumber’s grease lubricates rubber and plastic components safely.
Remove the Faucet Handle
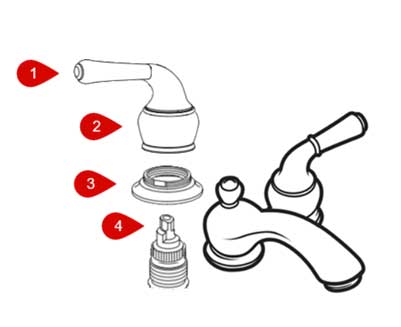
Handle removal methods differ by faucet brand and design. Follow the steps that match your specific model.
Standard Set Screw Removal
Most faucets have a decorative cap on top or the side of the handle. Gently pry off this cap with a flathead screwdriver. Insert a 3/32″ Allen wrench into the exposed hole and turn counter-clockwise to loosen the set screw. Pull the handle straight up to remove it. If the handle is stuck, spray penetrating oil around the base, wait 5 to 10 minutes, then gently wiggle while pulling upward.
Delta Quarter-Turn Method
Delta faucets use plastic retention tabs to hold the handle in place. Hold the handle steady and turn the base a quarter-turn counter-clockwise. Lift the handle straight up. If stuck, soak the base in undiluted vinegar overnight to dissolve mineral bonds before attempting again.
Moen Dome Cover Removal
Some Moen models feature a dome cover that appears to rotate but actually pulls straight off. After removing the handle, you will see a plastic cartridge nut. If your Moen has a pull-out sprayer, you must disconnect the hose from beneath the sink to free the spout for full access.
Inspect Internal Components

With the handle removed, examine each part closely to identify damage or wear.
Cartridge Inspection
The cartridge regulates flow and temperature in single-handle faucets. Look for cracks, warping, cloudiness, or erosion inside the channels. Metal shavings indicate advanced wear and require replacement. Replace the cartridge if you notice any of these signs, especially if the faucet is over 5 years old.
O-Ring and Seal Examination
Rubber O-rings lose elasticity over time due to chlorine exposure and hard water. Inspect for splits, cracks, flattening, or brittleness. Even slightly worn O-rings cause binding and should be replaced. Damaged O-rings also cause leaks, so address them proactively.
Retention Tab Check (Delta Models)
Plastic tabs hold Delta handles in place. If they are calcified, loose, or broken, the entire base rotates with the handle. Clean calcified tabs thoroughly with vinegar or replace them if they are damaged.
Clean All Parts With Vinegar
Cleaning removes the mineral deposits that cause most stiffness. This step resolves the problem in the majority of cases.
Vinegar Soaking Protocol
Prepare a 50/50 mixture of white vinegar and water for light buildup. For heavy calcification, use undiluted distilled vinegar. Submerge removable parts for 15 to 20 minutes for light deposits, 30 minutes for moderate buildup, and up to 60 minutes for severe cases. For parts that cannot be removed, wrap them with a vinegar-soaked cloth and let sit for 15 to 30 minutes.
Scrubbing Technique
Use a soft toothbrush to clean cartridge splines, O-ring grooves, handle interiors, and threads. For stubborn crust on metal surfaces, apply vinegar paste with a non-scratch pad. Rinse all parts thoroughly with clean water and dry completely with a lint-free cloth before lubrication.
Apply Lubrication Correctly
Lubrication is critical for restoring smooth operation. Using the wrong product damages seals and causes new problems.
Use Only Silicone-Based Grease
Silicone plumber’s grease is the only safe lubricant for faucet internals. It works with rubber and plastic, does not degrade seals, and resists water washout. Never use WD-40, Vaseline, motor oil, or petroleum jelly, as these destroy rubber components and cause leaks.
Lubrication Application Guide
Apply a thin film of silicone grease to the inner and outer surfaces of all O-rings. Coat cartridge stem sliding surfaces and splines. Grease both sides of friction rings before reinstallation. Lubricate stem extension contact points with the handle and bonnet. Apply grease to the spout shank for smooth swiveling in kitchen faucets. Work grease into the handle-to-base joint to reduce friction.
Reassemble the Faucet
Proper reassembly ensures the fix holds and prevents new problems from developing.
Follow the Correct Sequence
Insert the cartridge into the valve body, aligning the splines precisely. Place the trim ring onto the bonnet. Add the friction ring on top. Insert the stem extension. Slide the handle onto the stem. Secure with the set screw or by threading the base clockwise.
Align and Tighten Properly
In the off position, the handle should point 90 degrees outward from the spout. For double-handle faucets, ensure both handles are level when closed. Tighten the set screw just enough to secure the handle. Do not over-tighten, as this compresses O-rings and causes binding. In Delta models, leave the screw slightly loose to reduce friction.
Test the Repair
Turn the water back on slowly to flush any loosened debris. Open both shutoff valves beneath the sink gradually. Operate the handle multiple times to distribute the lubricant evenly.
Success Indicators
The handle should turn with minimal force. There should be no wobble, grinding, or lateral movement. The base must remain stable during operation. Check for leaks at the base or handle. Verify proper hot and cold mixing and full spout swivel if applicable.
If Stiffness Persists
Re-disassemble and check for misaligned cartridge, insufficient lubrication, residual mineral deposits, or damaged retention tabs. Consider replacing the cartridge if the faucet is older or shows visible wear.
Brand-Specific Solutions

Moen Stiff Spout Fix
Many Moen faucets feel stiff not from the handle but from a dry spout shank. Remove the handle and dome cover. Disconnect the pull-out sprayer hose from under the sink. Lift out the spout assembly. Clean the shank and O-rings with vinegar. Apply silicone grease liberally to all moving surfaces. Reassemble in reverse order.
Delta Base Rotation Fix
When the base spins with the handle, the plastic retention tabs are calcified. Remove the handle using the quarter-turn method. Soak the base and tabs in vinegar. Clean thoroughly with a toothbrush. Apply silicone grease to the joint. Reinstall the handle with a slightly loose set screw.
When Replacement Is Necessary
Cleaning and lubrication fix most cases, but sometimes parts need replacing.
Replace the Cartridge If
The handle remains stiff after thorough cleaning. You see visible cracks, warping, or erosion. The faucet leaks at the base. The faucet is over 5 years old. Temperature control is erratic or inconsistent.
Replace O-Rings If
They are split, flattened, or brittle. Leaks persist after reassembly. Binding continues despite proper lubrication.
Prevent Future Stiffness
Regular maintenance keeps your faucet operating smoothly for years.
Maintenance Schedule
Wipe the handle and base with a damp cloth monthly to prevent surface buildup. Every 3 to 4 months, remove handles if accessible, soak in vinegar, and reapply silicone grease. Once a year, relubricate all internal joints even if the faucet feels fine.
Long-Term Protection Tips
Install a water softener in hard water areas to reduce mineral deposits. Never use steel wool, harsh chemicals, or abrasive cleaners on faucet finishes. Address early warning signs like increased turning effort, gritty sensations, or slight wobble immediately before problems worsen.
Frequently Asked Questions About Fixing Stiff Faucet Handles
Can I fix a stiff faucet handle without replacing parts?
Yes. In most cases, cleaning with vinegar and lubricating with silicone grease resolves the issue completely. Replacement is only necessary when components show visible damage like cracks or severe wear.
How do I know if the cartridge needs replacing?
Replace the cartridge if the handle remains stiff after thorough cleaning and lubrication. Also replace if you see visible cracks, warping, erosion, or cloudiness. Leaks at the handle base or erratic temperature control are additional signs.
What kind of grease should I use on faucet parts?
Use only silicone-based plumber’s grease. It is safe for rubber, plastic, and metal components. Avoid WD-40, Vaseline, motor oil, or any petroleum-based products, as these degrade rubber seals.
Why does my faucet base move when I turn the handle?
This indicates seized retention tabs, commonly seen in Delta faucets. Calcium deposits weaken the grip on plastic tabs, causing the entire base to rotate with the handle. Clean the tabs thoroughly and apply silicone grease.
Is it expensive to fix a stiff faucet handle?
No. DIY repairs typically cost under $20. The main expenses are vinegar, silicone grease, and replacement O-rings if needed. This is far cheaper than calling a plumber.
Key Takeaways for Fixing Your Stiff Faucet Handle
A stiff faucet handle is almost never a major plumbing failure. In over 90% of cases, the problem is mineral buildup, dried O-rings, or lack of lubrication, all of which are easily fixed with basic tools and materials. The repair process involves shutting off water, removing the handle, soaking components in vinegar to dissolve deposits, scrubbing with a toothbrush, applying silicone grease to all moving parts, and reassembling carefully. Most homeowners can complete this fix in under an hour without professional help. If stiffness persists after thorough cleaning and lubrication, inspect the cartridge for damage and consider replacement. Regular maintenance, including quarterly cleaning and annual lubrication, extends faucet life by 5 to 10 years and prevents future stiffness.


