
A crooked, loose, or reverse-operating faucet handle isn’t just annoying. It disrupts your daily kitchen or bathroom routine and breaks the visual symmetry of your sink. The good news? Most faucet handle problems can be fixed in under 30 minutes with basic tools and no professional help. This guide covers every adjustment technique you need, from realigning crooked handles to reversing rotation direction, tightening wobbly connections, and preventing future issues.
Fix Crooked Handle Alignment

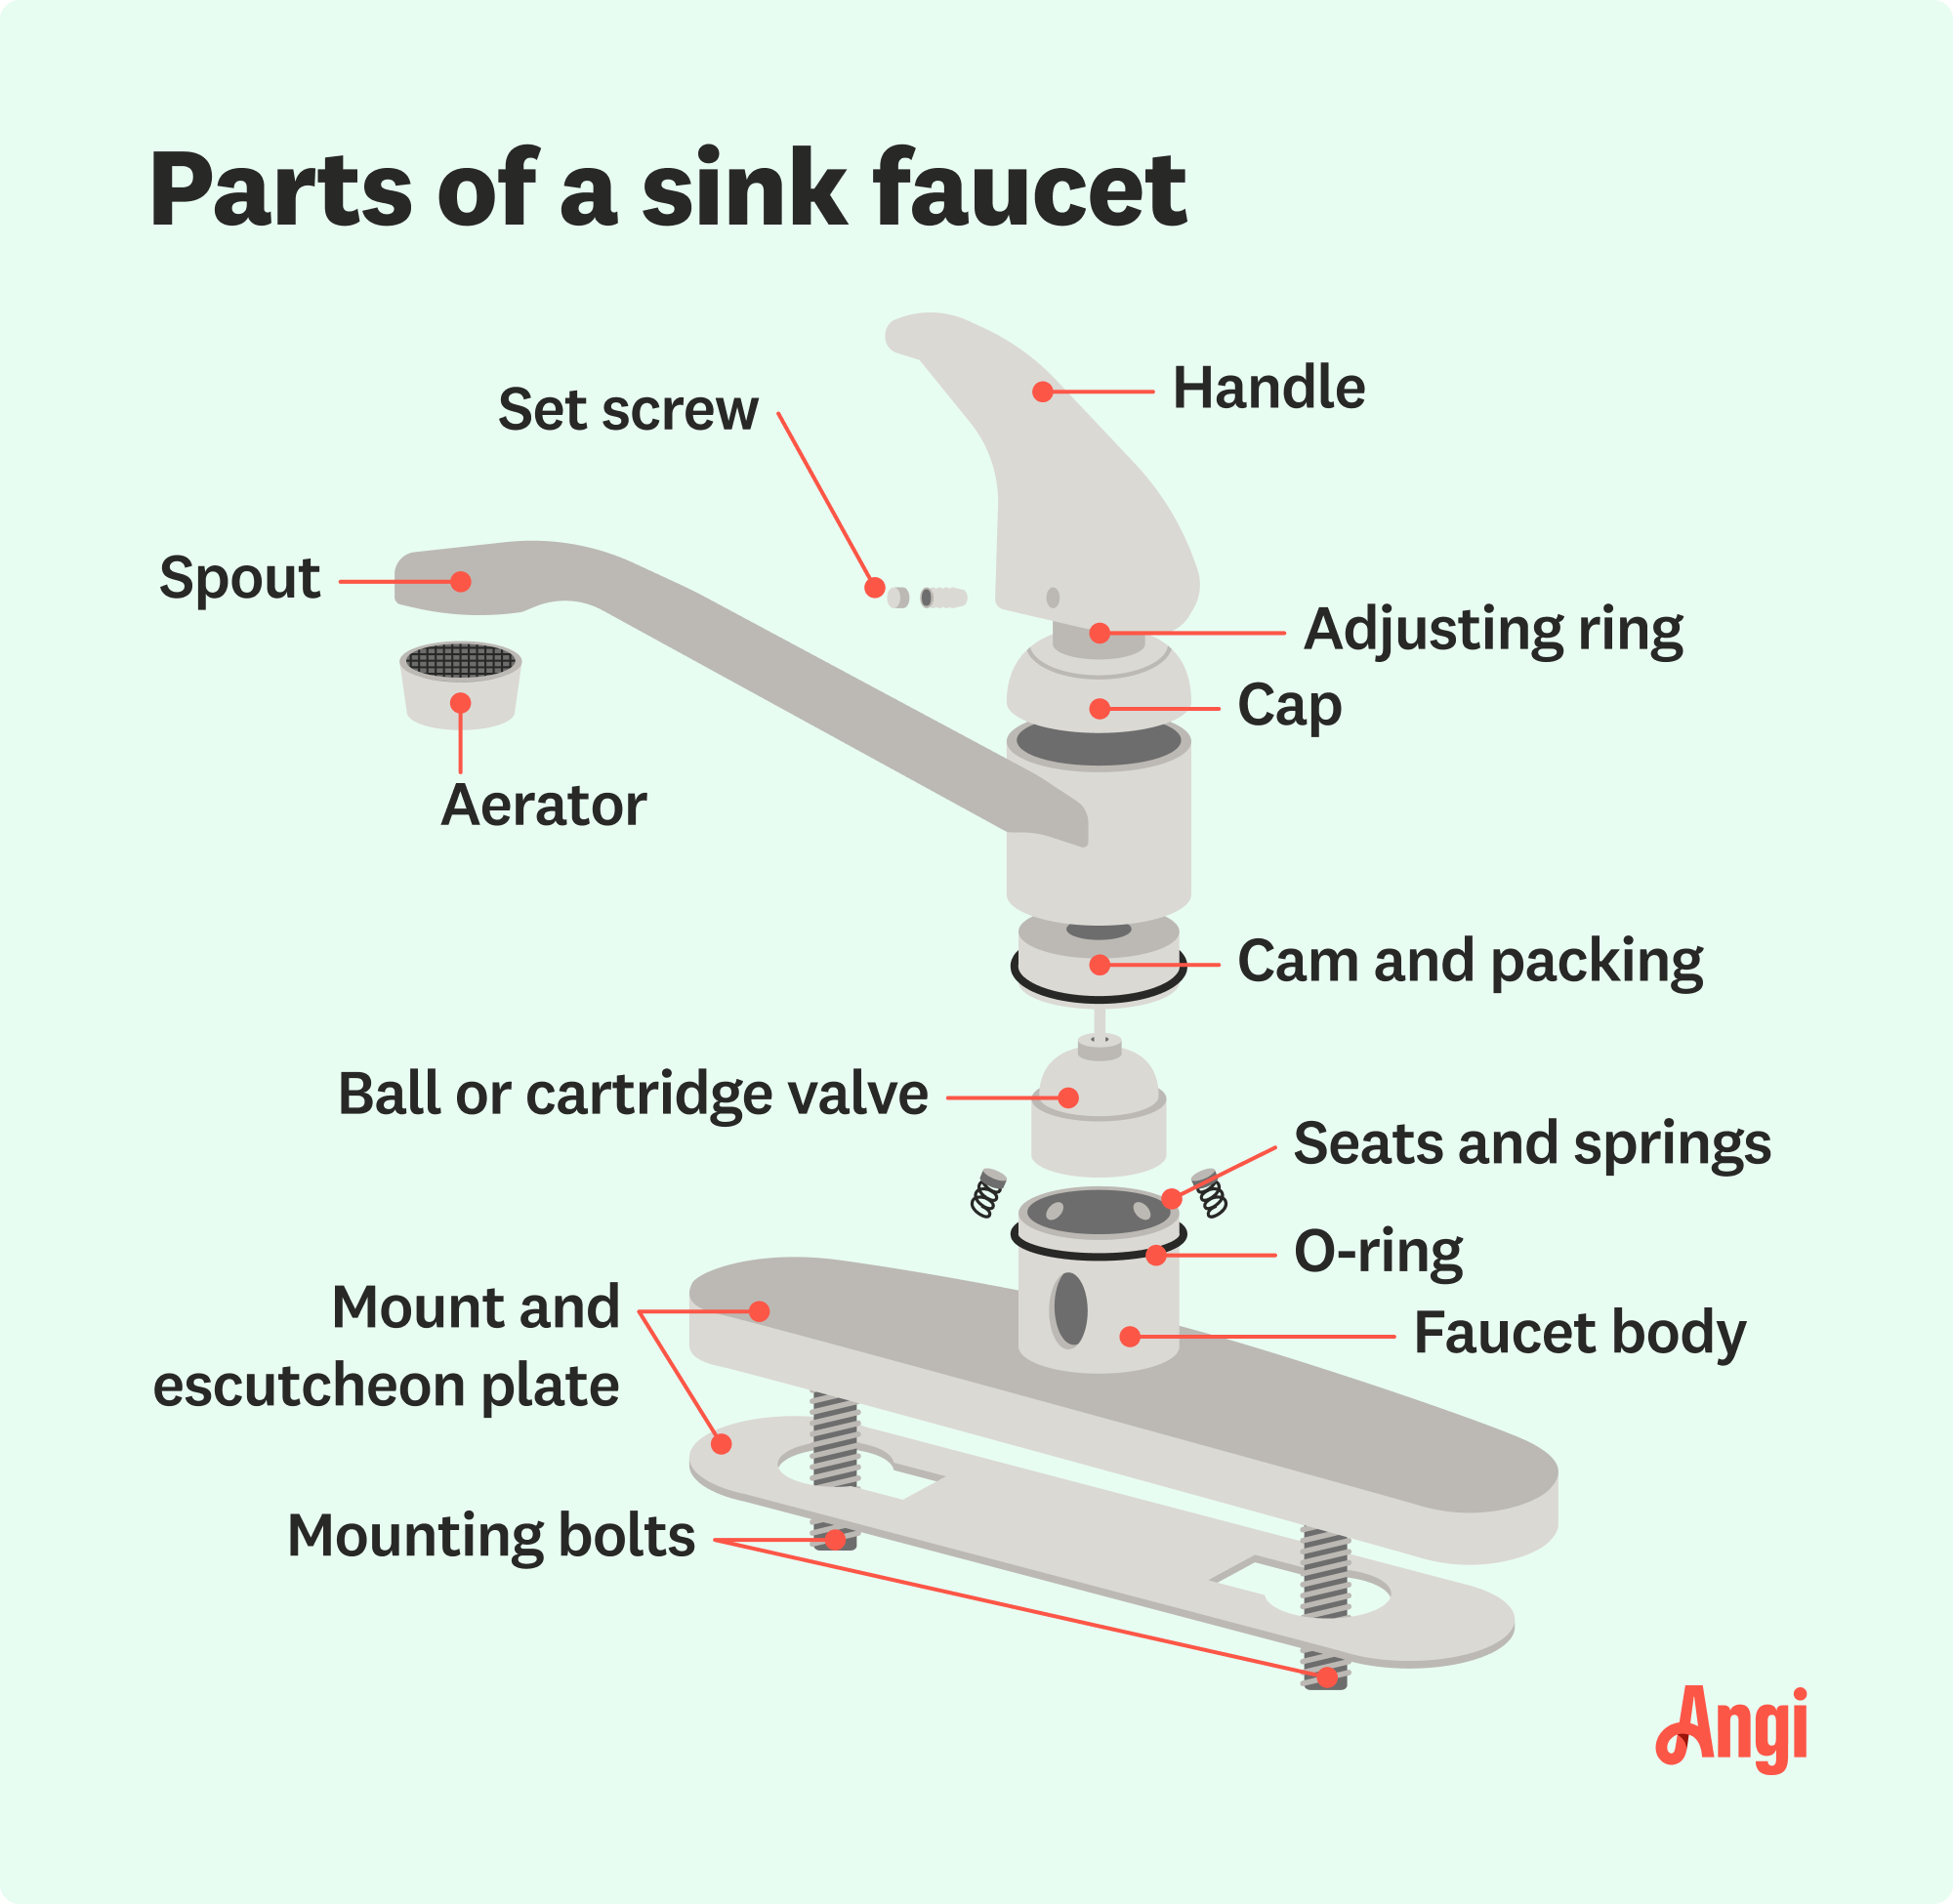
Misaligned handles stick out at odd angles when turned off, breaking aesthetics especially in double-handle setups. This commonly happens after initial installation or cartridge replacement.
Reindex the Handle on the Stem
If your handle stops at a 45-degree angle instead of pointing straight out, realign it by rotating its position on the splined shaft.
- Turn off water supply valves under the sink.
- Pry off the decorative cap (marked “H” or “C”) with a plastic tool or butter knife.
- Remove the Phillips screw underneath.
- Lift the handle off the stem. Wiggle gently if stuck due to mineral buildup.
- With the faucet in the fully off position, inspect the splined shaft (notched post).
- Rotate the handle one or more spline teeth to change its resting angle.
- Reinstall the handle, screw, and cap.
Pro Tip: Some stems have indexed stops. Align the handle between the nearest gear-like teeth for optimal positioning.
Adjust Valve Body Under Sink
When reindexing isn’t enough, rotate the entire valve body for fine-tuned alignment.
- Locate the brass retainer nut (#24) under the sink.
- Use a basin wrench to loosen it slightly. Do not remove completely.
- Rotate the valve body until the handle points straight outward in the “off” position.
- Tighten the nut snugly. Avoid over-torquing that could crack seals.
- Reattach the handle and test.
Warning: This adjustment moves the internal stop. Only turn the nut less than a quarter-turn to avoid misalignment or leaks.
Tighten Loose or Wobbly Handles
A shaky handle means a loose connection. Left unattended, it can damage internal parts or cause leaks over time.
Snug the Handle Screw
Most looseness comes from a loose top screw.
- Remove the decorative cap and Phillips screw (#15).
- Clean any corrosion or debris from the screw and socket.
- Reinsert and tighten firmly, ensuring the handle sits flush.
- Replace the cap.
Common Mistake: Overtightening strips the screw hole. Tighten until snug, not forced.
Secure the Stem Connection Under Sink
If the handle still wobbles after tightening the screw, the stem-to-faucet connection may be loose.
- Access the stem clamp nut under the sink.
- Use a basin wrench to tighten it one quarter turn.
- Check compression fittings at the stem top. Snug them gently if leaking.
- Avoid overtightening. It can deform brass components or crack valve seats.
Visual Cue: Look for water stains or mineral deposits around fittings. These are signs of past micro-leaks needing attention.
Reverse Handle Rotation Direction
Some faucets open when turned clockwise, which feels backward. This usually happens with replacement cartridges or misaligned stops.
Flip the Handle Stop Mechanism
The fix lies in flipping the internal stop to restore standard operation: counterclockwise to open, clockwise to close.
- Remove the handle to expose the stem.
- Pull out the keeper pin or C-clip securing the handle stop.
- Detach the stop from the stem.
- Flip it over so the larger tooth faces upward.
- Realign the large tooth with the notch on the stem.
- Reinsert the C-clip using a flat-head screwdriver. Press until fully seated.
- Reinstall the handle and test.
Model Note: This applies to dual-cartridge systems like Dano 3H 10 H/C, common in two-handle tub or lavatory faucets.
Test for Correct Operation
After reassembly, verify proper direction:
- Turn handle counterclockwise. Should open water flow.
- Turn clockwise. Should shut off completely.
- Repeat for both hot and cold sides.
Expert Tip: Always test each side independently to confirm consistent behavior.
Improve Water Flow Control
If most temperature adjustment happens in just 30 degrees of a 90-degree turn, the faucet lacks precision and makes fine control difficult.
Understand the Design Limitation
Most two-handle faucets use quarter-turn ceramic cartridges with non-linear flow curves. This means rapid opening after the initial turn.
- No user-adjustable friction exists on standard models.
- Price Pfister and some premium brands may include friction washers, but these are rarely serviceable.
Apply Practical Workarounds
Since internal adjustment isn’t possible, try these solutions:
- Reposition the lever so it points downward at the ideal setting. Gravity helps hold it in place.
- Avoid partially closing shutoff valves. This stresses seals and reduces lifespan.
- Replace the faucet with a model known for smoother modulation (e.g., high-end ceramic disk cartridges).
- Consider switching to a single-handle faucet with a mixing spool for better temperature control.
User Insight: Asymmetrical lever arms can drift due to water pressure imbalance, especially on the cold side with higher supply pressure.
Stop Handle Drift and Slippage
Handles that move on their own after being set are often affected by gravity or low internal friction.
Reposition Lever for Gravity Lock
Use physics to your advantage.
- Adjust the handle so the lever arm points downward when set.
- Gravity will resist upward movement caused by water pressure or vibration.
Best For: Shaving, handwashing, or filling containers where hands-free stability matters.
Inspect Internal Components
Drift can also signal wear.
- Check O-rings and bushings for wear. Replace if cracked or flattened.
- Test for stem play. Excessive wiggle means the cartridge may need replacement.
- Lubricate threads sparingly with plumber’s grease during reassembly if movement feels too loose or stiff.
Prevent Leaks After Adjustment
Any under-sink work risks introducing leaks, even minor ones that worsen over time.
Test Connections Systematically
After reassembly:
- Turn water supply back on slowly to prevent pressure shock.
- Open both handles gradually.
- Feel all joints with dry fingers. Check supply hose connections, retaining nuts (#24), and compression fittings at stem base.
- Watch for drips or moisture on the floor over 5 to 10 minutes.
Leak Fix Guide:
- Pinched O-ring? Disassemble and replace.
- Cross-threaded nut? Back off and restart alignment.
- Over-tightened fitting? Loosen slightly and retighten gently.
Know When to Replace Instead of Repair
Sometimes adjustment isn’t enough. Internal damage or poor design demands replacement.
Repair If
- Handle is misaligned or loose.
- Rotation is reversible via stop flip.
- Minor leaks stop after tightening.
- Cartridge appears intact.
Replace If
- Internal gears are stripped or won’t hold position.
- Cartridge leaks internally (water seeps into handle).
- Flow control is inherently poor with no fine adjustment possible.
- Multiple adjustments fail to correct function.
Pro Tip: Keep original packaging for 30 to 90 days. If performance disappoints, return or exchange before warranty expires.
Maintain Long-Term Handle Performance
Prevent future issues with simple regular maintenance.
Clean Handles Regularly
Use non-abrasive cleaners to avoid scratching chrome, brushed nickel, or oil-rubbed bronze finishes.
- Avoid vinegar-based solutions on sterling silver or brass. They can tarnish.
- Wipe handles daily to reduce mineral buildup.
Inspect O-Rings Annually
In hard water areas, O-rings degrade faster.
- Remove handle once a year to check for cracking, flattening, or brittleness.
- Replace as a set if one shows wear.
Lubricate Sparingly
During reassembly:
- Apply plumber’s grease to stem threads and O-rings.
- Avoid silicone sprays. They attract dirt and reduce grip.
Replace Cartridges Proactively
Ceramic cartridges last 5 to 7 years.
- Replace them before failure if you notice stiff turning, dripping from spout, or handle slippage.
Quick Fixes at a Glance
| Issue | Solution | Time Required | Tools Needed |
|---|---|---|---|
| Handle crooked when off | Reindex on spline or adjust valve body | 10 to 15 minutes | Screwdriver, basin wrench |
| Loose or wobbly handle | Tighten screw or stem nut | 5 to 10 minutes | Screwdriver, wrench |
| Turns clockwise to open | Flip handle stop, reseat C-clip | 10 minutes | Screwdriver, pliers |
| Handles drift out of position | Reposition lever downward | 1 minute | None |
| Poor flow control | Reposition or replace faucet | Varies | None or full set |
| Asymmetrical stops | Rotate valve body under sink | 10 to 15 minutes | Basin wrench |
Frequently Asked Questions About How to Adjust Faucet Handle
Why does my faucet handle point at an angle when turned off?
This is a misalignment issue caused by incorrect handle positioning on the splined shaft. Remove the handle and rotate it one or more spline teeth to realign it with the faucet in the off position.
How do I stop my faucet handle from wobbling?
Tighten the Phillips screw under the decorative cap first. If wobble persists, access the stem connection under the sink and tighten the stem clamp nut one quarter turn.
My faucet turns backwards. How do I fix the direction?
Remove the handle and locate the handle stop mechanism on the stem. Pull out the C-clip, flip the stop over so the larger tooth faces upward, and reseat it. This reverses rotation to standard: counterclockwise to open.
Can I adjust water flow precision on a two-handle faucet?
Most two-handle faucets have non-linear flow curves by design. No user-adjustable friction exists. Workarounds include repositioning the lever downward or replacing with a single-handle faucet for better temperature control.
When should I replace my faucet instead of adjusting it?
Replace if internal gears are stripped, the cartridge leaks internally despite adjustments, or flow control is inherently poor due to the faucet design and multiple fixes fail.
Key Takeaways for Adjusting Your Faucet Handle
Adjusting a faucet handle is a straightforward fix when you know where to look. Most problems stem from simple misalignment or looseness that can be corrected in under 30 minutes using basic tools like a screwdriver and basin wrench. Reindexing the handle on the splined shaft fixes crooked positioning, tightening the stem connection eliminates wobble, and flipping the handle stop reverses incorrect rotation direction. For persistent issues like poor flow control, consider replacing the faucet with a model featuring smoother ceramic disk cartridges. With proper care and annual O-ring inspections, your handles will stay aligned, tight, and reliable for years.


