
A steady drip from your showerhead even when the water is turned off can waste thousands of gallons of water annually. According to the U.S. Environmental Protection Agency, household leaks can add up to 10,000 gallons lost per year, driving up water bills and straining natural resources. The good news is that 90% of dripping shower faucet cases stem from worn cartridges, damaged O-rings, or mineral buildup problems you can fix yourself in under an hour with basic tools. This guide walks you through diagnosing the leak, identifying your faucet type, replacing faulty parts, and preventing future drips without calling a plumber.
Identify Your Shower Faucet Type
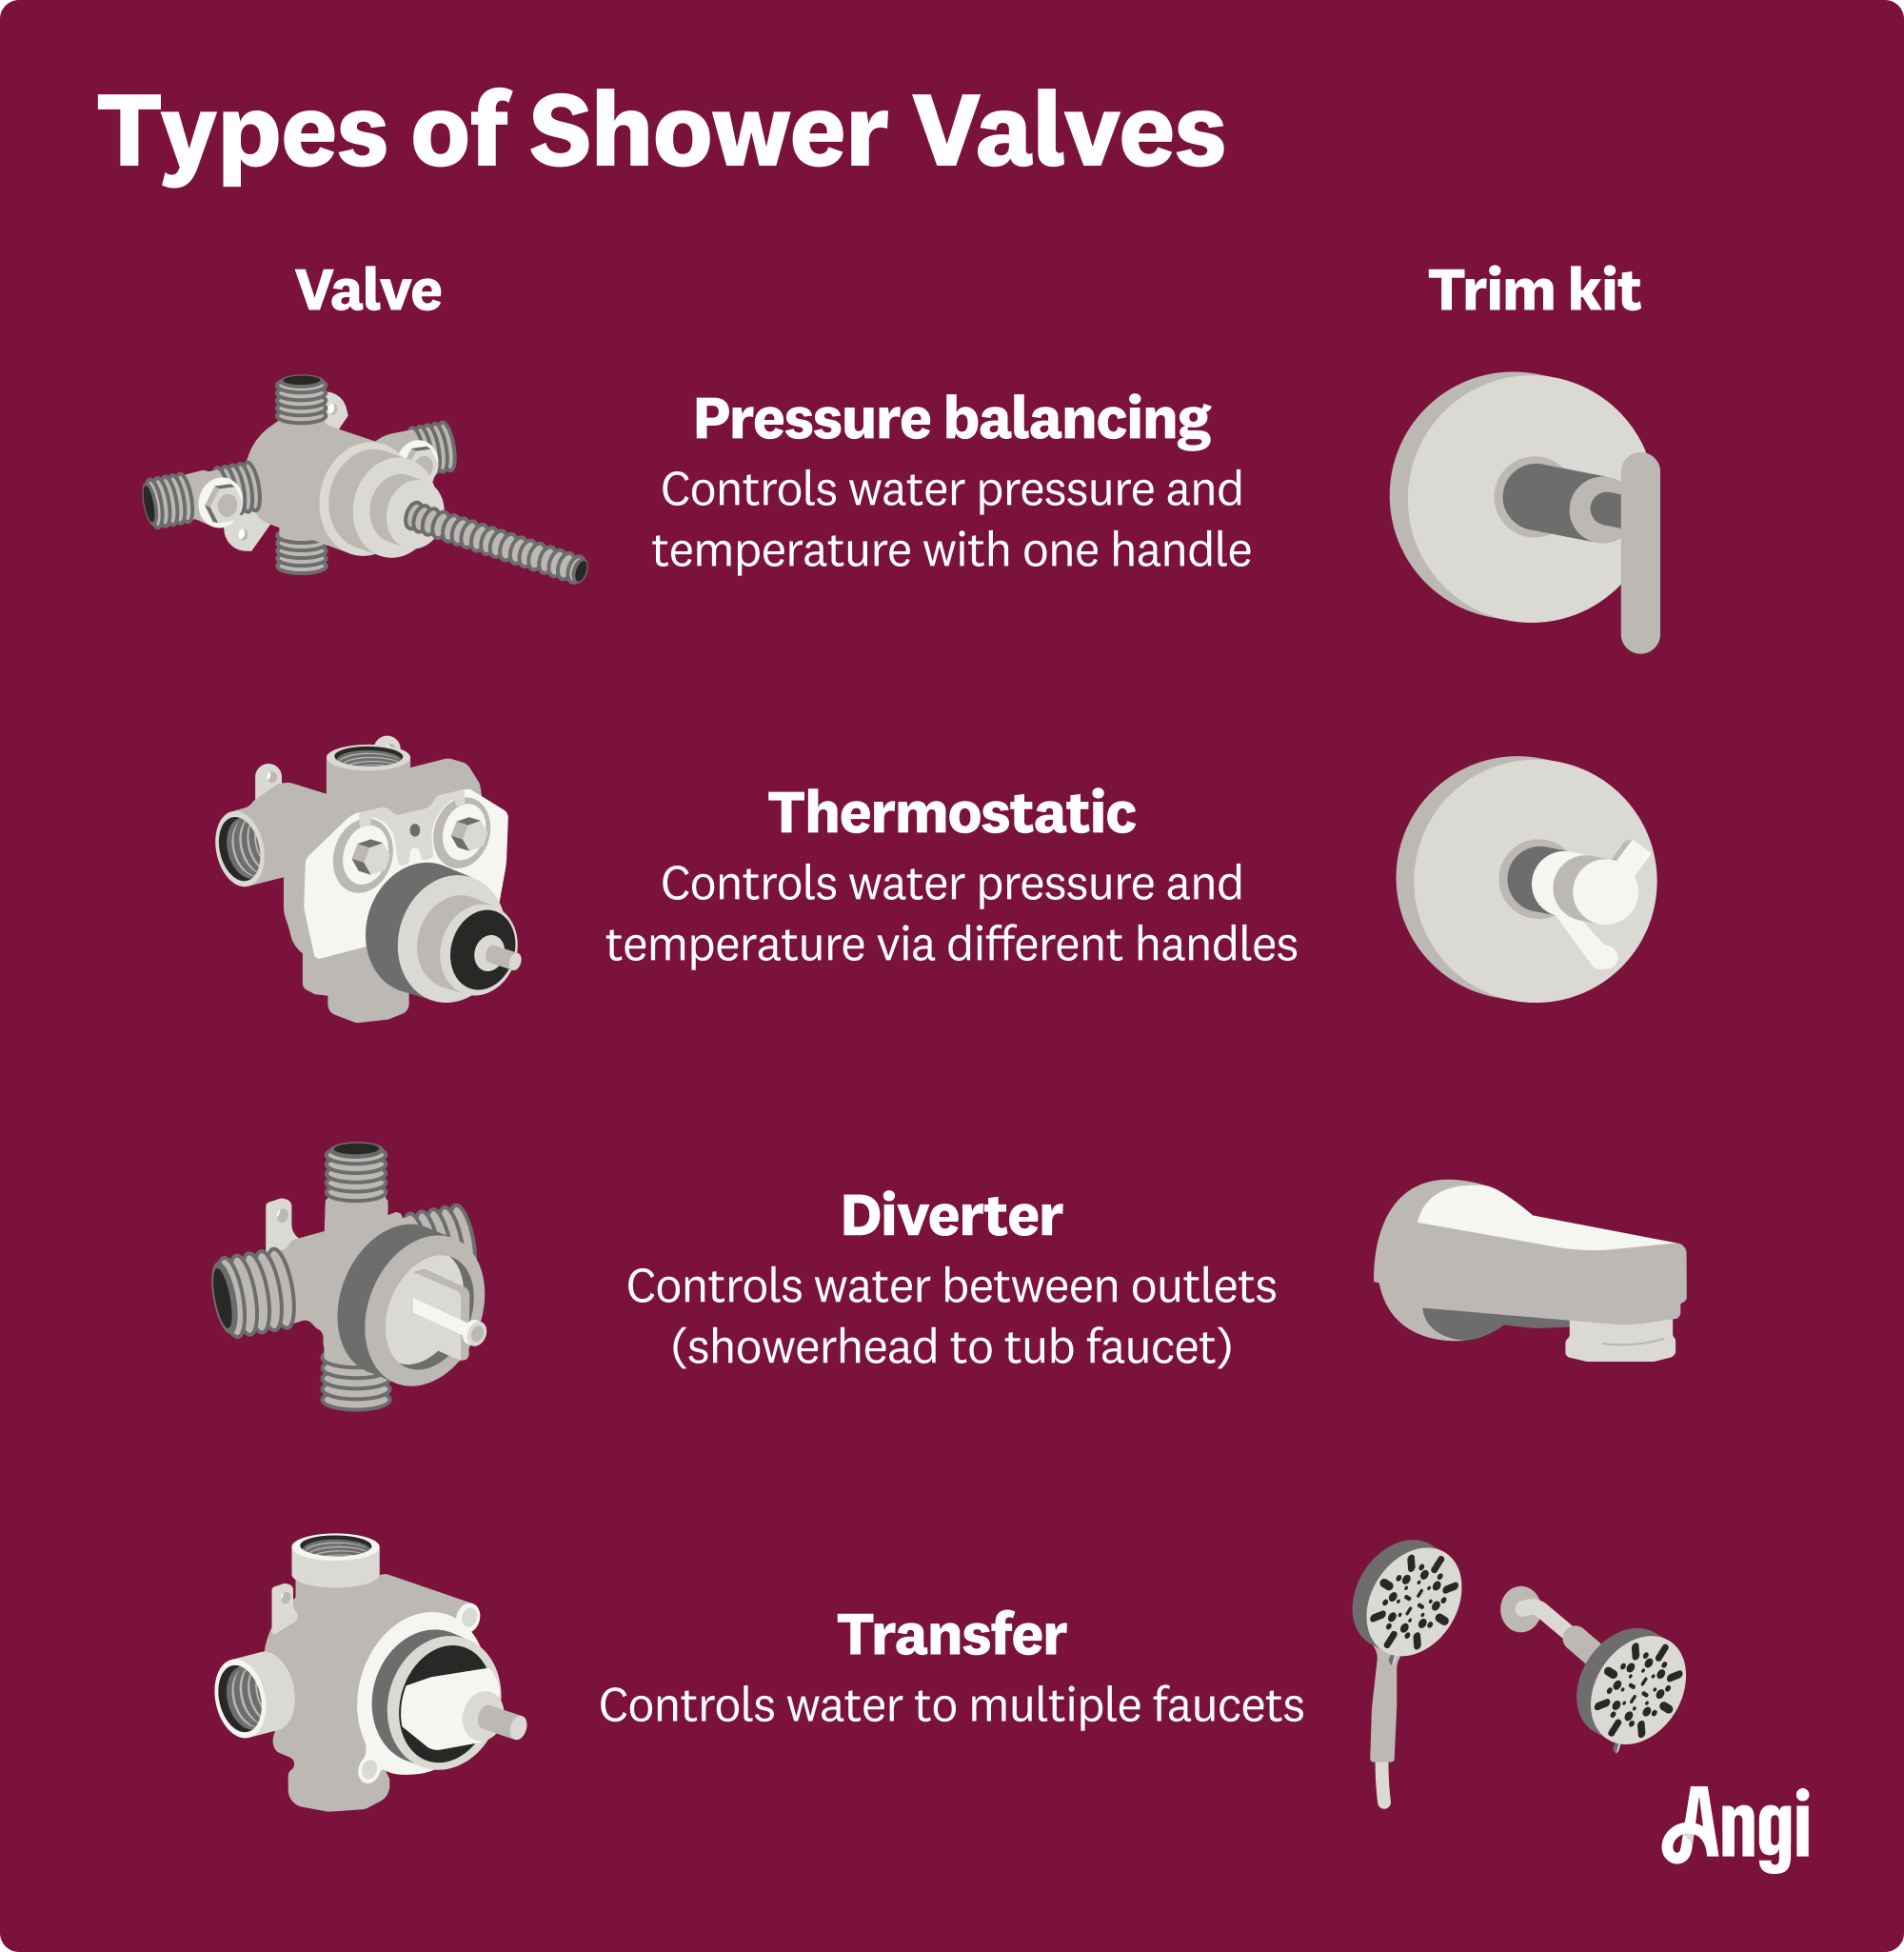
Understanding your specific faucet design is the first step toward an effective repair. Different types use different internal mechanisms, which determines what parts you’ll need to replace.
Single-Handle Cartridge Valve
Most modern homes feature a single-handle cartridge valve that controls both hot and cold water with one lever. Inside, a plastic or ceramic cartridge contains rubber O-rings that wear out over time. When these seals fail, water bypasses the valve and drips from the showerhead. Brands like Moen, Delta, and Kohler commonly use this system. Repair involves replacing the cartridge or its O-rings.
Double-Handle Compression Valve
Found in older homes, this system has separate hot and cold knobs. Each knob presses a rubber washer against a metal seat to stop water flow. Drips occur when washers degrade or seats become pitted. Fixing it requires replacing washers, springs, and possibly reseating the valve. While slightly more involved, it remains a DIY-friendly repair.
Pressure-Balancing or Thermostatic Valve
These advanced valves maintain safe shower temperatures by adjusting flow if hot or cold pressure changes. A failing pressure-balancing cartridge can cause drips, sudden temperature swings, or incomplete shutoff. Repairs demand exact replacement parts, as installing the wrong cartridge may lead to scalding or continued leakage.
Check the Diverter Type
A diverter redirects water from the tub spout to the showerhead. Two common types exist. The tub spout diverter has a pull-up knob on the spout, while the in-wall diverter uses a separate wall handle or button. If water leaks from both the tub and shower when the diverter is engaged, the internal mechanism is worn and needs replacement.
Shut Off Water Supply Before Repairs
Working on live plumbing risks flooding and serious property damage. Taking this step first protects your home and makes the repair process safer.
Locate Main Shutoff Valve
Before starting, turn off the main water supply. Look for the shutoff near your water meter, basement, or utility closet. Turn the valve clockwise until tight. If your home has local shutoffs behind an access panel, use those instead. Never skip this step.
Relieve Residual Pressure
Open the shower valve to drain remaining water and release pressure. Plug the tub drain or lay down a towel to catch small screws or parts. Keep a flashlight handy to inspect dark valve areas during disassembly.
Remove Handle and Trim Plate
With the water off, you can safely access the internal components. This step exposes the cartridge for inspection and replacement.
Pry Off Decorative Cap
Use a flathead screwdriver or utility knife to gently pop off the handle cap. Underneath, you will find a set screw, usually Allen or Phillips style, that secures the handle to the stem.
Loosen Set Screw
Insert the correct wrench or screwdriver and turn counterclockwise to loosen. If the screw is stuck, apply penetrating oil like WD-40, wait 15 minutes, and tap lightly with a hammer if needed.
Pull Off Handle
Once the screw is out, lift the handle straight off. If it resists, gently rock it side-to-side while pulling. Avoid prying, as forcing it can damage internal components.
Remove Trim Plate
Unscrew the escutcheon or trim plate covering the valve. Cut through old caulk with a utility knife if necessary. Gently pull the plate away from the wall. Check the weep holes, the small slots at the bottom that allow moisture to escape and prevent wall damage. Clear any blockages with a toothpick.
Extract and Inspect the Cartridge
The cartridge is the heart of most shower faucet systems. Removing it reveals the root cause of the drip and determines whether you need a simple fix or a full replacement.
Remove Retaining Clip
At the top of the valve body, you will see a metal or plastic retaining clip. Use needle-nose pliers to pull it straight up. Do not twist, as this can bend or break the clip.
Pull Out Cartridge
Grasp the cartridge stem and pull straight out. If it is stuck, soak the area with penetrating oil, use a cartridge puller tool, or grip gently with channel-lock pliers while wiggling without twisting.
Inspect the removed cartridge for torn or flattened O-rings, mineral deposits appearing as white or green crust, cracks or scoring on the body, and worn alignment tabs.
Clean or Replace the Faulty Cartridge
Based on your inspection, you can either restore the existing cartridge or install a new one. Both approaches are covered here.
Soak in Vinegar to Remove Buildup
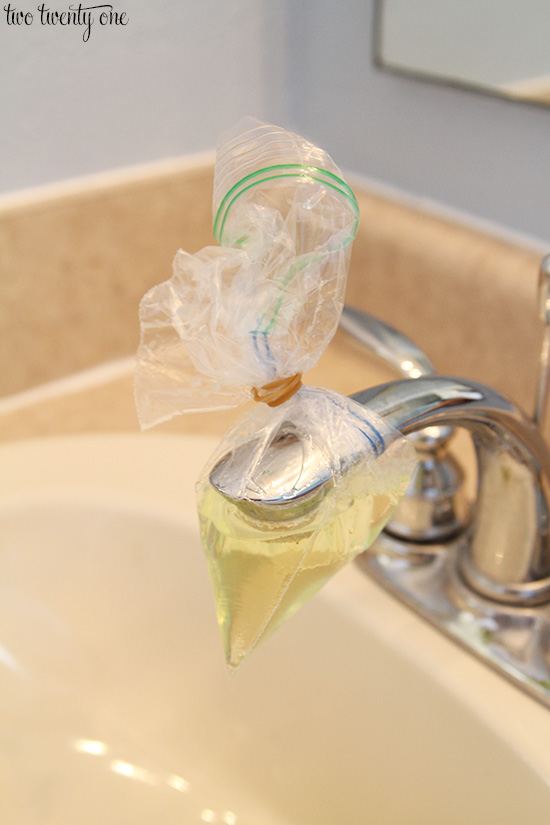
If the cartridge looks salvageable, soak it in white vinegar for 4 to 12 hours. This dissolves mineral deposits. Use a soft brush to scrub ports and O-ring grooves. Rinse thoroughly and dry before reuse.
Replace Worn O-Rings
Check all rubber seals. If any are cracked, stretched, or misshapen, replace them. Most repair kits include new O-rings. Always apply silicone-based plumber’s grease before reassembly, as this extends seal life and ensures smooth operation.
Install New Cartridge
Match the new cartridge exactly to the old one, including brand, model, and port orientation. Hold it with H for hot and C for cold markings facing upward. Apply grease to all seals, then insert straight in. Do not force or twist.
Reinstall and Reassemble the Faucet
Proper reassembly ensures your repair holds and prevents new leaks from forming during installation.
Seat Cartridge Fully
Push the cartridge all the way into the valve body until it clicks or seats flush. Incomplete seating is a top cause of post-repair leaks. Reinstall the retaining clip, which should snap securely into the grooves.
Reattach Trim and Handle
Slide the trim plate back into place, aligning with notches. Screw it in snugly, but do not over-tighten, which can crack plastic or strip threads. Slide the handle on, insert the set screw, and tighten. Press the decorative cap back into place.
Pro Tip: Adjust the limit stop to restrict hot water access, reducing scald risk, especially in homes with children.
Test for Leaks After Repair
Your repair is only successful if it stops the drip. Thorough testing confirms everything is working properly.
Turn Water Back On
Slowly open the main shutoff valve. Watch for leaks around the handle base, trim plate, and showerhead connection. Use a flashlight to spot slow seepage.
Operate the Faucet
Turn the handle through all positions, cold, warm, and hot. Check for smooth movement, consistent flow, and no drips after shutoff. Wait 2 to 3 minutes after turning off. One or two initial drops are normal. A steady drip every few seconds means the repair failed, likely due to improper seating or wrong cartridge.
Fix Leaks at Showerhead and Tub Spout
Sometimes the drip originates from the showerhead or spout rather than the valve. Addressing these areas completes the repair.
Stop Showerhead Drips
A leak where the showerhead meets the arm usually means poorly sealed threads. Fix it by wrapping the showerhead with cloth, unscrewing with a wrench turning left, cleaning threads on both pieces, removing old Teflon tape, applying 3 to 4 wraps of new tape clockwise, hand-threading back on, and snugging with wrench without over-tightening.
Replace Tub Spout Diverter
If water leaks from both tub and shower, the diverter is failing. For threaded spouts, unscrew counterclockwise. For slip-on spouts, loosen the set screw under the spout and pull straight off. Install the new spout, ensuring it is straight and tight. Test by turning the diverter.
Boost Low Water Pressure
Low pressure often accompanies leaks and indicates mineral buildup restricting flow. Clearing these deposits improves performance.
Clean Showerhead with Vinegar
Mineral buildup clogs nozzles and reduces flow. Remove the showerhead and soak in vinegar for 4 to 12 hours. Use a toothbrush or toothpick to clear holes. Rinse and reattach.
Check Cartridge Screen
Some cartridges have a small mesh screen that traps debris. Remove and clean it with a brush. If only hot water is weak, the mixing valve may be clogged, requiring cartridge replacement.
Inspect for High Water Pressure
Ideal pressure is 40 to 80 psi. If higher, water can force past seals. Test with a $10 gauge on an outdoor spigot. In closed-loop systems, a faulty expansion tank can cause pressure spikes. Tap it; if it sounds solid rather than hollow, it may need replacement.
Fix Stiff or Stuck Handle
A stiff handle makes adjusting water temperature difficult and can damage internal components if forced.
Clean and Lubricate Stem
Turn off water and remove the handle. Inspect the stem for corrosion or worn splines. Clean with vinegar and a brush. Apply silicone plumber’s grease to the stem and O-rings before reassembly.
Replace Worn Handle or Cartridge
If the splines are smooth or broken, the handle will not grip. Replace either the handle or the entire cartridge. Never force a stiff handle, as this can break internal parts and lead to costly repairs.
Troubleshoot Persistent Drips
If your repair did not stop the drip, systematic troubleshooting identifies the issue.
Cartridge Not Fully Seated
If the drip continues, remove and reinsert the cartridge. Ensure it is fully seated and the retaining clip is secure. Re-grease all O-rings before reinstalling.
Installed Backwards or Wrong Model
If hot and cold are reversed or the faucet will not shut off, the cartridge may be backwards or incorrect. Check orientation. H and C should face up. Bring the old cartridge to the store for exact matching.
Debris in Valve Body
Flush the valve with water after removing the cartridge. Use a small brush to clean ports. Leftover grit can prevent a tight seal.
Worn Valve Seat
In older compression valves, a pitted or scratched seat can cause leaks. Replace the seat or use a faucet reamer to smooth it. Always replace washers at the same time.
Know When to Call a Professional
Some situations require licensed expertise. Recognizing these prevents further damage and ensures safe repairs.
Signs of Water Damage
If the wall around the trim feels soft, stained, or moldy, water has likely been leaking behind it. Turn off water and call a plumber immediately, as this could indicate structural damage.
Corroded or Soldered Pipes
Green or white crust on pipes means corrosion. If the valve is soldered to copper pipes, DIY replacement is unsafe. Only licensed plumbers should handle soldered joints.
Repeated Repair Failures
If you have replaced the cartridge twice and it still leaks, the valve body may be damaged. This requires cutting into the wall and professional replacement.
Suspected High Pressure or Expansion Issues
If your water heater relief valve leaks or you hear banging pipes, pressure may be too high. A plumber can install or repair an expansion tank to stabilize the system.
Prevent Future Leaks
Regular maintenance extends faucet life and prevents costly repairs down the line.
Clean Annually
Soak your showerhead in vinegar once a year. This prevents mineral buildup and maintains flow.
Avoid Over-Tightening
Snug is enough. Over-tightening screws, handles, or fittings can crack plastic or damage seals.
Use Silicone Grease Only
Never use Vaseline or petroleum jelly on O-rings, as these degrade rubber. Silicone-based plumber’s grease is safe and long-lasting.
Replace Cartridges Proactively
Even without leaks, replace cartridges every 5 to 10 years, especially in hard water areas. This prevents sudden failures and water waste.
Install a Water Softener
If you have hard water, consider a water softener or inline filter. This reduces scale buildup in valves and appliances.
Frequently Asked Questions About Fixing a Dripping Shower Faucet
Why is my shower faucet still dripping after I replaced the cartridge?
The most common reasons are the cartridge not being fully seated, installed backwards, or being the wrong model. Debris in the valve body or a worn valve seat in compression valves can also cause persistent drips. Remove the cartridge, re-grease all seals, and ensure it is oriented correctly with H and C facing up.
Can I fix a dripping shower faucet myself, or do I need a plumber?
In 90% of cases, you can fix a dripping shower faucet yourself with basic tools and a replacement cartridge. Full valve body replacement, especially with soldered pipes, requires a professional. However, cartridge, O-ring, washer, and diverter replacements are DIY-friendly projects.
How do I identify what type of shower faucet I have?
Look at the handle configuration. A single handle indicates a cartridge valve. Two separate handles indicate a compression valve. Remove the handle cap and inspect the stem shape to confirm. Take photos to the hardware store for help matching replacement parts.
What causes a shower faucet to drip when the water is off?
When the water is off, a drip indicates failed seals in the cartridge. The rubber O-rings wear over time, allowing water to bypass the valve and drip from the showerhead. Mineral buildup or debris can also prevent the cartridge from shutting off completely.
Is Vaseline safe to use on shower faucet O-rings?
No. Petroleum-based products like Vaseline degrade rubber O-rings over time. Always use silicone-based plumber’s grease for O-rings and moving parts. This maintains flexibility and extends the life of the seals.
Do I need an expansion tank if my shower faucet leaks?
You may need an expansion tank if you have a closed-loop plumbing system with a check valve or pressure regulator. Thermal expansion increases water pressure, forcing water past shower valve seals. If your water heater relief valve leaks or pipes bang, have your pressure checked.
Key Takeaways for Fixing Your Dripping Shower Faucet
A dripping shower faucet is almost always a DIY fix that saves $150 to $450 compared to hiring a plumber. The majority of leaks stem from worn cartridge O-rings, and replacing the cartridge or seals resolves the problem in most cases. Focus on correct part matching, ensure full cartridge seating, and use silicone grease on all seals during reassembly. Avoid over-tightening, which damages plastic components and creates new leaks. Test your repair thoroughly before considering additional troubleshooting. If you encounter corrosion, water damage behind walls, or soldered pipes, call a licensed plumber rather than attempting DIY repairs in those situations.







