
A dripping bathroom faucet isn’t just annoying—it can waste thousands of gallons of water a year and increase your utility bill by up to $100. The good news? Most leaks are fixable with basic tools and a little know-how. Whether your faucet drips from the spout, leaks around the handle, or shows signs of moisture under the sink, this guide will help you diagnose the cause and make a lasting repair. You’ll learn how to identify your faucet type, replace worn components like cartridges and washers, and stop leaks at their source—all without calling a plumber in most cases.
We’ll walk you through step-by-step fixes for both double-handle (compression) and single-handle (cartridge) faucets, plus how to troubleshoot under-sink leaks and pop-up drain issues. With the right replacement parts and a few common tools, you can complete most repairs in under an hour. Let’s stop that drip for good.
Identify Your Faucet Type
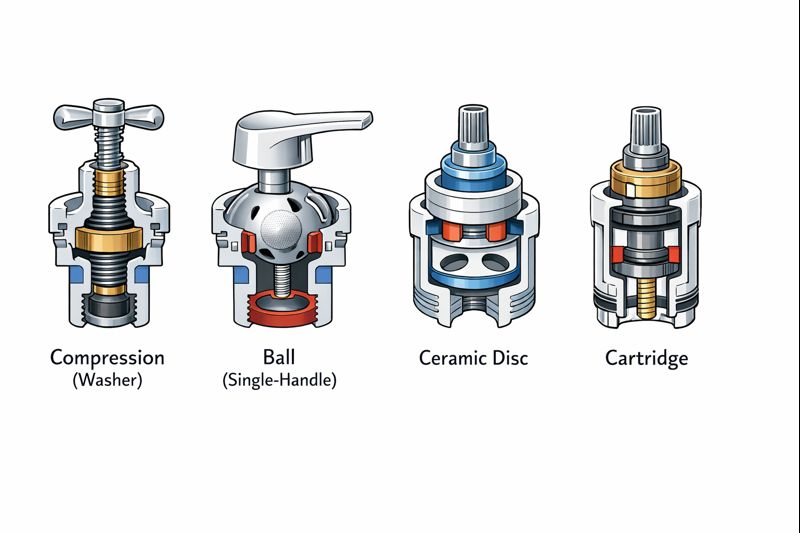
Knowing your faucet’s internal mechanism is key to fixing it correctly. Different designs fail in different ways, and using the wrong parts can make the problem worse.
Check for Compression or Cartridge Design
Double-handle faucets usually use a compression system with rubber washers that wear out over time. When you turn the handle, the washer presses against a valve seat to stop water flow. If it drips when off, the washer or seat is likely damaged.
Single-handle models typically use a cartridge system, where a plastic or ceramic cartridge controls water flow. These don’t rely on washers and are common in brands like Moen and Delta. A drip from the spout usually means the cartridge needs replacing.
Look for Visual Clues
Two separate handles indicate a compression (washer-based) faucet. One lever that moves side-to-side and up/down suggests a cartridge or ball-type faucet. A round cap under the handle could indicate a ball-type faucet (older Moen models). Ceramic discs inside are found in high-end disc-type faucets.
If you’re unsure, take a photo and use the manufacturer’s online tool. Moen, Delta, and Pfister all offer “Identify My Product” features on their websites.
Shut Off Water Supply First
Never start a faucet repair without turning off the water. Skipping this step risks flooding your bathroom or cabinet.
Locate Angle Stop Valves
Under the sink, find the two shutoff valves. The right side controls cold water and the left side controls hot water. Turn both clockwise until tight. Do not force them. If they’re stiff or corroded, stop and consider professional help.
Confirm Water Is Off
Turn on the faucet to drain any remaining water. No flow means it’s safe to proceed. If water still runs, the valves may be faulty. Do not continue without fixing them first.
Fix a Leaky Double-Handle Faucet
Compression faucets are common in older homes and fail when washers or valve seats wear out. Replacing these parts stops most spout drips.
Remove the Handle
Start with the side that’s leaking. Use a flathead screwdriver to pry off the decorative cap on the handle. Beneath it, you’ll find a set screw. Insert a 3/32″ Allen wrench and turn counter-clockwise to loosen. Lift the handle straight off. Don’t drop the screw into the drain.
Unscrew the Bonnet Nut
Use channel locks wrapped in a cloth to avoid scratching the finish. Grip the bonnet nut and turn it counter-clockwise. Finish loosening by hand to prevent damage. Set the nut aside carefully.
Replace Washer, Spring, and Seat
Pull out the stem to access the washer, spring, and valve seat. Remove the screw holding the washer and replace with a new one from a Delta washer and spring kit or FIX-A-TAP repair kit. Ensure the beveled end of the spring faces inward. Inspect the valve seat inside the faucet body. If pitted or eroded, replace it using a seat wrench.
Install new parts in reverse order, pressing the washer firmly into place.
Reassemble and Test
Reinsert the stem, hand-tighten the bonnet nut (don’t over-tighten), and reattach the handle. Turn water back on slowly. Test both hot and cold for no drips at the spout, no sputtering or reduced flow, and no moisture at the base.
If it still leaks, the valve seat may need replacement or the faucet could be too worn for repair.
Replace a Single-Handle Faucet Cartridge
Most modern single-handle faucets use cartridges. When they wear out, water drips even when the faucet is off.
Take Off the Handle
Pop off the decorative cap with a flathead screwdriver. Insert a 3/32″ Allen wrench into the set screw and turn counter-clockwise. Gently lift the handle off. Take photos during disassembly to help with reassembly.
Remove Dome Cap and Retainer Nut
Twist the dome cap beneath the handle counter-clockwise by hand. If stuck, use an adjustable wrench wrapped in a towel. Then remove the retainer nut underneath.
Extract the Old Cartridge
Some cartridges have a top screw. Remove it with a Phillips head. Pull the cartridge straight up. Use needle-nose pliers or a cartridge removal tool if it’s stuck. Check the base for loose O-rings or springs and retrieve them.
Install the New Cartridge
Compare the new cartridge to the old one. An exact match is required. Lightly coat it with silicone grease before insertion. Align it with the slots in the faucet body and push straight down. Do not twist. Reinstall the top screw if needed.
Reassemble the Faucet
Replace the retainer nut and hand-tighten clockwise. Reinstall the dome cap. Place the handle back on, align the internal slot, secure the set screw, and snap the decorative cap back on.
Turn Water On and Test
Ensure the faucet is off. Open the shutoff valves slowly. Let water run for 1-2 minutes to flush debris. Close and watch for 5 minutes. Check for no drip at spout and no moisture at handle or base.
Minor seepage may stop after a few uses as seals rehydrate.
Stop Leaks at the Handle Base
A wet handle or base usually means a failed O-ring or loose packing nut.
Diagnose the Source
If water appears only when the faucet is running, the O-ring is likely worn. If it’s constantly damp, the packing nut may be loose.
Replace the O-Ring
After removing the handle and cartridge, inspect the O-rings around the stem. If cracked or flattened, replace them with new ones from a repair kit. Lubricate with silicone grease before reassembly.
Tighten or Replace Packing Nut
If the nut is loose, use an adjustable wrench to snug it. Don’t over-tighten. If it’s stripped or the leak continues, replace the entire cartridge assembly.
Fix Under-Sink Leaks
Water pooling under the cabinet means a connection has failed. Test each part systematically.
Dry and Inspect Components
Wipe down the angle stop valves, supply lines, faucet tailpieces, drain connections, and pop-up rod. Use a small mirror to see tight spaces.
Test One Side at a Time
Turn on the cold water valve slowly. Watch for leaks at the angle stop (indicates a failing valve), supply line connection (loose nut or worn seal), and hose body (pinhole leak or kink damage). Repeat with the hot side after turning cold off.
Replace Faulty Supply Lines
If a line is cracked or leaking, replace it with a braided stainless steel hose (1/4″ compression x 3/8″ or 1/2″). Hand-tighten the nuts, then use a wrench for a quarter turn. Bring the old line to the store for exact matching.
Repair Pop-Up Drain Leaks
Water dripping from the rod entry point behind the drain is often due to a loose nut.
Tighten the Retaining Nut
Locate the retaining nut on the back of the drain pipe. It’s often reverse-threaded, so turn it counter-clockwise to tighten. Use a mirror for visibility.
Fix Cracks or Failed Seals
If tightening doesn’t work, check for cracks around the hole. Apply epoxy putty (like JB Weld) as a temporary fix. Replace the entire pop-up assembly for a permanent solution.
Seal a Leaky Sink Rim
Water seeping around the drain flange means the seal has failed.
Remove and Re-Caulk the Drain
Take out the drain assembly. Clean the sink surface thoroughly. Apply plumber’s putty for metal drains or silicone caulk for plastic. Reinstall the drain and tighten. Give an extra quarter-turn to compress the washer. Wipe away excess sealant.
Find the Right Replacement Parts
Using incorrect parts is the number one reason repairs fail.
Identify Your Model Number
Check the base of the faucet, original packaging, or manufacturer’s website. Use online tools like Moen.com/Identify, Delta Faucet Parts Diagrams, or Pfister Parts Lookup. For faucets over 5 years old, enable “show discontinued items” in the database.
Download Maintenance Guides
These include exploded diagrams, part numbers, and torque specs. Essential for complex models.
Know When to Call a Plumber
DIY fixes work in most cases, but some issues require professional help.
Call a Licensed Plumber If
Angle stop valves are seized or leaking. The faucet body is corroded or stripped. A pipe has cracked or joint failed. The leak returns after multiple repairs. You see water damage in walls or flooring.
Experts from Roto-Rooter and Bunnings Workshop stress that pressurized systems and damaged valves should not be handled without proper training.
Prevent Future Leaks
Small habits extend faucet life and prevent drips.
Perform Annual Maintenance
Inspect supply lines for bulges or corrosion. Replace washers or cartridges every 5-7 years. Clean aerator monthly to remove mineral buildup. Wipe handles dry after use to reduce deposits.
Upgrade for Longevity
Install braided stainless steel supply lines. Use a water softener in hard water areas. Apply Teflon tape on threaded connections during reassembly.
Final Test After Repair
Always verify your fix with a full system check.
Follow the 5-Minute Leak Test
Turn water on slowly. Run faucet for 60-120 seconds to flush debris. Shut off completely. Watch for 5 minutes at the spout, handle, supply lines, and drain. Repeat with hot water.
If no leaks appear, you’re done. If dripping continues, recheck cartridge alignment, washer seating, and presence of debris in valve seat.
Key Takeaways for Fixing Your Leaky Bathroom Faucet
Fixing a leaky bathroom faucet saves water, money, and prevents damage. With the right tools, exact replacement parts, and careful reassembly, most repairs take less than an hour. Always shut off water first, avoid over-tightening, and lubricate new cartridges with silicone grease. If in doubt, consult manufacturer support. Moen, Delta, and Pfister offer free parts under lifetime warranties with proof of purchase. Stop the drip today and keep your bathroom dry and efficient.
Frequently Asked Questions About Fixing a Leaky Bathroom Faucet
How long does it take to fix a leaky bathroom faucet?
Most DIY repairs take 30-60 minutes. Simple washer replacements on double-handle faucets often take under 30 minutes. Cartridge replacements on single-handle faucets may take up to an hour if the part is stubborn.
Why does my faucet still drip after replacing the cartridge?
This usually happens if the cartridge is misaligned, the wrong model was purchased, or debris is stuck in the valve seat. Recheck the installation, flush the system by running water for a minute, and verify you have the exact model number for your faucet.
Can I fix a leaky faucet without turning off the water?
No. Always shut off the water supply before starting any repair. Even a small drip can become a significant leak once you start loosening fittings. The water must be off to safely complete the repair.
How much does it cost to fix a leaky bathroom faucet yourself?
DIY repairs typically cost $10-40 for replacement parts like washers, cartridges, or O-rings. Professional plumbers charge $100-200 for the same repairs. DIY saves the labor costs entirely.
What causes a bathroom faucet to leak?
The most common causes are worn washers or valve seats in compression faucets, failed cartridges in single-handle faucets, degraded O-rings around the handle, loose packing nuts, and worn supply lines or connections under the sink.







