
A dripping outdoor faucet might seem like a minor annoyance, but it can waste thousands of gallons of water per year and lead to costly damage to your home’s foundation or walls. Whether you are dealing with a steady drip from the spout or water seeping around the handle, the fix is often simple and requires only basic tools. Most outdoor faucet leaks are caused by worn internal parts, particularly a degraded washer or O-ring, and can be repaired in under an hour. This guide walks you through exactly how to stop an outdoor faucet from leaking with step-by-step instructions and preventive maintenance tips.
Shut Off Water and Prepare the Work Area
Before starting any repair, you must turn off the water supply to prevent flooding. Locate the indoor shut-off valve for your outdoor faucet, which is typically found in the basement, crawlspace, or utility room near where the pipe exits the house. Turn the valve clockwise until it is tight. If your home does not have a dedicated shut-off valve for the outdoor faucet, you will need to close the main water supply instead.
Once the water is shut off, open the outdoor faucet to drain any residual water and release pressure from the line. For complete drainage, open a nearby indoor faucet such as a basement sink to allow air into the system. This step reduces mess and prevents water from backing up into walls during disassembly.
Remove the Faucet Handle and Packing Nut

Look for the small screw that secures the handle, which is often hidden under a decorative plastic cap. Use a flat-head screwdriver to pop off the cap, then remove the screw with a Phillips or hex bit. Gently pull the handle straight off the stem. If the handle is stuck due to corrosion, spray penetrating oil around the base and wait 5-10 minutes before trying again.
Next, use an adjustable wrench to loosen the packing nut, which is the hex-shaped nut located below the handle. Turn it counterclockwise while holding the faucet body steady with channel locks to prevent twisting the supply pipe. If the nut will not budge, apply penetrating oil, let it soak for 10 minutes, and tap lightly with a hammer to break corrosion before attempting again.
Pull Out the Valve Stem for Inspection
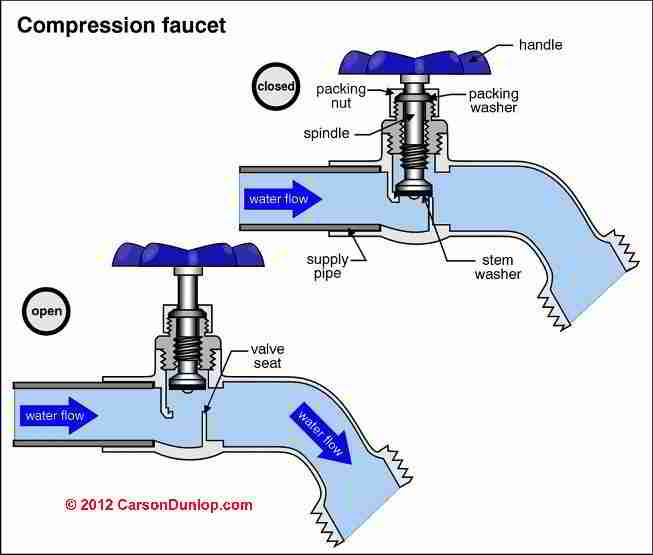
With the packing nut removed, carefully pull out the valve stem from the faucet body. For frost-proof faucets, the stem may be 10-12 inches long and slides out slowly. Keep track of any washers or O-rings that fall out during removal, as you will need to inspect and replace these parts.
Identify your faucet type before proceeding with repairs. Frost-proof faucets have a long stem that shuts off water inside the house, making them common in cold climates. Standard spigots have a shorter stem where the shutoff happens at the faucet body. Anti-siphon models feature a vacuum breaker cap on top to prevent backflow contamination.
Check and Replace the Washer or O-Ring
Examine the flat rubber washer at the base of the stem for signs of damage. Look for cracks, flattening, chipping, or erosion. This washer creates a seal against the valve seat inside the faucet, and when it wears out, water escapes even when the faucet is fully closed.
To remove the old washer, hold the stem securely with pliers and use a Phillips screwdriver to unscrew the washer. If it is stuck, carefully pry it off with a utility knife while being careful not to enlarge the mounting hole. Install a new washer that matches the original in size, shape, and thickness. Soft rubber washers create the best seal. When unsure about the correct size, bring the old washer to a hardware store or purchase an assorted washer kit for $5-10.
Test the Valve Seat and Replace if Needed
With the stem removed, shine a flashlight into the faucet body to inspect the valve seat. This is the smooth surface where the washer seals against to stop water flow. If the valve seat is pitted, cracked, or corroded, even a new washer will not stop the leak.
If you have a valve seat wrench available, use it to unscrew and replace a damaged seat. For faucets without a replaceable seat, the entire faucet body may need replacement. Light corrosion can be smoothed gently with a deburring tool or fine emery cloth, though this is only a temporary fix.
Reassemble the Faucet and Test
Slide the repaired stem back into the faucet body and hand-tighten it first. Then use the wrench to secure the packing nut until snug, being careful not to over-tighten as this can damage seals or strip threads. Reattach the handle by sliding it back on, aligning the screw hole, and securing with the screw.
Slowly turn the water back on by opening the indoor shut-off valve. Open the outdoor faucet and let water run for 30-60 seconds to flush out air and debris. Close the faucet and check for leaks around the spout and handle. For a thorough test, attach a garden hose and turn it on to create backpressure, which reveals hidden leaks or weak seals.
Replace the Entire Faucet If Needed
Consider replacing the whole faucet if the packing nut or body is cracked, if the valve seat is damaged and cannot be replaced, if the supply line is corroded or leaking behind the wall, or if the faucet is over 10-15 years old. Modern frost-proof models cost less than $15 and offer better freeze protection.
To install a new frost-proof spigot, shut off the water and drain the line. Unscrew the old faucet from inside, using penetrating oil if it is stuck. Clean the pipe threads and apply pipe dope or Teflon tape. Screw in the new 1/2-inch frost-proof faucet hand-tight, then wrench-tighten about one-quarter turn past hand-tight. Restore water and test for leaks.
Fix Anti-Siphon and Vacuum Breaker Leaks
If the faucet leaks only when a hose is attached, the anti-siphon valve may be faulty. This device prevents contaminated water from siphoning back into the supply line. To diagnose, shut off the water and unscrew the vacuum breaker cap, usually located on top of the faucet.
Inspect the internal seals and spring for cracks or debris. Replace the entire vacuum breaker assembly with a matching model. Anti-siphon repairs require specific parts, so bring the old component to the hardware store to ensure proper compatibility.
Prevent Future Leaks with Regular Maintenance
Before cold weather arrives, disconnect all hoses and leave the faucet open to drain water and prevent freeze expansion that can crack pipes. In cold climates, use an insulated faucet cover for additional protection against freezing temperatures.
Replace the washer every 3-5 years even if no leak is visible, as this takes only 10 minutes and prevents future drips. Avoid overtightening the handle, as forcing it closed damages washers and seats. Turn the handle just until the water stops flowing.
Call a Plumber for Complex Issues
Seek professional help if water leaks behind the wall or near the foundation, if the supply pipe is cracked or frozen, if the faucet is soldered to a copper line, or if no indoor shut-off valve is accessible. The appearance of mold or dampness indoors near the faucet location also requires immediate professional attention.
Licensed plumbers can safely replace damaged lines, perform pressure tests, and ensure code-compliant installations. Hidden leaks can cause wood rot, mold growth, and foundation damage if left unaddressed.
Save Money with DIY Repair
DIY washer replacement typically takes 30-60 minutes and costs only $2-10 for parts. Full faucet replacement takes 45-90 minutes and costs $6-25 for the new faucet. In contrast, professional repair costs $150-300 including labor. Fixing the leak yourself saves over 90% compared to hiring a plumber for the same job.
Frequently Asked Questions About Outdoor Faucet Leaks
Why does my outdoor faucet drip even when turned off completely?
This usually indicates a worn-out washer or O-ring at the base of the valve stem. The rubber component creates a seal against the valve seat, and when it becomes cracked, flattened, or eroded from age and use, water escapes past it. Replacing the washer fixes this issue in most cases.
Can I repair my outdoor faucet without turning off the water?
No. You must shut off the water supply before attempting any repair to prevent flooding and water damage. If there is no dedicated shut-off valve for the outdoor faucet, turn off the main water supply to the entire house.
How do I know if my outdoor faucet is frost-proof?
Frost-proof faucets have a long stem that extends 10-12 inches into the house, with the actual shutoff valve located inside the heated space. When you turn off a frost-proof faucet, water drains out automatically through a hole in the stem, making them ideal for cold climates.
Why does my outdoor faucet only leak when I attach a garden hose?
This typically points to a problem with the anti-siphon valve or vacuum breaker. These devices can crack or accumulate debris over time, causing leaks specifically under backpressure. Inspect and replace the vacuum breaker assembly if this is the case.
How often should I replace the washer in my outdoor faucet?
Replace the washer every 3-5 years as preventive maintenance, even if no leak is visible. This simple step takes about 10 minutes and helps avoid unexpected drips and water waste.
When should I replace the entire outdoor faucet instead of just repairing it?
Replace the faucet if the body is cracked, if the valve seat is damaged and cannot be replaced, if the faucet is older than 10-15 years, or if multiple repair attempts have failed. Modern faucets are inexpensive and often provide better performance and freeze protection.
Key Takeaways for Stopping Outdoor Faucet Leaks
The majority of outdoor faucet leaks, approximately 80% or more, are caused by worn washers and can be fixed with a $2-10 part and basic tools. Always match replacement parts exactly in size and shape, and avoid overtightening nuts and screws as this damages seals and accelerates future leaks. Test your repair thoroughly by checking for leaks both under normal conditions and with a garden hose attached to create backpressure. If your faucet is over 10-15 years old or shows signs of corrosion or damage, replacing it entirely is often faster and more reliable than multiple repair attempts. By addressing leaks promptly and performing annual maintenance, you can save thousands of gallons of water, lower your utility bills, and prevent costly water damage to your home.







