

Is your Delta faucet dripping, leaking at the base, or not delivering proper water flow? You’re not alone. Millions of homeowners face these common issues, but fixing a Delta faucet is a straightforward DIY job that takes under an hour with basic tools. Whether you have a two-handle bathroom faucet or a single-handle kitchen model, most problems stem from worn internal parts like cartridges, O-rings, or valve seats that are designed to be replaced, not repaired.
This guide walks you through every step, from diagnosing the problem to final testing, using exact part numbers and pro tips from thousands of successful repairs. No guesswork. No plumber fees. Just a permanently fixed faucet.
Diagnose Your Delta Faucet Issue
Before disassembling anything, identify the exact symptom to target the right fix. Taking a few minutes to diagnose saves time later and ensures you replace the correct parts.
Identify the Leak Location
Where the water appears tells you which part is failing. A drip from the spout when the faucet is off points to a worn cartridge in two-handle models or failed valve seats and springs in single-handle models. A leak at the handle base indicates a degraded O-ring under the handle. Water pooling around the spout base means a faulty spout O-ring. Moisture appearing under the sink suggests a loose cap, cracked valve body, or leaking supply lines.
Recognize Operational Problems
Other warning signs include a stiff or sticky handle caused by dry O-rings, mineral buildup, or a misaligned cartridge. A spongy or uneven handle movement often indicates a worn cam or pitted ball assembly. Low or sputtering water flow typically means a clogged aerator or debris in the valve body. If you have no hot or cold water, check for clogged inlets, a failed cartridge, or shut-off valves that are not fully open.
Pro Tip: Run both hot and cold fully before repair to confirm which side is failing.
Shut Off Water and Prepare Workspace
Skipping preparation risks water damage and lost parts. Taking these safety steps before starting protects your home and makes the repair smoother.
Essential Safety Steps
Turn off the water supply by locating the hot and cold shut-off valves under the sink and turning them clockwise until tight. Relieve pressure by opening the faucet handles for five to ten seconds to drain residual water, then close them again. Plug the drain using a rag or sink plug because small parts like screws and springs can vanish fast. Protect the finish by laying a soft towel in the sink to prevent scratching chrome, nickel, or bronze.
Warning: Never skip shutting off water. Unexpected spray can flood cabinets or damage flooring.
Gather Tools and Replacement Parts
Using the right tools and genuine Delta parts ensures a lasting fix. Having everything ready before starting prevents mid-repair trips to the hardware store.
Required Repair Tools
A 1/8-inch hex key (Allen wrench) removes the handle set screw, which is the most common size needed. An adjustable wrench or basin wrench loosens the top cap while protecting the finish. Needle-nose pliers extract stubborn O-rings or cartridges. A flathead screwdriver (1/4-inch) pries off decorative caps, and taping the tip prevents scratches. A dental pick cleans O-ring grooves and removes old rubber. A small container organizes screws, springs, and washers so nothing gets lost.
Must-Have Replacement Materials
Silicone-based plumber’s grease (like Rector Seal) lubricates seals without damaging rubber. White vinegar or descaling solution dissolves limescale in hard water areas. A soft brush or microfiber cloth cleans internal components safely.
Important: Never use petroleum-based grease. It deteriorates rubber O-rings and voids your warranty.
Fix Two-Handle Delta Faucet
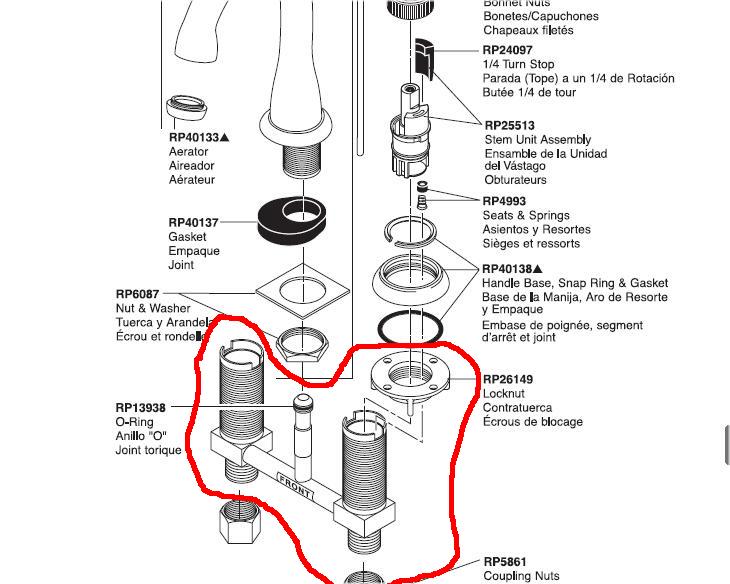
Most two-handle leaks come from worn cartridges or degraded valve seats. This procedure covers the majority of Delta two-handle models found in bathrooms.
Remove Handle and Top Cap
Pry off the decorative cap on the handle with a flathead screwdriver. Insert the 1/8-inch hex key into the set screw and turn counterclockwise. Lift the handle straight up and set it aside. Use an adjustable wrench to turn the top cap (bonnet nut) counterclockwise, then remove the cap. Keep water off during the next steps.
Visual cue: Look for cracks, flattened O-rings, or eroded rubber on the old cartridge.
Extract and Replace Cartridge
Pull the cartridge straight up by hand or with needle-nose pliers. Inspect it for wear, looking for a cracked O-ring, weak spring, or damaged seat. Clean the valve body with a vinegar-soaked cloth to remove sediment. Lubricate the new O-ring with silicone grease before installation.
Best practice: Replace the entire cartridge rather than individual parts for long-term reliability.
Reinstall With Proper Alignment
Align the cartridge ridges with the slots in the valve body. Insert straight down until fully seated without wiggling. Reinstall the top cap by hand-tightening first, then snugging with a wrench. Do not over-tighten, which can crack the cap or compress the cartridge unevenly.
Critical: Misalignment is the number one cause of post-repair leaks.
Reattach Handle and Test
Slide the handle back on the stem. Insert and tighten the set screw, but do not fully torque it yet. Slowly turn on the water supply. Open the handles to flush air, expecting sputtering for ten to fifteen seconds. Close them and watch for five to ten minutes for any drips.
Success check: No leaks should appear at the spout, handle base, or cap.
Repair Single-Handle Delta Kitchen Faucet
Single-handle models use a ball-valve system, which is common in Delta kitchen faucets. This repair requires slightly more steps but follows the same logical process.
Remove Handle and Cap Assembly
Shut off the water and relieve pressure as described earlier. Use the 1/8-inch hex key to loosen the set screw. Lift the handle off, tapping gently if it sticks. Unscrew the cap (bonnet) with an adjustable wrench. Remove the cam assembly and set it aside.
Pro Tip: Take a photo before removing parts. Reassembly becomes much easier.
Extract Ball, Seats, and O-Rings
Lift out the ball assembly and inspect it for pitting or roughness. Remove the spout by lifting it straight off. Use a screwdriver to pop out the valve seats and springs. Remember that the springs must be installed with the larger end facing down. Remove the upper and lower O-rings using a dental pick.
Important: Replace the spout O-ring every time because it is a frequent failure point.
Clean and Replace Components
Wipe the ball, cam, and valve body with a vinegar-dampened cloth. Scrub the O-ring grooves to remove all old rubber residue. Install the new lower O-ring into the valve body groove. Lubricate all O-rings with silicone grease before insertion.
Recommended kit: Use repair kit RP25486, which includes all O-rings, seats, springs, ball, and cam.
Reinstall Ball, Seats, and Spout
Insert the ball into the valve body, aligning the slot with the nub. Press the seat and spring into place with the large end of the spring facing down. Grease the spout lip and O-ring groove. Install the new spout O-ring and slide the spout down. Place the cam over the ball stem, then screw on the cap.
Warning: Hand-tighten the cap first, then snug with a wrench. Over-tightening cracks plastic.
Reattach Handle and Final Test
Lubricate the ball stem threads. Slide the handle on and secure it with the hex key. Slowly restore water and check under the sink for leaks. Run full hot and cold cycles for one to two minutes to flush debris. Turn off and inspect for drips at the base and spout.
If leak persists: Recheck spring orientation and O-ring seating.
Find Correct Delta Parts
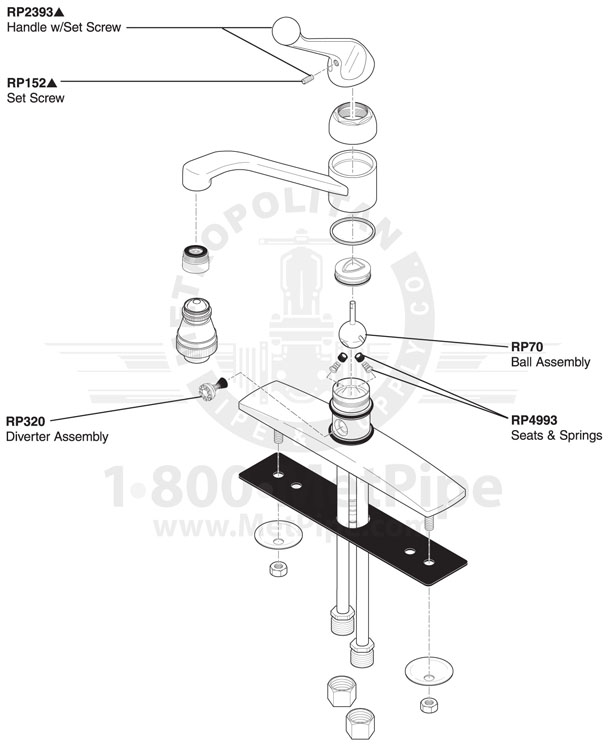
Using the wrong part causes early failure. Always verify before ordering to avoid wasted time and money.
Common Cartridge Part Numbers
For modern two-handle faucets (14-series), use RP49934. For older two-handle models, check compatibility with RP20961. Widespread bathroom faucets often use RP24094. Roman tub and high-flow models may require RP50582.
Single-Handle Repair Kits
The complete kit (RP25486) includes the ball, cam, seats, springs, and all O-rings. RP25513 is the ball assembly only. RP48875 covers spout O-ring replacement.
Find your model number: Check the underside of the spout or base. Use Delta’s online parts lookup for exact matches.
Use Delta’s Lifetime Warranty
You may qualify for free replacement parts. Delta’s warranty covers nearly all repair components at no cost.
Claim Free Repair Parts
Delta covers cartridges, O-rings, valve seats and springs, and finishes against corrosion. To request parts, call 1-800-345-DELTA (3358) or visit www.deltafaucet.com/support. Provide your model number and approximate purchase date.
Tip: Register your faucet online to speed up future claims.
Prevent Future Problems
Extend your repair’s life with simple maintenance performed regularly throughout the year.
Maintenance Best Practices
Clean the aerator every three to six months by soaking it in vinegar and scrubbing with a brush. Flush the valve body annually, especially in hard water areas. Lubricate all O-rings during every disassembly. Replace both cartridges at once, even if only one leaks, to prevent staggered failures. Take photos during teardown to help with reassembly.
Pro Tip: Over-tightening is the number one DIY mistake. Hand-tighten plus a quarter-turn is enough.
Troubleshoot After Repair
Fix common post-repair issues fast by understanding what causes them and how to address them.
No Water Flow
Check that shut-off valves are fully open. Inspect the cartridge or ball for debris that may block the inlet. Flush the lines by opening valves briefly with the faucet off.
Leaking at Handle Base
Replace the O-ring and apply silicone grease before installation. Ensure the cap is snug but not over-tightened.
Handle Stiff or Binding
Loosen the cap slightly because over-tightening compresses the O-rings. Lubricate the cartridge stem or ball with plumber’s grease.
Sputtering Water
Air in the lines requires running the faucet for one to two minutes to purge. A clogged aerator means removing it, soaking it, and cleaning it thoroughly.
Final test: Operate through the full temperature and flow range with no leaks and smooth action.
Real-World Repair Tips
Learning from thousands of successful fixes helps you avoid common pitfalls.
First-time repairs typically take forty-five to ninety minutes. Experienced DIYers usually complete the job in thirty to forty-five minutes. The success rate exceeds ninety percent when using genuine parts and proper lubrication.
The most common mistakes include installing springs upside down, forgetting to lubricate O-rings, and over-tightening the cap.
One user noted that after replacing just the O-ring, the drip came back in three weeks. They learned to swap the whole cartridge. Another recommended taking pictures at each step, which saved them when they forgot how the cam sat.
Frequently Asked Questions About Fixing Delta Faucets
How do I know if my Delta faucet needs a new cartridge?
A dripping spout when the faucet is off is the most common sign of a worn cartridge in two-handle faucets. You may also notice reduced water flow, handles that are hard to turn, or inconsistent water temperature.
Can I repair my Delta faucet myself, or do I need a plumber?
Most Delta faucet repairs are straightforward DIY jobs that take under an hour. With basic tools like hex keys, an adjustable wrench, and needle-nose pliers, homeowners can successfully fix leaks, replace cartridges, and restore proper operation.
Where can I find the model number for my Delta faucet?
The model number is typically located on the underside of the spout, on the base of the faucet, or on the original packaging. You can also use Delta’s online parts lookup tool by entering descriptions or checking your purchase documentation.
What tools do I need to fix a Delta faucet?
The essential tools include a 1/8-inch hex key (Allen wrench), adjustable wrench, needle-nose pliers, flathead screwdriver, and dental pick. You will also need silicone-based plumber’s grease, white vinegar for cleaning, and a small container for organizing small parts.
Does Delta offer free replacement parts?
Yes, Delta’s lifetime warranty covers all faucet components, including cartridges, O-rings, valve seats, springs, and finishes. Contact Delta at 1-800-345-DELTA or visit their support website to request free replacement parts.
How often should I perform maintenance on my Delta faucet?
Clean the aerator every three to six months. Flush the valve body annually, especially in hard water areas. Lubricate all O-rings during every disassembly, and schedule a professional maintenance check every one to two years.
Key Takeaways for Fixing Your Delta Faucet

A properly repaired Delta faucet can last decades when you use genuine parts and follow proper procedures. The key steps involve diagnosing the exact symptom, shutting off water supply before starting, replacing worn cartridges or ball assemblies entirely, and lubricating all O-rings with silicone-based plumber’s grease. Avoiding over-tightening and ensuring proper alignment prevents the most common post-repair leaks.
Delta’s lifetime warranty covers free replacement parts, so take advantage of this resource rather than spending money on aftermarket components. With the right tools, genuine parts, and this guide’s step-by-step procedures, you can eliminate leaks, restore smooth handle operation, and extend your faucet’s life for years without ever needing a plumber.







