
Is your Kohler faucet dripping steadily from the spout? You’re not alone. A constant drip is usually caused by a worn ceramic cartridge, especially in models like the Revival Series or R7216-4D. The good news: fixing a Kohler faucet is a DIY-friendly repair that takes under an hour and costs less than $30. With the right tools and part number, you can stop the leak, restore smooth operation, and avoid a plumber’s $150+ service call. This guide walks you through every step, from identifying the faulty side to testing your fix, using exact part numbers and proven techniques.
Find the Leak Source Before Repair
Drip Comes From Spout
If water drips from the spout when the faucet is off, the ceramic cartridge is failing. This is the most common cause of Kohler faucet leaks. The cartridge’s internal seals wear down over time, allowing water to pass through even when the handle is in the off position. Before you start the repair, confirm this is the issue by observing where the drip originates.
Isolate the Faulty Side
For two-handle models, you need to determine which cartridge is bad.
- Shut off the hot water valve under the sink.
- Watch the drip closely.
- If the drip stops, the hot cartridge is faulty.
- If it continues, repeat the test with the cold water valve.
Visual clue: Water pooling under the handle after removal is normal. Do not mistake it for a secondary leak.
Gather Tools and Parts for Kohler Faucet Repair
Essential Repair Tools
You will need specific tools to access and replace the cartridge without damaging your faucet.
• Adjustable wrench or crow’s-foot wrench
• Strap wrench to protect chrome finish
• Rubber-jawed pliers or towel-wrapped pliers
• 3/8-inch ratchet with crow’s-foot attachment
• Clean rag and white vinegar for buildup
Pro tip: Never use metal tools directly on finished surfaces. Always wrap tools or use non-marring alternatives.
Required Replacement Parts
• Ceramic cartridge specific to your model
• O-rings if not included with the cartridge
• White vinegar for cleaning mineral deposits
Critical: Buy by exact part number, not just model name. Cartridges are not universal.
Locate Model and Part Number for Correct Fit

Find the Model Stamp
Look under the sink at the water supply lines. Common models include R7216-4D, Revival Series, or similar alphanumeric codes. The stamp is often on the flex lines or the valve body itself.
User hack: Record a short video with your phone. Tight spaces make reading the stamp difficult, and video gives you a replay option.
Search Kohler’s Parts Site
- Go to Kohler faucet parts online.
- Enter your model number exactly as stamped.
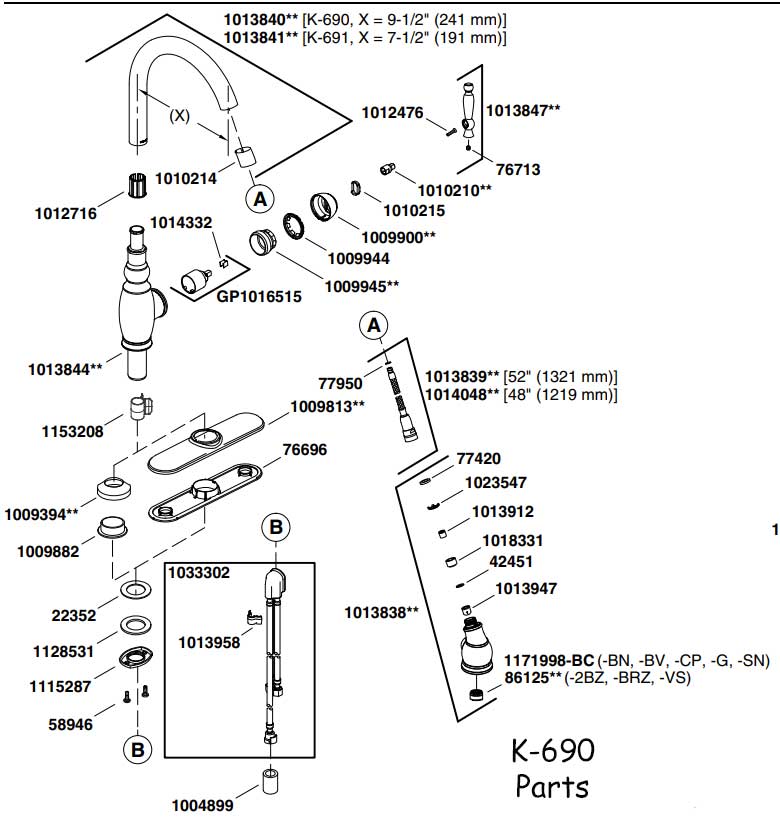
- Pull up the exploded diagram to verify part compatibility.
Match the Correct Cartridge
For R7216-4D hot side, the part number is GP1092204. For Revival single-handle cold side, use RGP 77006-RP. These are confirmed via official Kohler schematics.
Warning: Always verify through the official diagram. Wrong parts will not seal properly.
Replace Single-Handle Kohler Cartridge
Shut Off Water Supply
Close the under-sink shut-off valve for the affected side. If none exists, turn off the main water supply. Open the faucet to drain residual water and release pressure.
Time saver: Work with the sink empty. This prevents water splashing and gives you better visibility.
Remove the Handle
Use a strap wrench to turn the handle counter-clockwise. If stuck, apply pliers only to the rubber part of the strap, never to the finish. Lift the handle straight off once loose.
Note: All tested Kohler handles unscrew lefty-loosey. This is consistent across models.
Extract the Old Cartridge
The cartridge is visible once the handle is removed. Secure the valve body from below by gripping the flat sides of the nut with a wrench. Use a crow’s-foot wrench on top to unscrew the cartridge. Have a helper hold the nut if access is tight.
Avoid: Do not grip the supply line threads. This can crack the valve body and cause major leaks.
Install New Cartridge
Remove the plastic seal from the new cartridge before insertion. Insert it straight down until fully seated. The O-ring compresses to create a watertight seal. Wipe the area dry before reassembly.
Upgrade tip: RGP 77006-RP has a wider sealing surface, which reduces future leak risk.
Fix Two-Handle Kohler Faucet Leaks
Shut Off One Side First
Close the hot or cold valve under the sink, depending on which side is leaking. Open the faucet to release pressure before disassembly.
Test first: Confirm which side drips before taking apart both handles.
Remove the Handle Base
Wrap the base with a towel to protect the finish. Use wrapped pliers to turn the base counter-clockwise. Remove the base cap to expose the retaining nut.
Stuck handle: Apply steady pressure. Do not jerk or force it, which can crack the base.
Clean Mineral Buildup
Wipe the housing with a clean rag. If corrosion is severe, soak parts in white vinegar for 10 to 15 minutes. Rinse thoroughly and dry before reassembly.
Prevention: Clean annually to extend cartridge life and maintain smooth operation.
Pull and Replace Cartridge
Remove the retaining nut with pliers. Pull the old cartridge straight out without twisting. Insert the new cartridge fully, then reinstall the nut. Tighten until snug, not tight.
Danger zone: Over-tightening cracks ceramic cartridges. Stop at resistance.
Reattach Handle Correctly
Reinstall the base with the handle in the on position. This ensures proper alignment with the valve. Return the handle to the off position. It should move smoothly without grinding.
Check: Verify no resistance or grinding before restoring water supply.
Avoid Common DIY Mistakes
Do Not Rotate the Valve Body
When removing the cartridge, the valve body can spin. Use a wrench from below to lock the flat sides in place.
Pro move: Have a helper stabilize the nut while you turn the cartridge.
Never Over-Tighten
Tighten until snug, then stop. Excessive force cracks cartridges and strips threads.
Test fit: If it leaks after tightening, the cartridge is not seated properly, not under-tightened.
Protect the Finish
Always use towels, rubber tools, or plastic wraps on chrome and brushed nickel. Scratches are irreversible and costly.
Costly error: A scratched handle can require a $200 faucet replacement.
Use the Right Wrench
A crow’s-foot wrench fits where standard wrenches cannot. It provides better access in tight under-sink spaces.
DIY hack: Pair with a 3/8-inch ratchet for improved leverage and control.
Test the Repair Thoroughly
Restore Water Supply
Slowly open the shut-off valve. Watch for leaks at the base, spout, and all connections.
Red flag: Immediate spray indicates a misaligned seal.
Purge Air From Lines
Run water for 15 to 30 seconds. Sputtering is normal as air escapes from the lines.
Cycle the Faucet
Turn the faucet on and off 5 to 10 times. Check for smooth handle motion, full water flow, and no drip when off.
Final Leak Check
Wipe all joints dry. Wait 5 to 10 minutes. Look for beads of water, slow seepage, or drips from the spout.
Pass standard: Zero leaks after 10 minutes means the repair is successful.
Know the Right Kohler Faucet Part Numbers
| Faucet Type | Cartridge Part Number | Notes |
|---|---|---|
| Revival Series cold side | RGP 77006-RP | Wider seal, better durability |
| R7216-4D hot side | GP1092204 | Confirmed via Kohler schematic |
| General two-handle | Model-specific | Always verify online |
Rule: Never guess part numbers. Search by exact model and side.
Real DIY Repair Insights
Repair Time: 30 to 60 Minutes
First-time repairs take closer to 60 minutes. With proper tools and good access, experienced DIYers complete the job in 30 minutes.
Lighting tip: Use a headlamp for hands-free visibility under the sink.
Success Rate: Near 100 Percent
Using the correct cartridge and avoiding over-tightening virtually guarantees success. Most users report the drip stops completely after replacement.
User quote: “Fixed the leak perfectly. Faucet feels like new.”
Save $100 Plus With DIY
Cartridge cost runs $15 to $30. Professional plumbers charge $100 to $200. One DIY repair pays for itself many times over.
Extend Your Kohler Faucet Life
Cartridge Lifespan: 5 to 10 Years
Lifespan depends on water hardness and usage frequency. Replace at the first sign of drip to prevent water waste and further damage.
Annual Maintenance
Remove and clean the aerator monthly. Wipe the cartridge area with a vinegar-soaked rag periodically. Inspect O-rings for cracks or wear.
Pro tip: Label shut-off valves hot and cold for faster diagnosis during future repairs.
Warranty Facts
Kohler offers limited lifetime warranties on faucets. Cartridges are wear items and not covered, but defect-free parts are warrantied. Keep receipts for part purchases.
Final Fix Checklist for Kohler Faucet Repair
When all boxes are checked, your Kohler faucet should operate silently, smoothly, and leak-free.
• Shut off water supply before starting
• Identified the correct leaking side
• Used exact part number for your model
• Protected finish during removal
• Secured valve body during install
• Did not over-tighten the cartridge
• Tested for 10 plus minutes post-repair
This repair is not just about stopping a drip. It saves water, money, and avoids unnecessary faucet replacements. With the right approach, your Kohler faucet can last decades.
Next step: Bookmark this guide or save your model and part numbers in your phone for the next time you need to fix Kohler faucet leaks.
Frequently Asked Questions About Fixing Kohler Faucets
Why does my Kohler faucet drip even when turned off?
A drip from the spout when the faucet is off indicates a worn ceramic cartridge. The internal seals degrade over time, allowing water to pass through. Replacing the cartridge stops the leak.
How do I find the model number on my Kohler faucet?
Look under the sink on the water supply lines. The model number is stamped on the flex lines or valve body. Take a video with your phone since lighting is poor in that space.
Can I replace just the cartridge or do I need a whole new faucet?
In most cases, replacing the ceramic cartridge fixes the leak completely. Cartridges cost $15 to $30, while full faucet replacement runs $100 or more. Cartridge replacement is the first and most effective solution.
What tools do I need to fix a leaking Kohler faucet?
You need an adjustable wrench or crow’s-foot wrench, a strap wrench to protect the finish, rubber-jawed pliers, a 3/8-inch ratchet, and clean rags. A headlamp helps with visibility under the sink.
How long does a Kohler faucet cartridge last?
Ceramic cartridges typically last 5 to 10 years, depending on water hardness and how often the faucet is used. Annual cleaning and maintenance can extend this lifespan.
Is it worth fixing a Kohler faucet myself?
Yes. DIY repair costs $15 to $30 for parts and takes 30 to 60 minutes. Professional plumbers charge $100 to $200 for the same job. The savings justify the simple repair.
Key Takeaways for Fixing Your Kohler Faucet
Fixing a leaking Kohler faucet centers on identifying the faulty cartridge, sourcing the exact part number, and performing a careful replacement. The process requires basic tools, attention to finish protection, and patience to avoid over-tightening. Single-handle and two-handle models follow similar steps, with the main difference being handle removal and the number of cartridges involved. Testing thoroughly after reassembly confirms success. With proper maintenance, your repaired Kohler faucet will deliver years of leak-free operation.







