
That persistent drip under your bathroom sink is more than a nuisance. It can waste hundreds of gallons of water per year, fuel mold growth in your vanity, and quietly rot the cabinet floor. The encouraging reality? Nearly every bathroom sink leak comes from one of four predictable spots, and you can fix all of them with basic tools and a few dollars in parts.
This guide walks you through diagnosing the leak, applying the correct fix, and stopping the drip for good. You will learn what tools to gather, which sealants actually work, and how to avoid the over-tightening mistakes that cause most DIY repair failures. Most repairs take under an hour.
Pinpoint the Leak Source Before Touching a Wrench
Guesswork leads to wasted parts and repeat repairs. Spend ten minutes identifying the exact leak location, and the rest of the job becomes straightforward.
Inspect the Four High-Risk Areas
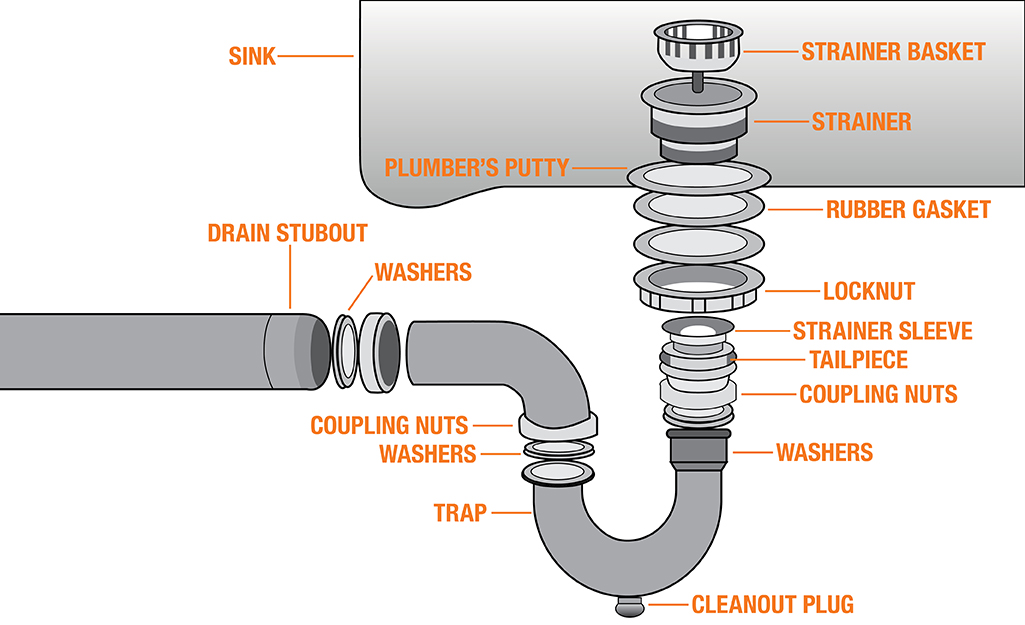
Leaks in bathroom sinks originate in four zones: the pop-up drain flange, the faucet handle and valve, the supply lines under the sink, and the P-trap. Wipe everything dry, then run the water while watching closely.
- Drain flange area: Water pooling at the sink bottom edge or seeping around the drain opening
- Faucet handle and spout: Moisture behind the handle or drips from the spout when the faucet is off
- Supply lines and shutoff valves: Dampness along the hoses or at the connection nuts
- P-trap: Water collecting at the curved pipe or dripping from the slip nuts
Match Symptoms to Likely Causes
| Symptom | Likely Source |
|---|---|
| Drip from back of handle | Worn O-ring on valve stem |
| Slow drip from spout | Corroded valve seat |
| Water under P-trap | Worn gaskets or loose slip nuts |
| Damp supply hose | Hose failure or loose fitting |
| Leak around drain flange | Failed sealant or loose lock nut |
Turn off both shutoff valves under the sink and open the faucet to release pressure before you start any inspection or disassembly.
Fix a Leaking Pop-Up Drain Assembly
The pop-up drain is the most common leak location, especially on plastic Glacier Bay and similar budget assemblies. You rarely need to replace the whole unit; resealing with the right materials stops the leak for years.
Remove the Old Drain and Clean All Surfaces
- Loosen the lock nut under the sink holding the pop-up assembly.
- Disconnect the lift rod from the pivot ball and clip.
- Pull out the stopper and pivot rod together.
- Scrub the flange, washer, and nut with a rag to remove old putty, mineral buildup, and debris.
Set parts on a clean towel and inspect each one. Replace any cracked, brittle, or flattened washer or gasket.
Apply Silicone Instead of Plumber’s Putty
Skip the plumber’s putty on plastic drains. It dries rigid, cracks, and fails within a couple of years. Use 100% silicone caulk instead. It stays flexible through the natural movement of plastic, resists mold, and lasts up to ten years.
Pro Tip: Choose a mold-resistant, waterproof silicone labeled for kitchen and bath use.
- Wrap 2 to 3 layers of Teflon tape clockwise around the drain pipe threads.
- Apply a continuous bead of silicone where the top nut meets the sink.
- Apply a second bead around the bottom washer on the underside of the flange.
Reinstall and Verify the Seal
- Insert the flange into the sink drain hole.
- Thread the top nut on and hand-tighten.
- Snug with channel locks, but stop immediately if you feel resistance; plastic threads strip easily.
- A uniform bead of silicone should squeeze out all the way around the connection, confirming a complete seal.
- Wipe excess silicone with a damp paper towel before it skins over.
- Reconnect the lift rod and clip.
Let the silicone cure for at least 30 minutes before running water. Then run water for 10 minutes and check underneath for any sign of seepage.
Repair a Dripping Faucet Handle
A leak behind the handle almost always traces to a worn O-ring on the valve stem. This repair takes about 20 minutes and costs less than $4 in parts.
Shut Off Water and Access the Valve Stem
- Close both supply valves under the sink (turn clockwise).
- Open the faucet to drain residual water.
- Remove the handle. On Delta faucets, twist off the decorative cap or loosen the set screw with an Allen wrench. On other models, pry off the cap and remove the mounting screw.
Replace the O-Ring and Inspect the Valve Seat
- Unscrew the valve stem nut with an adjustable wrench.
- Pull out the valve stem using pliers if it sticks.
- Pry the old O-ring out of its groove with a small screwdriver.
- Roll a matching new O-ring into the groove.
- Apply a thin layer of waterproof valve grease to the O-ring and stem. This step is non-negotiable; dry O-rings tear and fail quickly.
Now check the valve seat inside the faucet body. Remove the old seat and spring with a screwdriver. The wider end of the spring goes in first, tapered side up. Clean the cavity with a paper towel. If the seat is pitted or corroded, replace it. Grease the seat top before reinstalling.
Reassemble and Test
- Apply grease to the bottom of the stem and align its notches with the slots in the faucet body.
- Push the stem in and ensure smooth up and down motion.
- Thread the nut on counterclockwise first to avoid cross-threading, then snug it clockwise.
- Reattach the handle and tighten the set screw just until snug.
Open the supply valves slowly and check for leaks. If the drip continues, swap the entire valve stem. Take the old one to the hardware store to get an exact match.
Replace a Leaking Supply Hose
Rubber supply hoses degrade over time, especially on the hot water side. Replace any hose that feels damp, shows rust, or bulges under pressure.
Disconnect the Old Hose
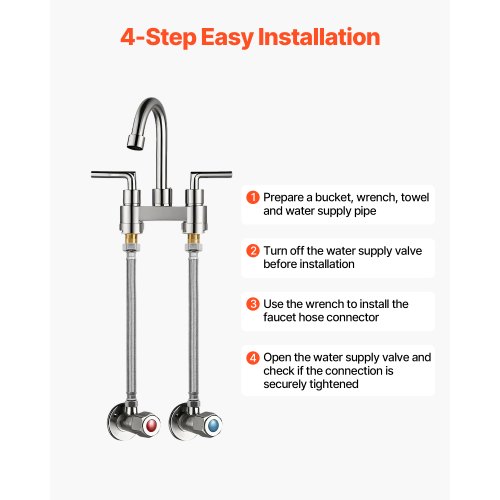
- Shut off the supply valves and drain the lines.
- Place a bucket under the connections.
- Loosen the nut at the faucet end first, holding the faucet body steady with a second wrench to avoid stressing the plumbing.
- Disconnect the shutoff valve end by hand once loose.
Bring the old hose to the hardware store. Match the length, diameter, and end fittings exactly.
Install the New Hose
- Attach the larger male-threaded end to the faucet first. Hand-tighten, then give a quarter-turn with the wrench.
- Connect the other end to the shutoff valve using the same hand-tight plus quarter-turn method.
Avoid the temptation to crank down harder. Over-tightening flattens the rubber washer and actually creates leaks.
Test Thoroughly for Delayed Leaks
- Open the shutoff valve slowly with the faucet running to purge air.
- Close the faucet and fully open the valve.
- Check both ends for drips immediately, then again after 1 to 2 hours.
A leak that appears hours later usually points to a poorly seated washer or a connection that needs one more eighth of a turn.
Fix a Leaking P-Trap
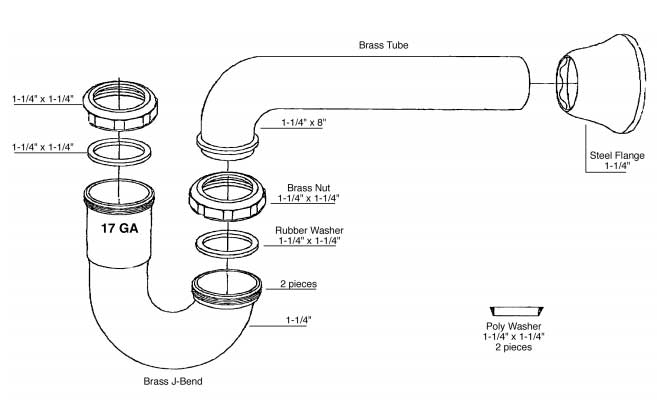
The P-trap’s curved pipe holds a water seal that blocks sewer gas. When its rubber gaskets wear out, water drips from the slip nuts. This is one of the easiest and cheapest bathroom sink leak repairs.
Remove the Trap and Replace the Gaskets
- Place a bucket under the trap to catch residual water.
- Loosen both slip nuts with a wrench and remove the P-trap.
- Inspect the rubber gaskets inside each nut. Replace any that are cracked, flattened, or deformed.
- Check the trap body for hairline cracks. If you find any, replace the entire trap assembly (kits cost under $15).
Reinstall with Proper Torque
- Slide new gaskets into both slip nuts.
- Reconnect the trap and hand-tighten both nuts.
- Give each nut a quarter-turn with the wrench for proper seating.
Over-tightening cracks plastic fittings and creates the very leak you are trying to fix.
Test the Drain
Run water for several minutes and watch all joints. If a connection still drips, tighten just that nut another eighth of a turn and retest.
Know When to Replace the Whole Faucet
Sometimes the faucet itself is the problem. Repairs will not save a fixture with internal corrosion or a damaged cartridge.
Replace the faucet if you notice:
– A persistent leak at the base after replacing O-rings and seats
– Cracks or corrosion on the faucet body
– A cartridge that will not seat even after replacement
– Multiple components failing at the same time
While you have the supply lines off, upgrade the hoses to stainless steel braided versions and replace old quarter-turn valves if yours are stuck or stiff. These upgrades prevent the next leak before it starts.
Stop the Next Leak Before It Starts
A repair is only as good as the maintenance that follows it. Build these habits into your routine.
Monthly Quick Checks
- Run a dry paper towel under each connection and look for moisture.
- Inspect hoses for bulges, rust spots, or stiffness.
- Cycle the shutoff valves on and off to confirm they still close fully.
Annual Maintenance Tasks
- Replace O-rings proactively every few years, not just when they fail.
- Clean mineral buildup off valve stems with steel wool or a calcium remover.
- Reapply silicone to drain seals every 5 to 7 years.
Smart Upgrades for Long-Term Reliability
- Switch rubber supply hoses to stainless steel braided versions rated for 10+ years.
- Use 100% silicone on all plastic drain assemblies instead of plumber’s putty.
- Choose repairable faucet designs (Delta is a strong example) so future fixes take minutes, not hours.
Frequently Asked Questions About Bathroom Sink Leaks
What is the most common cause of a bathroom sink leak?
A worn O-ring on the faucet valve stem is the single most frequent cause, accounting for the majority of leaks from the handle or spout. Under the sink, worn P-trap gaskets and degraded rubber supply hoses are the leading culprits.
Can I use plumber’s putty on a plastic bathroom sink drain?
No. Plumber’s putty dries rigid and cracks as plastic components flex with temperature changes and use. Use 100% silicone caulk on plastic drains instead. It remains flexible, resists mold, and can last up to ten years.
How do I tell if the leak is from the faucet or the drain?
Dry everything under the sink and around the drain, then run only the faucet for a minute without filling the basin. If water appears at the supply lines, P-trap, or shutoff valves, the leak is in those areas. If water shows around the drain flange while the basin is full, the drain seal is the problem.
How tight should supply line nuts be?
Hand-tight plus a quarter-turn with a wrench. The rubber washer inside the nut does the sealing, not the torque. Over-tightening compresses the washer unevenly and actually causes leaks.
How long does silicone take to cure before I can use the sink?
Silicone is water-ready in 30 minutes for most products, which means light use is safe. Full cure takes 24 hours. Avoid twisting or stressing the joint during that window for the best long-term seal.
When should I call a plumber instead of fixing it myself?
Call a licensed plumber if the leak continues after replacing the obvious components, if you see water damage spreading in the cabinet or wall, if the shutoff valves will not close, or if the leak involves pipes inside the wall. These situations involve either structural risk or work that may require a permit.
Final Thoughts on Fixing Your Bathroom Sink Leak
A dripping bathroom sink is one of the most satisfying home repairs because the fix is immediate, the parts are cheap, and the water savings add up fast. Focus on the four leak zones (drain flange, handle, supply lines, and P-trap), diagnose with a dry paper towel rather than guesswork, and reach for 100% silicone over plumber’s putty on any plastic assembly. Remember the cardinal rule: hand-tight plus a quarter-turn is almost always correct, and more force causes more leaks than it prevents.
Your next step: Grab a flashlight, a dry paper towel, and five minutes. Find the exact leak location before you buy any parts, and the repair will take less time than the trip to the hardware store.







