
Stainless steel faucets bring a sleek, modern look to kitchens and bathrooms, but they show fingerprints, water spots, and limescale all too easily. If you have ever wiped your faucet only to see streaks and smudges reappear minutes later, you are not alone. The good news is that with the right techniques, cleaning a stainless steel faucet does not have to be frustrating or time-consuming. This guide reveals how to clean stainless steel faucets effectively, removing grime, restoring shine, and preventing future buildup using simple tools and household supplies.
Whether you are battling hard water stains or just want to keep your fixture looking new, you will learn step-by-step methods that protect the finish while delivering professional results. From daily maintenance to tackling stubborn limescale, these techniques work for any kitchen or bathroom faucet.
Daily Cleaning Routine
For most households, a quick daily wipe keeps fingerprints and light smudges under control. Consistent maintenance prevents buildup and reduces the need for deep cleaning.
Wipe With the Grain
Always clean in the direction of the grain, which are the faint parallel lines on the metal surface. Wiping across or in circles creates visible swirls and dulls the finish over time. Use a soft microfiber cloth dampened with warm water and a drop of mild dish soap. Gently wipe the entire faucet, focusing on high-touch areas like handles.
Rinse and Dry Immediately
After wiping, rinse with clean water to remove soap residue, then dry thoroughly with a second microfiber cloth. Skipping the dry step invites water spots, especially in hard water areas. A quick buff enhances shine and repels future smudges.
Pro Tip: Keep a dedicated microfiber towel near the sink for post-use touch-ups. Just 10 seconds a day can maintain a spotless look.
Remove Hard Water Stains

Mineral deposits from hard water leave chalky white spots around spouts and bases. These are not just unsightly; they can erode the finish if left untreated.
Apply Vinegar Solution
Mix equal parts white vinegar and water in a spray bottle. Spray directly onto affected areas. For heavy buildup, soak a paper towel in undiluted vinegar and press it over the spot for 5 to 15 minutes. Never leave vinegar on longer than 30 minutes because prolonged acid exposure may etch the surface.
Scrub Gently With a Toothbrush
Use a soft-bristled toothbrush to loosen deposits in crevices. Focus on the base, aerator, and joints where water collects. Avoid abrasive pads because they scratch and trap minerals.
Rinse and Dry
Flush with clean water, then dry completely. Check for lingering haze. If spots remain, repeat the process or try a baking soda paste next.
Warning: Do not use vinegar on faucets with brass or copper accents because acid can damage those finishes.
Eliminate Grease and Grime Buildup
Kitchen faucets often accumulate cooking oils and sticky residues that attract dust and grime.
Use Dish Soap for Light Grease
Dampen a microfiber cloth with warm, soapy water. Wipe all surfaces with the grain. Pay extra attention to the handle and spout base where oils collect.
Tackle Stubborn Residue With Baking Soda
For baked-on grime, make a paste of baking soda and water. Apply with a cloth or soft brush, gently rub in the direction of the grain, then rinse. Baking soda lifts grease without scratching and neutralizes odors, which is ideal after handling fish or strong spices.
Avoid Harsh Degreasers
Oven cleaners or industrial solvents can strip protective coatings. Stick to mild, non-abrasive options to preserve the faucet is integrity.
Clean Around the Base and Seams
Dirt and moisture hide where the faucet meets the sink, leading to mold, staining, or corrosion.
Use Cotton Swabs and Toothbrushes
Dip a cotton swab or soft toothbrush in vinegar or baking soda paste. Carefully clean around the base, under the handle, and along seams. Let the solution sit for 2 to 3 minutes to break down buildup.
Dry Thoroughly
After cleaning, use a dry cloth or folded paper towel to absorb trapped moisture. Leaving dampness in crevices invites mildew and mineral staining.
Visual Cue: Look for dark rings or discoloration around the base because these signal trapped grime or water exposure.
Fix Dull Finish and Restore Shine
Even well-maintained faucets can lose their luster due to soap scum, hard water, or improper drying.
Buff With a Microfiber Cloth
After cleaning, buff the surface using circular motions or with the grain. A dry, clean microfiber generates light friction that brings back shine.
Apply Stainless Steel Polish
For deeper restoration, use a commercial stainless steel polish or wax. Apply a small amount to a cloth and rub evenly. These products add a protective layer that resists fingerprints and water spots.
Try Olive Oil for a Natural Shine
Buff a tiny drop of olive or mineral oil onto the surface with a microfiber cloth. It enhances gloss and repels water. Do not overapply; wipe off any greasy feel.
Expert Note: Oil treatments work best on brushed or matte finishes, which tend to show spots more than polished ones.
Handle Limescale in the Aerator
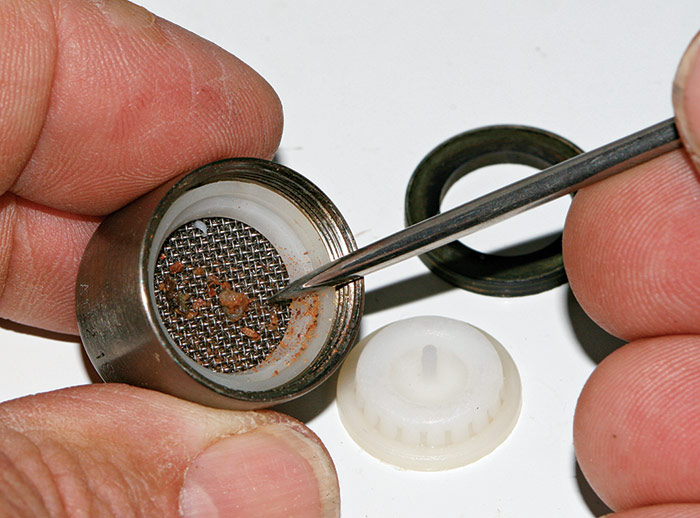
Reduced water flow usually means mineral buildup in the aerator, which is the small screen at the faucet tip.
Unscrew and Disassemble
Use your hands to unscrew the aerator. If it is tight, wrap pliers in a cloth to avoid scratching. Remove all internal parts, including mesh screens, rubber rings, and plastic housing.
Soak in Vinegar
Place components in a bowl of 50/50 vinegar-water solution for 30 minutes. For severe buildup, use undiluted vinegar. Agitate gently, then scrub with a toothbrush.
Reassemble and Reattach
Rinse all parts thoroughly under running water. Reassemble carefully and screw back onto the faucet. Test water flow because pressure should return to normal.
Maintenance Tip: Clean the aerator every 3 to 6 months, more often if you have hard water.
Remove Rust and Discoloration
True rust on stainless steel is rare, but reddish spots do appear.
Identify the Cause
Most rust is actually iron contamination from steel wool or high-iron water. Rainbow-like hues may result from heat or chemical residue.
Treat With Baking Soda or Oxalic Acid
For minor spots, apply baking soda paste and gently scrub. If that fails, use an oxalic acid-based cleaner while wearing gloves. Rinse immediately and dry.
Prevent Future Stains
Never use steel wool or abrasive pads. Rinse the faucet after cleaning to remove any metallic particles.
Note: If discoloration persists, test a specialized stainless steel cleaner on a hidden area first.
Choose the Right Cleaning Supplies
Using proper tools ensures effective cleaning without damage.
Best Cloths and Tools
• Microfiber cloths: Ideal for wiping, polishing, and drying. Reusable and lint-free.
• Soft toothbrush: Perfect for tight spots.
• Cotton swabs: Great for precision cleaning.
Myth Busting: You do not need a stainless steel cloth. Any clean, soft microfiber works. Just avoid cross-contamination with harsh chemicals.
Safe Cleaning Agents
• White vinegar: Best for limescale.
• Baking soda: Gentle abrasive for grime.
• Mild dish soap: Daily cleaning.
• Lemon juice: Alternative to vinegar for light stains.
Commercial Cleaners That Work
• Simple Green (diluted 1:10): Effective and eco-friendly.
• Branch Basics: Non-toxic and safe for stainless steel.
• Stainless steel polishes: Add protection and shine.
Avoid: Bleach, ammonia, chlorine, and abrasive pads because they damage the finish.
Prevent Common Cleaning Mistakes
Even small errors can dull or scratch your faucet.
Never Use Steel Wool
It scratches the surface and leaves behind iron particles that rust over time.
Skip the Ammonia-Based Cleaners
Window sprays like Windex contain ammonia, which causes streaking and degrades the finish with repeated use.
Do Not Leave Wet Rags on the Faucet
Moisture sitting on the surface leads to water spots and finish erosion.
Avoid Harsh Acids
Hydrochloric or phosphoric acid can corrode stainless steel. Stick to mild acids like vinegar or citric acid, and limit dwell time.
Golden Rule: When in doubt, test any cleaner on a hidden area first.
Compare Natural vs. Commercial Cleaners

Choosing between homemade and store-bought solutions depends on your needs.
Natural Cleaners: Pros and Cons
• Pros: Inexpensive, non-toxic, eco-friendly, effective for daily cleaning.
• Cons: Require mixing, no protective coating, less convenient.
Commercial Cleaners: Pros and Cons
• Pros: Ready to use, some offer water-repellent or anti-fingerprint layers.
• Cons: Higher cost, some contain chemicals to avoid like ammonia or bleach.
Best Practice: Use natural cleaners for routine care and commercial products when you need extra protection or speed.
Maintain Long-Term Brilliance
A few habits go a long way in preserving your faucet is appearance.
Wipe and Dry After Each Use
Make it a habit. A 10-second dry with a microfiber cloth prevents nearly all water spots and smudges.
Install a Water Softener
If you have hard water, a water softener reduces limescale, extends faucet life, and improves cleaning efficiency. Even a small under-sink filter helps.
Apply Protective Wax Occasionally
For high-traffic faucets, apply stainless steel wax every few months. It creates a barrier against fingerprints and minerals.
Pro Tip: Label one microfiber cloth for cleaning and another for polishing to avoid residue transfer.
Frequently Asked Questions About Cleaning Stainless Steel Faucets
How often should I clean my stainless steel faucet?
For daily care, wipe and dry after each use. Deep clean kitchen faucets weekly and bathroom faucets monthly since they see less use.
Can I use Windex on stainless steel?
No. Most window cleaners contain ammonia, which damages the finish and causes streaking over time. Use mild soap, vinegar, or a stainless steel-specific cleaner instead.
Does olive oil really work for polishing?
Yes. A tiny amount of olive or mineral oil buffed onto a clean, dry surface enhances shine and repels water. Use sparingly because excess oil attracts dust and feels greasy.
Why does my faucet look cloudy after cleaning?
Cloudiness usually means soap or mineral residue. Rinse thoroughly and dry with a clean microfiber cloth. If it persists, wipe with vinegar, then dry immediately.
What causes rainbow-colored streaks?
These are often heat-induced oxidation or leftover cleaner residue. Try baking soda paste first. If that fails, test a specialized stainless steel cleaner on a hidden spot.
Do I need special tools for brushed stainless steel?
No. The same soft cloths and gentle cleaners work. Just always wipe with the grain because brushed finishes show scratches and swirls more than polished ones.
Key Takeaways for Cleaning Stainless Steel Faucets
Cleaning a stainless steel faucet does not require expensive products or hours of effort. With consistent care, the right tools, and a few smart techniques, you can keep your fixture looking like new for years. Focus on wiping with the grain, drying after use, and addressing hard water early. Whether you prefer natural solutions like vinegar and baking soda or commercial aids, the key is gentle, regular maintenance. The best cleaning method is the one you will actually do, so start with a simple daily wipe and build from there.


