A slow-draining or leaking bathroom sink disrupts your daily routine and can cause water damage if left unchecked. Most homeowners can repair a bathroom sink drain in under an hour using basic tools and straightforward steps. This guide covers everything from removing a corroded drain to leak-testing a brand-new installation, so you can achieve a watertight seal without hiring a plumber.
You’ll learn which tools to gather, how to remove the old assembly, two reliable installation methods, and how to test your work. Whether you’re dealing with a stubborn corroded drain or upgrading to a modern finish, the process is approachable for beginners.
Gather Essential Tools and Materials
Having the right supplies on hand prevents mid-project trips to the hardware store.
Required Tools for Drain Repair
- Adjustable wrench or pliers – for loosening slip nuts and tailpiece connections
- Vice grips – essential for gripping and removing corroded or stuck drain components
- Bucket or towel – to catch residual water from the P-trap
- Putty knife – for scraping off old plumber’s putty and debris
- Screwdriver – if your drain has mounting hardware or linkage
- Dry cloth or brush – for final surface cleaning
Necessary Replacement Parts
- New drain assembly – includes tailpiece, P-trap, and overflow components matched to your sink
- Plumber’s putty – for sealing the drain flange (peel off the blue protective film before use)
- Replacement drain plug – optional, since you can reuse the old one temporarily
Pro Tip: Skip silicone or sealants unless the manufacturer specifies them. Plumber’s putty remains the preferred choice for flange sealing.
Prepare the Work Area Under the Sink
A clean, organized workspace saves time and reduces mess.
Identify Your Drain Type
Check the underside of your sink to determine whether you have a plunger-style, pop-up, or standard drain. This affects how the stopper connects and how you’ll remove it.
Set Up Water Containment
Place a bucket directly beneath the P-trap or spread a towel beneath the sink. Even a small amount of standing water can spill when you loosen connections.
Organize Parts as You Remove Them
Lay components in the order you take them apart. Snap a quick photo of the original setup for reference during reassembly.
Remove the Old Drain Assembly
Disconnection starts beneath the sink and works upward.
Disconnect the P-Trap
- Position your bucket underneath.
- Loosen the slip nuts on both ends of the P-trap using pliers or a wrench.
- Carefully remove the curved pipe and set it aside.
- Expect a small amount of water to drain out.
Visual Cue: If water backs up or smells musty, clean the P-trap before reusing it.
Remove the Drain Stopper Mechanism
- Plunger-style drains: Unscrew the retaining nut under the sink, then pull the rod and stopper out from above.
- Pop-up drains: Twist off the flapper from the top and discard it.
Loosen the Tailpiece Nut
Back off the nut connecting the tailpiece to the drain body. This frees the assembly for removal.
Extract the Corroded Drain Body
Use vice grips if the drain won’t budge. Hold the top flange steady with one hand and turn the lower section clockwise to loosen the threaded connection. Pull the entire unit down through the sink.
Warning: Apply penetrating oil if the drain is severely corroded. Never force it, as this can crack the sink.
Clean the Sink Drain Opening Thoroughly
A spotless surface ensures a watertight seal with the new drain.
Scrape Off Old Sealant
Use a putty knife to remove all remnants of old plumber’s putty, gaskets, and debris from the drain hole and surrounding area. Work on both the top and bottom surfaces.
Wipe Down the Area
Finish with a dry cloth or brush. The hole should be smooth and free of any leftover material that could prevent proper seating.
Expert Note: A clean, dry surface is non-negotiable for a lasting seal.
Install the New Drain Using Plumber’s Putty
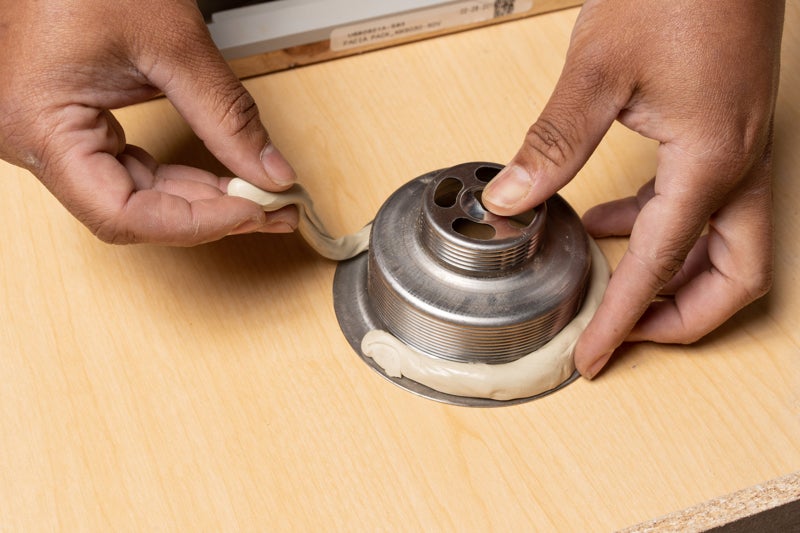
The traditional method works with most drain assemblies.
Apply Plumber’s Putty
- Roll a thick rope of putty about the thickness of a pencil.
- Apply it around the underside edge of the new drain flange.
- Peel off the blue protective film before use.
Critical Step: This creates the primary watertight seal. Do not skip it.
Insert and Secure the Drain Flange
- Push the flange up through the sink hole from below.
- Pull down gently to compress the putty.
- Thread the locknut onto the tailpiece and tighten by hand.
- Use a wrench for a final snug turn, but do not overtighten.
Remove Excess Putty
Wipe away any putty that squeezes out with a finger or putty knife. A clean finish prevents future buildup.
Install the New Drain Using a Pre-Installed Gasket

Many modern drains include a built-in rubber gasket, eliminating the need for putty.
Disassemble the New Drain Kit
- Unscrew the bottom cap.
- Identify the washer and gasket (go underneath) and the locknut and tailpiece (go above).
Install from the Top
- Drop the flange into the sink hole from above.
- From below, slide the gasket and washer onto the tailpiece.
- Thread the locknut on and tighten by hand only.
Critical Warning: Over-tightening can crack porcelain or strip threads.
Optional Hybrid Seal
For extra security, remove the gasket, apply a thin bead of putty, and reassemble.
Reconnect the P-Trap and Overflow
Rebuild the drainage system beneath the sink.
Attach the Tailpiece
Slide the new tailpiece into the drain body. Ensure it sits fully seated and aligned.
Connect the Overflow Tube
- Insert the plastic overflow nut into the side opening.
- Feed the long stem through the overflow tube.
- Push the tube fully into the drain body until it seals.
Check: The tube should sit flush with no gaps.
Reinstall the P-Trap
- Slide one end of the P-trap onto the tailpiece.
- Attach the other end to the wall drainpipe.
- Ensure the angled section faces downward.
- Hand-tighten slip nuts without using tools.
Alignment Tip: Don’t force misaligned pipes. Adjust the tailpiece length if needed.
Test for Leaks and Verify Performance

This final step confirms your work holds up under real conditions.
Run Water for the Leak Test
- Turn on the faucet and let water run for 3 to 5 minutes.
- Fill the sink to test the overflow function.
Inspect Key Areas
- Under the sink: Look for drips at the P-trap, tailpiece, and drain body.
- Drain flange: Check for seepage around the top edge.
- Overflow tube: Ensure no water leaks from the side connection.
- Stopper function: Confirm it opens and closes smoothly.
Fix Common Leaks
- Tighten the locknut slightly if the flange leaks, but don’t overdo it.
- Reapply putty if the seal failed.
- Re-seat the overflow tube if side leaks appear.
- Hand-tighten slip nuts if the P-trap drips.
Final Check: Dry all joints and re-inspect after 10 minutes of use.
Troubleshoot Common Drain Problems
Even careful installations can develop issues.
Drain Won’t Seal Properly
Old putty residue or insufficient new putty is usually the cause. Clean the surface and reapply a thick rope of fresh putty.
Overflow Is Leaking
The gasket may not be seated or the tube may not be fully inserted. Remove and reinsert the overflow tube, ensuring full contact.
P-Trap Misaligned or Backing Up
The angle may be incorrect or the connection may be cross-threaded. Rotate the P-trap so the downward bend faces the wall and realign the slip nuts.
Stopper Mechanism Stuck
The linkage may be misconnected or debris may be lodged in the pipe. Disconnect and reattach the rod, then flush the drain with hot water.
Corroded Drain Won’t Budge
Mineral buildup or rust is the likely culprit. Soak with penetrating oil, wait 15 minutes, and use vice grips with steady pressure.
Follow Pro Tips for Best Results
Avoid rookie mistakes with these expert-backed practices.
- Avoid overtightening. Hand-tight is enough for most connections.
- Use vice grips only for removal. Never use them to tighten.
- Reuse the old drain plug during the repair. It works fine temporarily.
- Work from below when possible for better visibility and control.
- Take photos before disassembly to save guesswork during reassembly.
Know the Time and Difficulty Level
How Long Will It Take?
- Experienced DIYer: 30 to 60 minutes
- First-timer: 60 to 90 minutes
- Severe corrosion: Up to 2 hours
Skill Level Required
This project is beginner-friendly with basic tools. No plumbing license or special training is needed. Most failures come from rushing, not from difficulty.
Cost Savings
- DIY cost: $20 to $40 for a drain kit and putty
- Plumber cost: $150 to $300 or more
- Savings: Over 80% by doing it yourself
Consider Upgrades and Alternatives
Turn a repair into a small bathroom refresh.
Upgrade to a Matte Black Finish
Modern matte black drains match contemporary fixtures and hide water spots better than chrome.
Choose the Right Drain Type
- Plunger-style: Reliable and easy to maintain
- Pop-up: Sleek look with linkage adjustment
- Standard: Simple design with no moving parts
Compare Sealant Options
| Method | Best For | Notes |
|---|---|---|
| Plumber’s putty | Drain flange | Preferred, reusable, non-hardening |
| Pre-installed gasket | Modern kits | No mess, just assemble |
| Silicone | Not recommended | Can harden and crack over time |
| Teflon tape | Threads only | Use only on minor thread damage |
Frequently Asked Questions About Bathroom Sink Drain Repair
How do I know if my bathroom sink drain needs to be replaced?
Persistent leaks, visible corrosion, slow drainage that doesn’t improve with cleaning, or a drain that won’t hold water are common signs. If you’ve already replaced the P-trap and the problem persists, the drain body itself likely needs replacement.
Can I repair a bathroom sink drain without removing the entire assembly?
Minor issues like a loose slip nut or worn gasket can often be fixed without full removal. However, if the drain body is corroded, cracked, or leaking from the flange, complete removal and replacement is the most reliable fix.
What is the difference between plumber’s putty and a rubber gasket?
Plumber’s putty is a traditional clay-like sealant that stays pliable and creates a watertight seal under compression. A rubber gasket comes pre-installed on many modern drains and provides a similar seal without the mess of putty. Both work well when applied correctly.
How long should plumber’s putty last before needing replacement?
Plumber’s putty can last for many years without hardening or cracking. However, if you ever remove the drain for maintenance, you should replace the putty with a fresh application rather than reusing the old ring.
Is it safe to use chemical drain cleaners in a newly repaired sink?
Avoid chemical drain cleaners after a repair. These products can corrode metal components and damage rubber gaskets. Instead, flush monthly with hot water and vinegar to keep the drain clear.
When should I call a plumber instead of doing it myself?
Call a professional if the sink itself is cracked, the drain hole is damaged, threads are stripped and won’t hold, or leaks persist after multiple repair attempts. These indicate problems beyond a standard DIY fix.
Key Takeaways for a Successful Bathroom Sink Drain Repair
Preparation makes the difference: gather tools, set up water containment, and identify your drain type before touching anything. A clean surface is essential for a watertight seal, so scrape away every trace of old putty and debris before installing the new flange. Choose the installation method that matches your drain, whether that’s traditional plumber’s putty or a pre-installed gasket, and remember that hand-tightening is almost always sufficient. Always finish with a thorough leak test by running water for several minutes and inspecting every connection point.
Your next step is simple: pick up a drain assembly and plumber’s putty from your local hardware store, set aside an afternoon, and follow this guide from start to finish. You’ll save money, gain a useful skill, and enjoy a leak-free bathroom for years to come.