
Tight space, awkward angles, and a stubborn nut that refuses to budge. If you’ve ever tried to replace a faucet under a sink, you know this frustration firsthand. Standard wrenches simply can’t fit behind the basin where supply lines and mounting nuts hide out. That’s exactly why a sink wrench (also called a basin wrench) exists.
This specialized tool is built for one purpose: reaching the unreachable. In this guide, you’ll learn how to pick the right model, identify its parts, use it safely, and handle tricky situations like rusted fittings or fragile plastic nuts.
Pick the Right Sink Wrench for the Job
Standard Basin Wrench vs. Socket-Style
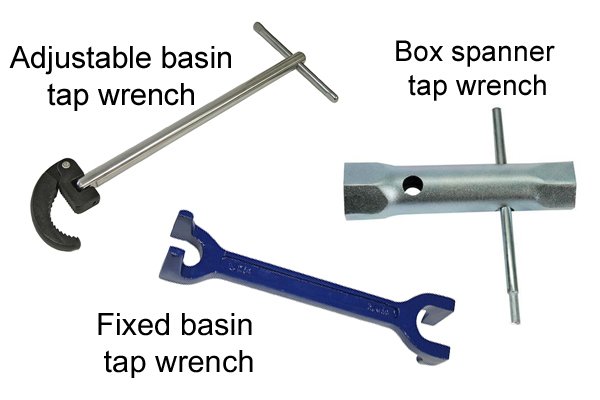
A classic basin wrench is an all-in-one tool with a long handle and a swiveling jaw. It costs around $20 or less, needs no extra parts, and works well for most faucet swaps. A socket-style attachment uses a ratchet and extension to deliver more torque, making it better for heavily corroded fittings. The socket-style option also grips plastic “ears” more evenly, reducing the risk of cracking.
When to Upgrade to the Ridgid Installer Tool
For serious DIYers, the Ridgid Faucet and Sink Installer Tool handles roughly 90% of under-sink tasks. It comes with interchangeable heads for faucet nuts, drain baskets, and shutoff valves. It’s heavier than budget models, but that extra weight means less flex and more torque when you need it most.
Understand the Wrench Design

How the Spring-Loaded Jaw Works
The head swivels to fit tight angles. One side tightens (marked “T”) and the other loosens (“L”). To test which is which, insert your finger: pushing into the hinge locks the grip, pushing away releases it. Label both sides with a permanent marker so you never guess while lying under the sink.
Key Features to Use Effectively
- Adjustable shaft: Extend or shorten to match your cabinet depth
- Square drive end: Attach an adjustable wrench here for extra torque
- Serrated jaws: Grip metal or plastic securely. Wrap sandpaper around slippery nuts for better friction
Loosen a Stubborn Nut Safely
Position the Jaws Correctly
Slide the wrench onto the nut so the round serrated side catches one corner while the flat side presses against the opposite flat edge. Angle the head so turning away from the hinge (counterclockwise) loosens the nut. For high-mounted fittings, extend the shaft fully before sliding it into place.
Turn Counterclockwise to Release
Apply steady pressure and rotate counterclockwise. If the nut resists:
- Add leverage by attaching an adjustable wrench to the square drive shaft
- Prevent slipping by wrapping folded sandpaper around the nut
- Break corrosion by spraying WD-40 the day before and letting it soak
Remove by Hand When Possible
Once the nut spins freely, unscrew it by hand. This avoids over-torquing and protects the threads. If it still sticks, tap it gently with a hammer or grip it with pliers wrapped in a cloth.
Tighten Without Damaging the Fitting

Flip the Wrench 180 Degrees
To tighten, rotate the tool so the “T” side now faces the nut. Keep the round jaw on one corner and the flat jaw on the opposite flat edge for even contact.
Turn Clockwise with Control
Rotate clockwise using firm but controlled pressure. Stop when the connection feels snug. Over-tightening plastic nuts can crack them and ruin seals, leading to leaks instead of preventing them.
Handle Corroded or Seized Nuts
Treat Rust Before You Start
Spray WD-40 (or any penetrating oil) on rusted nuts at least 24 hours before starting. Reapply right before use for maximum penetration.
Emergency Removal Options
If the nut still won’t budge, you have three choices:
- Remove the sink from the vanity for better access
- Cut the nut off using a hacksaw or a Dremel with a cutting wheel
- Protect nearby pipes with a metal shield to prevent accidental damage
Work Safely with Plastic Fittings
Avoid Cracking Plastic Nuts
Most modern faucets use plastic compression nuts meant for hand-tightening only. Wrench pressure can snap them instantly. If a tool is necessary:
- Use a socket-style wrench that grips the ears evenly
- Apply minimal pressure, just enough to seal the joint
- Finish by hand for safety
Choose the Right Tool for Plastic
The Ridgid tool’s dedicated socket adapter spreads pressure evenly across plastic fittings, making it the safest choice for fragile connections.
Master the Ridgid Installer Tool

Attach the Correct Adapter
The Ridgid kit includes several heads:
- Faucet nut adapter: Fits 3- or 4-tab mounting nuts
- Hex socket adapter: For shutoff valves and hex fasteners
- Strainer basket adapter: Works with 1-1/2″ and 2″ drain assemblies
- Supply line holder: Keeps the line steady while you tighten
Tighten Supply Lines the Right Way
- Hand-tighten the supply line onto the faucet first
- Insert the rubber washer and add optional thread sealant
- Use the supply line adapter for final tightening
- Turn on the water and check for drips
Free Stuck Shutoff Valves
Attach the adapter to the valve and use the long handle for maximum torque. If the valve is seized, apply penetrating oil first and insert a screwdriver into the adapter slot for extra leverage.
Prevent Common Mistakes
Don’t Over-Tighten Anything
Excess force causes real problems:
- Cracked plastic nuts
- Damaged rubber washers
- Stripped metal threads
- Leaks that need future repairs
Use just enough pressure to create a watertight seal, then stop.
Clean Threads Before Reassembly
Wipe away old debris, mineral buildup, and corrosion before installing new parts. Clean threads ensure a proper seal and prevent cross-threading.
Protect Your Body
Working under sinks strains your knees and back. Use a knee pad, position a small mirror for visibility, and take breaks when needed.
Extend the Life of Your Tool
Mark “T” and “L” Permanently
Label both sides of the jaw with a marker. You won’t have to fumble around trying to remember which direction tightens or loosens.
Keep Sandpaper Handy
A small piece of medium-grit sandpaper folded around a slippery nut gives the jaws instant traction. It takes seconds and saves frustration.
Store the Wrench Properly
Retract the shaft to its shortest length, wipe the jaws clean, and store in a dry place. This prevents rust, especially after working on corroded fittings.
Know When to Call a Professional
Some jobs go beyond any home toolkit:
- The nut is completely seized and won’t move at all
- You’ve cracked a fitting or caused a leak
- Water lines are brittle or visibly damaged
- You’re dealing with a specialty sink like a vessel or farmhouse style
A licensed plumber has specialized tools and experience to handle complex situations without water damage.
Frequently Asked Questions About Using a Sink Wrench
What is the difference between a sink wrench and a basin wrench?
They are the same tool. “Sink wrench” and “basin wrench” both refer to the long-handled, swiveling-jaw tool designed for reaching faucet and supply line fittings under sinks.
Can I use a sink wrench on plastic fittings?
Yes, but use extreme caution. Plastic compression nuts are designed for hand-tightening and can crack under tool pressure. A socket-style wrench or the Ridgid adapter is safer because it distributes pressure evenly.
How do I remove a nut that won’t budge?
Spray penetrating oil (like WD-40) and wait 24 hours. If it still won’t move, attach an adjustable wrench to the square drive for more torque, or cut the nut off with a hacksaw or Dremel.
Why does my sink wrench keep slipping?
The jaws may be worn, or the nut may be too smooth. Wrap medium-grit sandpaper around the nut before gripping. Also check that you’re using the correct side (“T” or “L”) for the direction you need to turn.
Is the Ridgid installer tool worth the extra cost?
If you do multiple plumbing repairs or want one tool for faucets, drains, and valves, yes. Its interchangeable adapters and heavy-duty build outperform generic models for frequent use.
Key Takeaways for Mastering Your Sink Wrench
A sink wrench is a small investment that solves one of plumbing’s biggest headaches: tight access. Choose the right style for your job, label the jaw sides, and always prep corroded fittings with penetrating oil. Work patiently, avoid over-tightening plastic parts, and know when to call a pro. With these habits, even a stubborn under-sink nut becomes a quick fix you can handle yourself.
Ready to tackle your next faucet replacement? Grab your basin wrench, label those jaws, and get started with confidence.







