
A leaky kitchen faucet isn’t just annoying. That steady drip-drip-drip can waste over 3,000 gallons of water per year and cost you $20 to $100+ on your water bill. The good news? Most leaks are easy to fix with basic tools and under $15 in parts. Whether your faucet drips when turned off, leaks at the base, or sprays unpredictably, this guide walks you through diagnosing and fixing it fast.
You’ll learn how to identify your faucet type, shut off water safely, replace worn components like cartridges or O-rings, and prevent future leaks. With clear steps and pro tips, you can stop the drip and restore quiet to your kitchen in under an hour for most repairs.
Stop the Drip: Why Fix a Leaky Faucet Now
Ignoring a small leak leads to big problems. Even a slow drip adds up fast in water waste and potential damage to your home. Fixing it early protects your wallet and prevents costly repairs down the line.
Save Water and Money
A faucet that drips once per second wastes more than 3,000 gallons annually. In hard water areas, mineral buildup accelerates wear on internal components. Repairing instead of replacing saves $35 to $185, since new faucets cost $40 to $200 while repair kits run just $5 to $15.
Prevent Hidden Damage
Moisture under the sink weakens cabinetry, corrodes supply lines, and encourages mold growth. A persistent leak may also signal failing shutoff valves, which could lead to flooding if ignored.
DIY Success Rate Exceeds 90%
Most faucet leaks are caused by one worn part like a cartridge, washer, or O-ring. Replace it correctly, and the leak stops. Over 90% of repairs succeed when you use the right part and follow proper steps.
Diagnose Your Leak: Where and When It Drips

Before disassembling anything, pinpoint where and when the leak occurs. This tells you what’s broken and what to replace.
Spout Drips When Faucet Is Off
This is the most common issue. It means the internal valve isn’t sealing properly. Likely causes include:
• Worn cartridge
• Degraded rubber washer
• Cracked ceramic disc
• Corroded valve seat
Quick test: If the drip stops only when you wiggle the handle, it’s likely a failing cartridge.
Leak at Base of Spout or Handle
Water pooling around the base points to failed O-rings or loose seals. These rubber rings wear out over time, especially with frequent use.
Fix tip: Replace all O-rings and lubricate with plumber’s grease. They’re cheap and often fail together.
Sprayer Hose or Spray Head Leaks
If water leaks from the spray nozzle when not in use, check for loose connections, inspect the hose for cracks or kinks, and replace sprayer O-rings or the entire assembly if needed.
Irregular Spray or Splashing
This isn’t always a leak. Often it’s a clogged aerator. Mineral deposits restrict flow, causing sputtering and splashback.
Solution: Unscrew and soak the aerator in vinegar overnight.
Leak Under Sink at Supply Lines
If water drips from pipes beneath the sink, the problem isn’t the faucet. It’s the supply hoses or shutoff valves. Persistent leaks here require immediate attention.
Identify Your Faucet Type for the Right Repair
:max_bytes(150000):strip_icc()/Types-of-faucets-1824889_color_rev_02-83ac08e1289d4e01b09216cd586fa7bc.jpg)
Each faucet uses different parts. Knowing your type ensures you buy the correct replacement.
Cartridge Faucet
Common in Delta, Moen, and American Standard models. Uses a plastic or brass cartridge to control water flow.
Symptoms: Smooth handle turn but drip continues unless wiggled
Key tool: 1.5 mm Allen wrench for set-screw
Common part: Delta RP50587 cartridge
Pro tip: Take a photo of the model number on the faucet base before buying parts.
Ceramic Disc Faucet
Found in high-end brands like Kohler and Grohe. Two ceramic discs slide to regulate water.
Symptoms: No handle resistance but drip persists
Fix: Replace entire disc module
Maintenance: Flush with vinegar in hard water areas
Ball-Type Faucet
Older Moen models use a rotating ball with internal seals.
Symptoms: Leaks at base, wobbly handle
Fix: Replace O-rings and ball mechanism
Lubrication: Use plumber’s grease on all seals
Compression Faucet
Pre-1990s design. Relies on rubber washers pressed against valve seats.
Symptoms: Must tighten handle hard to stop drip
Fix: Replace washer and inspect valve seat
Critical: A pitted seat will destroy new washers fast. Replace it too.
Gather Essential Tools and Replacement Parts
You don’t need a full toolbox. Just a few essentials get the job done.
Essential Tools
• Adjustable wrench
• Basin wrench for tight spaces
• 1.5 mm Allen wrench for set-screws
• Phillips and flathead screwdrivers
• Needle-nose pliers
• Flashlight
• Towel to protect sink finish
• Small container for screws
Replacement Parts You’ll Likely Need
• O-rings in various sizes
• Rubber washers matching shape and thickness
• Cartridge brand-specific
• Ceramic disc module
• Valve seat for compression faucets
• Aerator to clean or replace
Supplies That Help
White vinegar dissolves mineral buildup. Plumber’s grease lubricates O-rings. Teflon tape seals threaded joints.
Smart move: Bring old parts to the hardware store for exact matching.
Shut Off Water and Prepare Safely
Skipping prep risks flooding. Do this first, every time.
Turn Off Under-Sink Valves
Locate hot and cold shutoff valves under the sink. Turn them clockwise until tight.
If valves are stuck or missing, shut off the main water supply to the house.
Relieve Pressure
Open the faucet handles to drain remaining water and air from the lines. Let it run until flow stops.
Protect the Sink and Prevent Loss
Plug the drain to catch dropped screws. Place a towel in the basin to cushion falling parts. Keep a flashlight handy for visibility.
Remove and Inspect Key Components
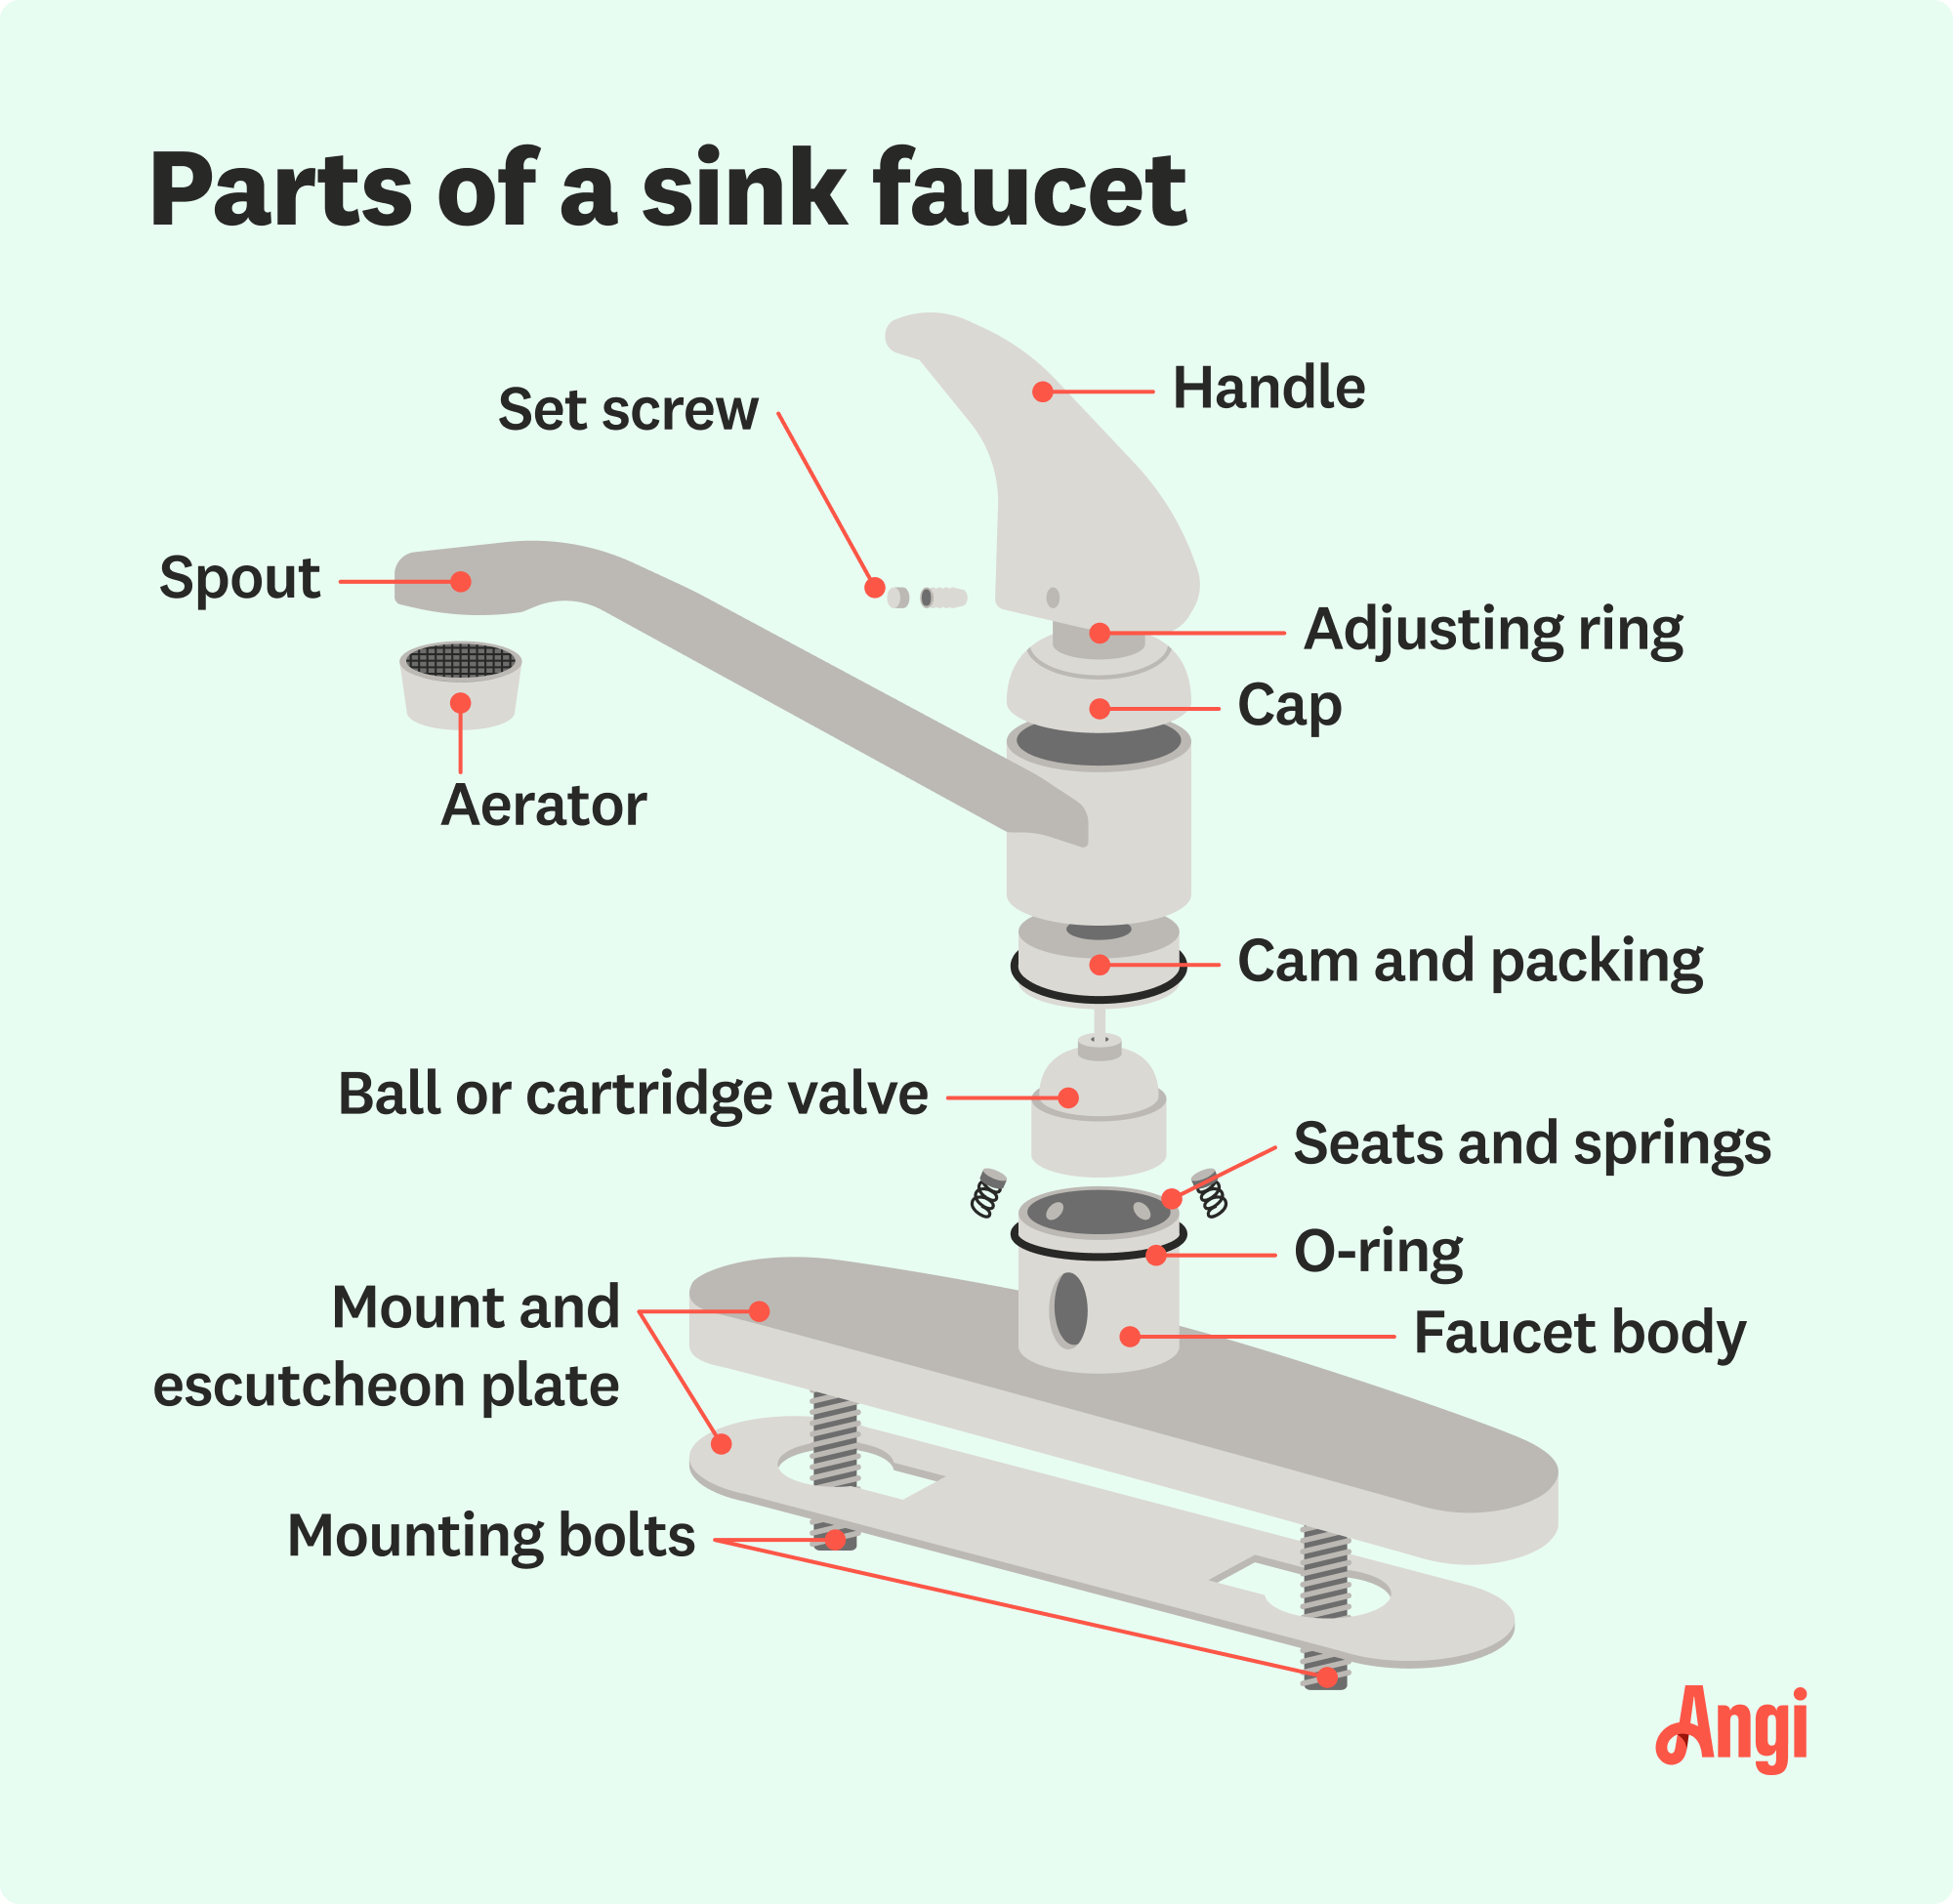
Start from the top, handle and aerator, then work down.
Unscrew and Clean the Aerator
The tip of the spout unscrews by hand or with pliers. Wrap in cloth to avoid scratches.
Disassemble into screen, flow restrictor, and washer. Soak in white vinegar overnight. Reassemble and reinstall.
Maintenance schedule: Clean every 3 to 6 months in hard water areas.
Remove the Handle
Pry off the decorative cap with a flathead screwdriver. Use a 1.5 mm Allen wrench to loosen the set-screw. Lift handle straight off.
Pro tip: Take photos during disassembly for reassembly guidance.
Fix Your Specific Faucet Type
Now replace the faulty part based on your faucet type.
Replace a Cartridge
Used in single and double-handle models like Delta and Moen.
Remove retaining nut with adjustable wrench. Pull out old cartridge, noting its orientation. Soak in vinegar for 30 to 60 minutes if clogged with minerals. Insert exact replacement, aligning tabs with slots. Press down firmly until seated. Reinstall retaining nut and handle.
Failure cause: Using the wrong cartridge model. Always match the number.
Hidden culprit: A failed sealing ring inside the handle can cause leaks even with a new cartridge. Inspect and replace if cracked.
Repair a Ceramic Disc Faucet
Smooth operation but persistent drip? Replace the disc module.
Remove handle. Unscrew cylinder assembly. Inspect ceramic discs for cracks or debris. Install new cylinder. Do not overtighten. Reassemble and test.
Prevention: Flush water lines after plumbing work to avoid grit damaging discs.
Fix a Ball-Type Faucet
Leaking at base or spout? Replace O-rings and ball.
Remove handle and cap. Lift out rotating ball. Replace all O-rings and lubricate with plumber’s grease. If ball is cracked or scored, replace it. Reassemble carefully.
Smooth operation tip: Lubrication prevents future leaks and eases handle movement.
Repair a Compression Faucet
Classic double-handle design. Replace washer and check valve seat.
Remove handle screw and lift off. Unscrew packing nut with adjustable wrench. Pull out valve stem. Remove brass screw and replace rubber washer with exact match. Replace stem O-ring if worn. Inspect valve seat. If pitted, use valve seat wrench to replace it. Reassemble.
Critical: A corroded valve seat will ruin new washers. Replace it too.
Reassemble and Test the Faucet
One wrong step can undo your work. Reassemble carefully.
Follow Reverse Order
Reinstall cartridge, handle, and set-screw. Snap cap back into place. Ensure all parts are seated fully.
Turn Water Back On Slowly
Open shutoff valves gradually to prevent water hammer.
Check for leaks at connections and base.
Test Full Operation
Turn on hot and cold. Verify complete shut-off. Check for smooth handle movement. Look for drips at spout and base.
Flush the System
Let water run for 2 to 5 minutes to clear debris.
Prevent clogs: This keeps particles from clogging the aerator.
Troubleshooting Common Problems After Repair
Fixed it but still leaking? Here’s what to check.
Leak Persists After Cartridge Replacement
Common causes include wrong cartridge model, misalignment during installation, debris in cartridge seat, failed internal sealing ring, or corroded faucet body.
Fix: Recheck alignment, verify part number, flush seat, and inspect seals.
Handle Feels Loose or Wobbly
Likely cause: Loose set-screw or worn ball mechanism.
Solution: Tighten set-screw or replace ball and O-rings.
Low Water Flow After Repair
Could be trapped debris in aerator.
Fix: Remove and clean aerator again.
When to Replace Instead of Repair
Repair works 90% of the time, but not always.
Replace if:
• Faucet body is cracked or corroded
• No parts available for your model
• Multiple repairs have failed
• Shutoff valves are leaking
• Visible water damage or mold under sink
• You want upgraded features like pull-down sprayer or touchless
Cost insight: A $150 faucet pays for itself in water savings and convenience over time.
Prevent Future Leaks
Keep your faucet leak-free with simple habits.
Avoid overtightening handles. This forces wear on washers and cartridges. Turn just until water stops.
Clean aerator every 3 to 6 months. This prevents clogs and reduces strain on internal parts.
Lubricate O-rings annually. Apply plumber’s grease during inspection.
Inspect under sink monthly. Look for moisture, drips, or corrosion.
Replace seals proactively. In high-use homes, swap washers and O-rings every 3 to 5 years.
Call a Plumber If
Don’t risk flooding. Call a pro when:
• Faucet body is cracked
• Shutoff valves won’t close
• Leak source is unclear
• Supply lines are damaged
• You’re unsure about turning off water
• Repairs keep failing
Safety first: Incorrect repairs can cause major water damage.
Key Takeaways for Fixing Your Leaky Kitchen Faucet
Fixing a leaky kitchen faucet is one of the easiest, most rewarding DIY tasks. With the right tools, a few dollars in parts, and this guide, you’ll stop the drip, save water, and avoid costly damage. Identify your faucet type first, then replace the worn component and test thoroughly. Most repairs take under an hour and pay for themselves in months. When in doubt, consult a licensed plumber, but for most leaks, you’ve got this.
Frequently Asked Questions About Fixing a Leaky Kitchen Faucet
How long does it take to fix a leaky kitchen faucet?
Most simple repairs like replacing a cartridge or O-ring take 30 minutes to an hour. Complex repairs involving multiple components may take 2 to 3 hours.
Why does my faucet drip even after I replace the cartridge?
This usually happens if the cartridge model is wrong, it’s misaligned during installation, debris is stuck in the seat, or the internal sealing ring inside the handle has failed. Recheck the part number and alignment.
Can I fix a leaky faucet without turning off the water?
No. You must shut off the water supply before starting any repair. This prevents flooding and allows you to work safely.
What is the most common cause of a leaky kitchen faucet?
The most common cause is a worn cartridge in single-handle faucets or a worn washer in compression faucets. Both are easy to replace with basic tools.
Should I repair or replace my kitchen faucet?
Repair if the faucet body is intact and parts are available. Replace if the body is cracked, the model is obsolete with no available parts, or you want upgraded features.
How much does it cost to fix a leaky kitchen faucet yourself?
DIY repair costs $10 to $30 for parts. Professional plumbers charge $150 to $300. A new faucet costs $40 to $200.







