
If your Grohe faucet isn’t switching between spray and stream, leaks from the handle, or drips along the pull-down hose, you’re not alone. Thousands of homeowners face these same issues, especially with popular models like the Grohe Bridgeford, Eurosmart, and Ladylux. The good news? Most problems aren’t due to major failure. Many fixes take under 30 minutes, cost less than $10, and don’t require a plumber.
This guide reveals the real causes behind common Grohe faucet issues based on hands-on repairs, technical specs, and user-tested solutions. You’ll learn how to diagnose leaks, replace worn plungers, fix stuck spray buttons, and swap out damaged hoses using compatible parts.
Fix Spray Head Mode Failure
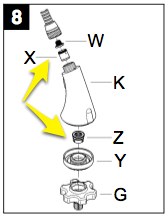
When your Grohe faucet sprays continuously or won’t switch from stream to spray, the problem is almost always inside the spray head assembly. It’s not the cartridge, diverter valve, or water pressure. It’s a worn plunger or O-ring.
Replace Worn Plunger and O-Ring
Grohe’s original plunger uses a molded plastic ring that mimics an O-ring. Over time, this groove cracks or thins, breaking the seal. When it fails, water stays in spray mode or leaks internally.
Parts Needed:
• Replacement plunger (often sold with O-ring kit)
• 1.9 mm × 13.7 mm O-ring
• Cost: $5 to $10
Tools:
• Pliers with cloth wrap
• 24 mm socket
• Flat-blade screwdriver
• Rubber mallet
Steps:
1. Unscrew the spray head from the hose by hand or with pliers. Protect the finish with cloth.
2. Secure the faucet body above using a spring clamp to prevent it from falling into the cabinet.
3. Remove outer cover by releasing snap clips with a flat-blade screwdriver.
4. Loosen central housing with a 24 mm socket.
5. Tap out old plunger gently with a rubber mallet. Don’t force it.
6. Pry out retaining spring carefully using a flat-blade screwdriver.
7. Slide new O-ring onto replacement plunger. Ensure it’s fully seated.
8. Insert new plunger by hand. No tools needed.
9. Reinstall spring with flat sides facing front.
10. Snap housing back into place, aligning tabs with notches.
Test: Turn on water, activate spray mode, then shut off. Button should reset automatically. Spray and stream should be distinct.
Pro Tip: Soak the old plunger in vinegar first. If it crumbles, that’s your culprit.
Stop Handle Base Leaks
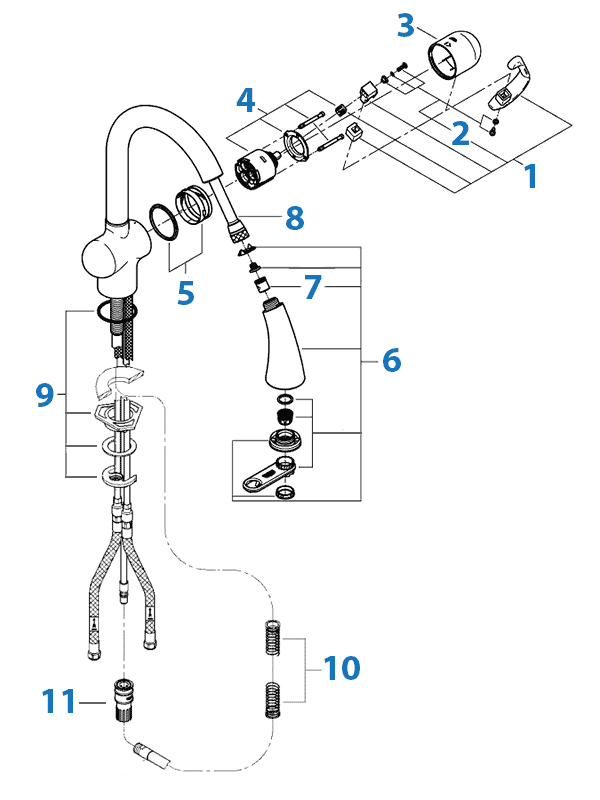
A drip from the base of the handle when turning the faucet on or off is often misdiagnosed as a bad cartridge. But in most cases, especially within the first year, the real issue is loose internal housing. Even a brand-new cartridge won’t stop the leak if the housing isn’t tightened during installation.
Tighten Internal Housing
Tools:
• 2.5 mm Allen wrench
• Adjustable wrench
• Multi-tool knife
Steps:
1. Shut off water supply using angle stop valves under the sink.
2. Pry off rubber handle cap with a multi-tool knife.
3. Loosen 2.5 mm Allen screw. Turn counter-clockwise.
4. Lift handle off with a slight wiggle.
5. Remove decorative cap by turning counter-clockwise.
6. Inspect internal housing. If loose, use an adjustable wrench to tighten it securely.
7. Reinstall handle, align perpendicular to spout.
8. Tighten Allen screw finger-tight plus a quarter-turn.
9. Snap cap back into place.
Test: Restore water, cycle faucet 5 to 10 times. No drips should appear at the base.
Warning: Don’t overtighten plastic components. This can crack threads and cause bigger leaks.
Replace Leaking Pull-Down Hose
If water pools under the sink when you use the spray, or the hose sprays from the side, you’ve got a damaged pull-down hose. Punctures, pet claws, or internal wear are common causes.
Install Compatible Replacement Hose
Recommended Part: Hansgrohe Replacement Spray Hose. This part is confirmed fit for most Grohe pull-down models post-2010. It includes O-rings, washers, quick-connect fittings, and guiding cap. Cost: $25 to $40.
Tools:
• Adjustable wrench
• Flat-blade screwdriver
• Drip pan
• Protective cloth for countertop
Steps:
1. Turn off water supply and relieve pressure by turning on the faucet.
2. Remove counterweight by unclipping it from the hose.
3. Disengage quick-release housing. Loosen Phillips screw on plastic housing. Gently pry apart to disconnect from supply line.
4. Remove locking collar from under the sink. Unscrew and slide off.
5. Pull old hose up through the faucet body.
6. Feed new hose down from the top. Keep plastic guiding cap attached to the lower end. Rotate slightly if it catches.
7. Reinstall locking collar from below. Tighten securely.
8. Attach spray nozzle to upper end. Twist collar into place.
9. Connect quick-release fitting. Insert new brass nipple into supply line until it clicks. Tug firmly to confirm lock.
10. Reattach counterweight at hose midpoint.
Test: Extend nozzle, activate spray, check for leaks under sink and along hose. No drips? You’re done.
User Confirmed: Replacing the hose took less than 30 minutes once I realized the Hansgrohe part was compatible.
Fix Stuck Spray Button
When the spray button won’t spring back after use, it’s usually due to a stuck plunger or weak spring, not a broken trigger.
Clean or Replace Plunger Mechanism
Steps:
1. Follow the spray head disassembly steps above.
2. Inspect plunger for cracks, thinning, or deformation.
3. Check spring tension. If flat or bent, replace it.
4. Soak components in white vinegar for 10 to 15 minutes to dissolve mineral buildup.
5. Rinse and reassemble with new O-ring.
6. Ensure spring is installed with flat sides facing front.
Test: Press button. It should snap back immediately. No resistance.
Prevention: Clean spray head monthly in vinegar to avoid buildup.
Fix Counterweight Slippage
After replacing the hose, you might notice the spray head droops or won’t retract. This happens when the new hose is slightly thinner, reducing friction so the counterweight slides down.
Restore Counterweight Grip
Materials:
• Silicone tape
• Adhesive rubber strip like weather stripping
• Thin O-ring (optional)
Steps:
1. Remove counterweight from hose.
2. Wrap interior groove with 1 to 2 layers of silicone tape or rubber strip.
3. Reinstall weight and test retraction.
Result: Weight stays in place, hose retracts smoothly.
Verified: The rubber wrap trick saved multiple users from buying a new counterweight.
Improve Spray Performance
Even after repair, your spray might sputter or feel weak. This is usually due to mineral buildup in the nozzle.
Clean Spray Head Filter
Steps:
1. Unscrew spray head from hose.
2. Remove internal filter screen (small plastic disc).
3. Soak in white vinegar for 15 to 30 minutes.
4. Rinse thoroughly and reassemble.
5. Run water through faucet for 30 seconds to flush debris.
Result: Strong, even spray returns.
Maintenance Tip: Soak spray head in vinegar monthly in hard water areas.
Reassemble Spray Head Correctly
Misaligned parts during reassembly cause leaks or failed resets. Follow this sequence carefully.
Align Tabs and Notches
- Insert plunger with correct orientation. Top and bottom are distinct.
- Reinstall retaining spring. Flat sides face front.
- Slide assembly into housing.
- Align two small tabs on housing with matching notches in faucet body.
- Press firmly until it snaps into place.
Important: If it doesn’t snap, don’t force it. Recheck alignment.
Test for Leaks and Function
Before calling it done, run a full diagnostic.
Post-Repair Verification Checklist
Test each item:
• Spray resets automatically after shutoff
• Distinct spray and stream modes
• No leaks at handle base, hose, or connections
• Counterweight holds position, head retracts fully
• Quick-connect click confirmed. Tug test passed.
Leak Test Procedure:
1. Open cold water first, then hot.
2. Cycle faucet on/off 5 times.
3. Use spray function for 1 minute.
4. Place dry towel under sink. Monitor 5 to 10 minutes.
Pass Criteria: Zero drips, full functionality, smooth operation.
Prevent Future Problems
Most Grohe faucet issues are preventable with simple care.
Annual Maintenance Routine
Follow these steps:
• Replace O-rings yearly, even if they look fine.
• Inspect hose for soft spots, bulges, or punctures.
• Apply plumber’s grease to new O-rings before installation. This improves seal and ease.
• Avoid kinking. Extend straight before pulling.
• Tighten internal housing during initial install. This prevents 80% of early leaks.
Hard Water Tip: Install an under-sink filter to reduce mineral buildup in spray head.
Know Your Warranty Rights
Grohe offers a Limited Lifetime Warranty on leaks and finish defects.
DIY Repair vs Warranty
Safe to DIY: O-ring replacement, tightening housing, hose swap
Risk of Voiding: Major disassembly, non-OEM parts, improper reassembly
Recommendation: If under warranty and unsure, contact Grohe first.
Many users say they’d rather try fixing it themselves than wait for the plumber, even when under warranty.
Frequently Asked Questions About Fixing a Grohe Faucet
Why does my Grohe faucet spray continuously without stopping?
This is almost always caused by a worn plunger or O-ring inside the spray head assembly. The plastic plunger ring degrades over time, losing its seal. Replace the plunger and O-ring to restore normal spray and stream modes.
Can I fix a leaking Grohe faucet handle without replacing the cartridge?
Yes. Most handle leaks at the base are caused by loose internal housing, not a faulty cartridge. Tighten the housing with an adjustable wrench. This solves the problem even with a brand-new cartridge.
What replacement hose works for Grohe pull-down faucets?
The Hansgrohe replacement spray hose is compatible with most Grohe pull-down models post-2010. It includes all necessary O-rings, washers, and quick-connect fittings. Cost is $25 to $40, far less than OEM.
How do I stop my Grohe spray head from drooping after hose replacement?
The new hose is likely thinner than the original, causing the counterweight to slip. Wrap the counterweight’s interior groove with silicone tape or rubber stripping to restore friction.
How often should I maintain my Grohe faucet?
Inspect and maintain your faucet annually. Replace O-rings yearly, clean the spray head in vinegar monthly in hard water areas, and check hose condition regularly.
Key Takeaways for Fixing Your Grohe Faucet
You don’t need a plumber to fix most Grohe faucet problems. With a few basic tools and $10 in parts, you can restore full function in under an hour. Focus on the plunger, O-ring, hose, and housing tightness. These are the real culprits behind most issues.
Skip the OEM part markup. Use compatible replacements like the Hansgrohe hose and proven tricks like the rubber wrap fix for the counterweight. Most repairs take 30 to 60 minutes and save you $100 or more in plumber costs.
Save time, save money, and keep your kitchen running smoothly. Fix your Grohe faucet today.







