
A stubborn faucet handle can turn a simple repair into a frustrating ordeal. Whether you’re replacing a leaky cartridge, cleaning mineral buildup, or upgrading your fixture, removing the faucet handle is the essential first step. But with hidden screws, corroded parts, and model-specific quirks, many homeowners get stuck right at the start. This guide cuts through the confusion with proven, step-by-step methods for every type of faucet. You’ll learn how to identify fastener types, use the right tools, and safely free even the most seized handles without damaging pipes or finishes.
Find the Handle Fastener Type
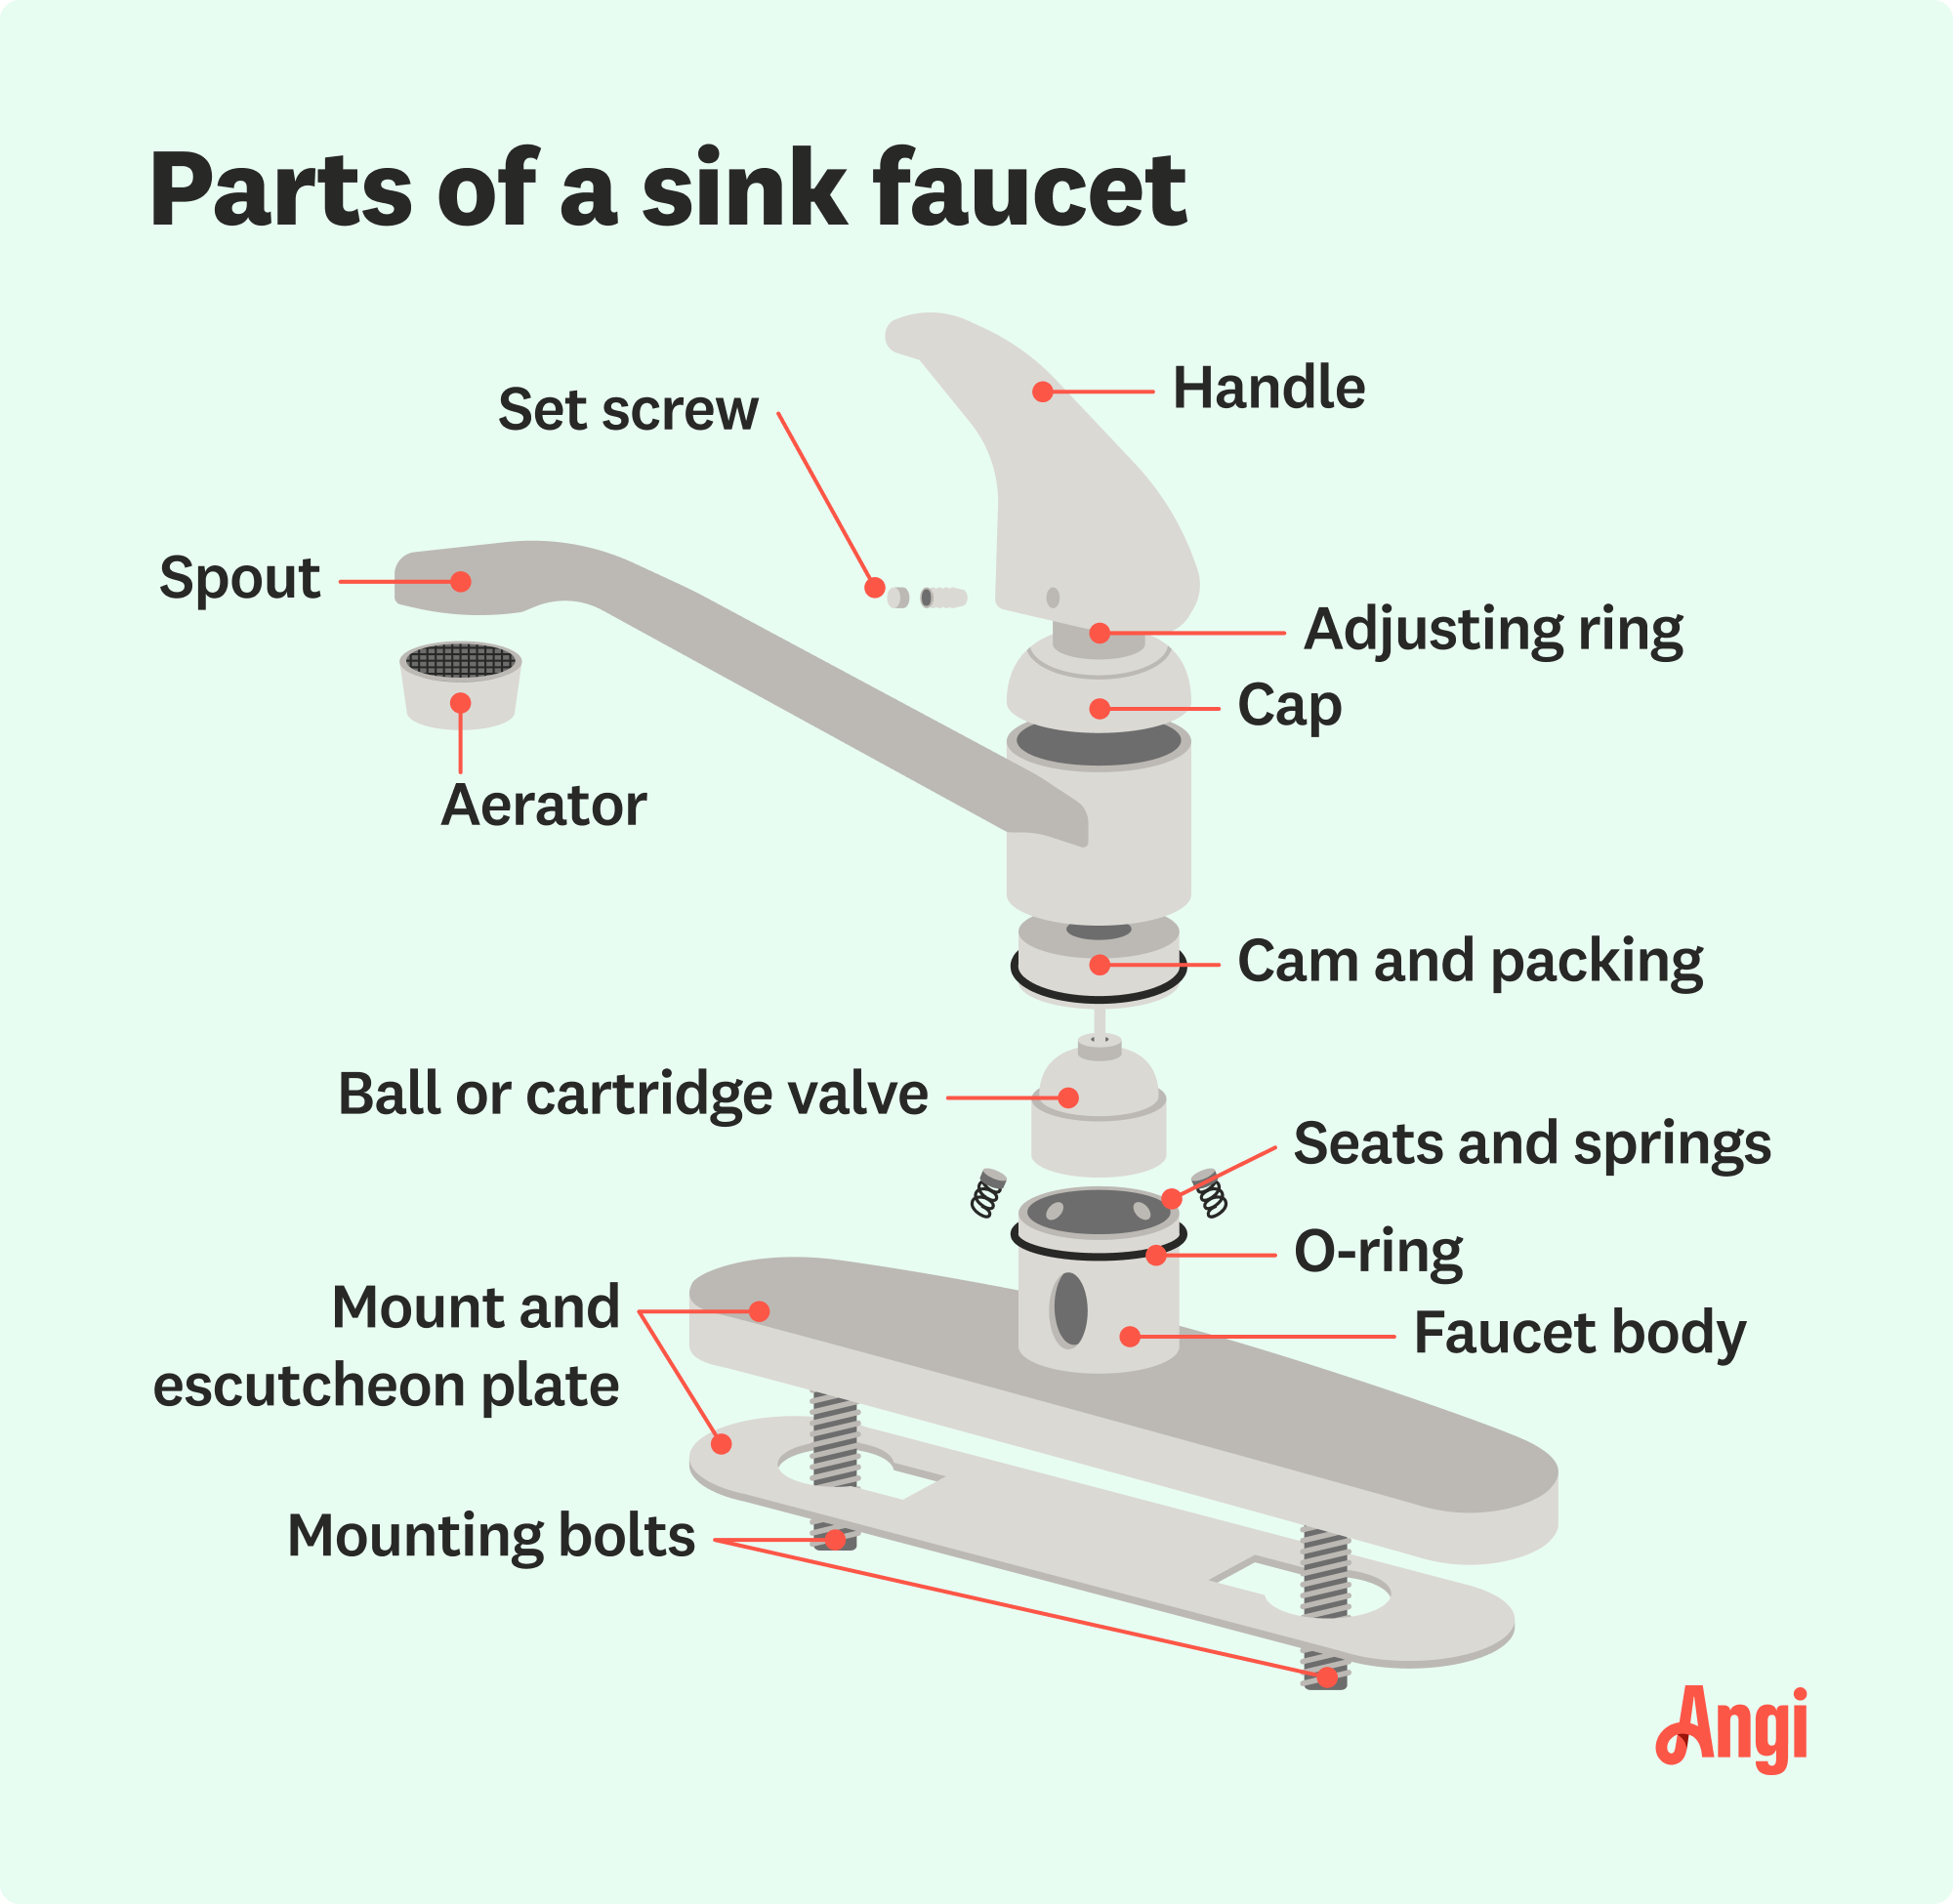
Before applying force, identify how your faucet handle is secured. Using the wrong method risks cracking plastic parts or stripping metal threads. Most handles fall into one of three categories: set-screw, twist-release, or press-fit. A quick visual inspection saves time and prevents damage.
Look for Hidden Screws Under Caps
Many handles conceal screws beneath decorative caps. These caps are often color-coded red for hot or blue for cold, or feature brand logos. Gently pry them off with a flat-head screwdriver or utility knife. Focus on seams around the top or sides of the handle.
What to look for includes small circular or rectangular caps and subtle parting lines. Common locations are the top center, side near base, and underside of lever. Pro tip: shine a flashlight at an angle to spot gaps where the cap lifts.
Once removed, inspect the screw type. Most use a hex Allen key, but some require a Torx star-shaped bit. If no screw appears, move to twist-release methods.
Check for Allen or Torx Set Screws
After removing the cap, you’ll likely see a hex or Torx screw. These secure the handle to the valve stem. Use the correct tool, as forcing the wrong size damages the fastener.
Standard sizes include 1/8 inch, 4mm, and 5mm Allen keys. Torx alternative uses a T20 bit, common on Danze, Moen, and high-end models. Tool tip: try a multi-bit hex Torx key set if unsure of size.
Insert the tool fully and turn counterclockwise to loosen. Back the screw out completely, not just loosened. A partially removed screw prevents the handle from lifting.
Warning: On models like the Danze D225012BN, the screw hole is shallow and hard to see. Use magnification and test multiple sizes to avoid stripping.
Identify Twist-Release Mechanisms
Some modern faucets have no screws at all. Instead, they use a cam or locking tab that releases with a quarter-turn. These are common on single-lever and contemporary lever-style handles.
Clues include a smooth top surface with no visible cap or screw. Look for a small groove or notch on the handle base. Action required: insert a 1.5mm flat-head screwdriver or tiny Allen key into the groove.
Twist clockwise by 90 degrees to disengage the lock. Then lift the handle straight up. If resistance is high, stop forcing it, as this may break internal tabs.
Expert note: never use pliers or excessive torque. These mechanisms are precision-fit and easily damaged.
Shut Off Water Before Starting
Always cut water supply before removing a faucet handle. Even minor disassembly can trigger leaks, especially if the valve stem shifts.
Locate shutoff valves, usually under the sink or behind an access panel. Turn both hot and cold valves clockwise until tight. Test by turning the faucet on briefly to confirm no water flows.
If shutoff valves are missing or seized, turn off the main water supply to the house. Skipping this step risks flooding, especially during cartridge replacement.
Pro tip: plug the sink drain or place a towel to catch small parts like screws or O-rings.
Remove the Handle Safely
With water off and fastener identified, proceed carefully. The goal is to free the handle without stressing internal plumbing or damaging the finish.
Lift Handle After Screw Removal
Once the set screw is fully removed, try lifting the handle straight up. Rock it slightly side to side if needed, but avoid twisting or prying.
Success signs include the handle lifting smoothly and exposing the valve cartridge or stem. Failure signs are the handle wobbling but not budging, or pipes moving when pulling.
If pipes shift, stop immediately. This means the handle is bonded to the stem, and force could damage wall plumbing.
Free a Stuck Handle With Penetrants
Many handles remain stuck due to mineral buildup or corrosion, even after screw removal. Use chemical dissolvers before applying mechanical force.
Apply CLR or Lime-A-Way for Limescale
Hard water leaves calcium deposits that glue metal parts together. Penetrating oils like WD-40 often fail here. Use a dedicated descaler instead.
Best products include CLR (Calcium, Lime and Rust) and Lime-A-Way. Application method involves pouring or injecting directly into the screw hole. Use a dropper or syringe for deep access. Soak time is 1 to 3 hours, longer for old installations.
Cover the area with a rag to prevent runoff. Reapply if needed. After soaking, try lifting again.
User insight: one homeowner reported success only after a 3-hour CLR soak. PB Blaster alone did nothing.
Try PB Blaster for Metal Corrosion
If limescale is not the issue, oxidation between metal parts may be the culprit. PB Blaster penetrates rust better than WD-40.
Where to spray includes around the handle base and inside the screw hole. Wait time is 30 minutes to several hours. Follow with tapping using a rubber mallet to help the penetrant work.
Avoid using heat like a hair dryer, as it can warp plastic or damage finishes.
Loosen a Seized Handle Mechanically

If chemicals do not work, mechanical methods can break the bond. Apply force gradually and evenly to avoid cracking components.
Tap With a Rubber Mallet
Gentle impact can disrupt mineral or corrosion bonds. Use a soft-faced hammer or rubber mallet.
Tap around the base in multiple directions. Do not strike the top, as this may deform the handle. Combine with upward pull after each tap to test.
This method works best when paired with prior soaking.
Use a Pry Bar With Protection
For stubborn handles, controlled prying may be necessary. Always protect the faucet trim and surrounding surfaces.
Place a short 2×4 across the trim like a shower bezel to distribute pressure. Insert a wonder bar or flat pry bar behind the handle. Pry gently from one side, then the other. For even force, use two pry bars on opposite sides with helper assistance.
Critical: stop if you feel resistance in the wall pipes. Moving plumbing risks leaks behind walls.
Cut Off Handle as Last Resort
If replacement is already planned and all else fails, cutting the handle off gives access to internal parts.
Tool needed is a Dremel with cut-off wheel. Method involves cutting a vertical slit along one side, then using pliers to peel open the split. This exposes and removes the remaining fastener or stem. Safety: wear eye protection and work slowly to avoid damaging the valve.
Handle Removal by Brand
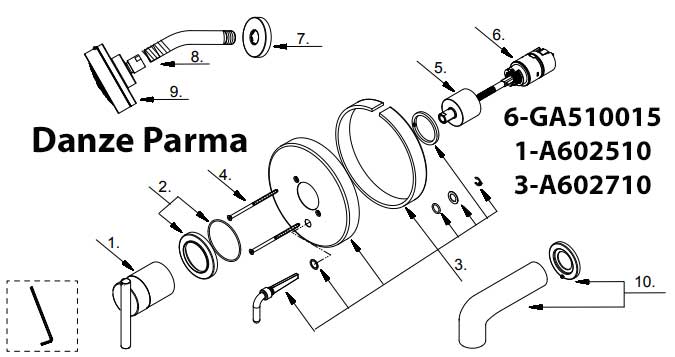
Different brands use unique designs. Knowing your model’s quirks speeds up the process.
Danze D225012BN Handle Removal
This single-handle bathroom faucet uses a concealed fastener that is hard to spot.
Set screw type is hex Allen or T20 Torx. Required tool is a 3 to 5mm Allen key or T20 bit. Challenge: the screw hole is shallow and obscured by grime. Fix: clean with a toothbrush, use a flashlight, and try multiple sizes.
Warranty tip: Danze offers a lifetime cartridge warranty. Send a photo to support for a free replacement before disassembling.
Moen Tub/Shower Handle Removal
Moen faucets often have a logo-marked handle with a bottom-mounted set screw.
Screw location is the underside of the handle. Common issue: calcium binds the handle to the stem after screw removal. Solution: use CLR or Lime-A-Way, as oils rarely work on limescale.
Visit Moen.com for diagrams or call customer service with your model number for support.
Why Remove a Faucet Handle
Understanding the purpose helps determine how far to disassemble.
Replace a Leaky Cartridge
Most spout leaks stem from a worn cartridge. Removing the handle gives access to replace it.
Symptom is dripping from the spout when the faucet is off. Fix involves pulling the cartridge, matching to a replacement, and reinstalling. Pro note: test fit the new cartridge before reassembly.
Clean Mineral Buildup
Hard water clogs internal passages and binds moving parts. Annual cleaning prevents seizing.
Best practice is to remove handles every 1 to 2 years. Action involves soaking the stem, cleaning O-rings, and re-lubricating with silicone grease.
Tighten Internal Nuts
Sometimes a loose retaining nut causes wobble or leaks. Access requires handle removal.
Check by lifting the handle. If it wiggles excessively, the nut may be loose. Fix by tightening with a wrench after the handle is off.
Troubleshoot Failed Removal
If the handle still will not come off, follow this diagnostic path.
Confirm Screw Is Fully Removed
A common mistake is only loosening the set screw. It must be completely removed to free the handle.
Check by shining a light into the hole. The screw should not protrude. Test by inserting the tool. It should go deep with no resistance.
If the thread is stripped, use a screw extractor or switch to the cutting method.
Prevent Wall Pipe Damage
If pulling the handle moves pipes inside the wall, stop immediately.
Cause is the handle bonding to the stem, transferring force. Solution involves soaking longer with CLR, tapping gently, and avoiding prying. Safety: use a wooden block to limit pry bar travel.
Damage to concealed plumbing leads to costly repairs.
Fix Stripped or Missing Screws
If the screw head is damaged, try these fixes.
Use a rubber band by placing it over the screw and inserting the tool for extra grip. Try a larger bit, as a Torx T25 may grip a stripped T20. Use a screw extractor kit by drilling a small pilot hole and reversing the thread out.
If the screw is missing but the handle is still stuck, focus on descaling.
Essential Tools and Tips
Use the right tools to avoid frustration and damage.
Recommended Tool Kit
Required tools include a 4mm or 5mm Allen key for removing set screws, the most common size. A T20 Torx bit serves as an alternative fastener for when hex slips. A flat-head screwdriver at 1.5mm prys caps and twist-releases without marring. A flashlight or headlamp locates hidden screws with hands-free lighting. CLR or Lime-A-Way dissolves limescale more effectively than oil. A rubber mallet breaks adhesion without surface damage. A Dremel with cut-off wheel destroys the handle as a last-resort option.
Pro Maintenance Tips
Label old parts by keeping the removed cartridge for matching. Stock spares by buying replacement cartridges before starting. Photograph steps to help with reassembly. Use non-abrasive cleaners to prevent finish damage. Lubricate O-rings annually to extend life and prevent seizing.
User insight: 40 percent of handles will not budge after 5 or more years without maintenance. Regular cleaning prevents this.
Final Steps and Warnings
Once the handle is off, proceed with your repair, whether cartridge replacement, stem cleaning, or inspection.
Reassemble in reverse order. Do not over-tighten screws. Test for leaks before finalizing.
Critical warnings include never forcing a handle without trying chemical and tapping methods first. Protect finishes with cloth or wood when prying. Order replacement parts ahead of time, especially under warranty. When unsure, contact the manufacturer with the model number.
Removing a faucet handle does not have to be a battle. With the right approach, even the most stubborn one will come off safely and efficiently.
Frequently Asked Questions About Removing Faucet Handles
What tools do I need to remove a faucet handle?
You will need an Allen key (4mm or 5mm most common) or a Torx bit (T20), a small flat-head screwdriver, a flashlight, and possibly penetrating oil or a calcium remover like CLR. A rubber mallet and pry bar serve as backup tools for stuck handles.
How do I know if my faucet handle has a hidden screw?
Look for a decorative cap on top or the side of the handle. These caps are often color-coded red for hot and blue for cold, or they feature a brand logo. Gently pry the cap off to reveal the screw underneath.
Why won’t my faucet handle lift after removing the screw?
The handle may be stuck due to mineral buildup, corrosion, or oxidation between the handle and valve stem. Apply a calcium remover like CLR or Lime-A-Way, let it soak for 1 to 3 hours, then try lifting again. Tapping with a rubber mallet can also help break the bond.
Can I use WD-40 to remove a stuck faucet handle?
WD-40 works for light rust but is not effective against hard water mineral deposits. For calcium and limescale buildup, use a dedicated descaler like CLR or Lime-A-Way. For metal corrosion, try PB Blaster instead.
What should I do if pulling the handle moves pipes in the wall?
Stop immediately. This indicates the handle is bonded to the stem, transferring force to the plumbing. Apply more penetrating solution, wait longer, and try tapping gently. Avoid prying, as this risks damaging concealed pipes and causing leaks.
Key Takeaways for Removing Your Faucet Handle
Removing a faucet handle requires identifying the fastener type first, whether a visible screw, hidden set screw, or twist-release mechanism. Always shut off the water supply before starting, and use the correct tool size to avoid stripping screws. For stuck handles, apply calcium remover (CLR or Lime-A-Way) before using mechanical force. Forty percent of handles older than 5 years will not budge without chemical treatment due to mineral bonding. When in doubt, contact the manufacturer with your model number for specific support.







