
A cracked, leaky, or outdated bathroom sink can make your whole bathroom feel worn out. The good news is that learning how to replace a bathroom sink is a realistic DIY project for most homeowners. With the right tools and a clear plan, you can swap out your old sink in just a few hours while protecting your countertop and plumbing. This guide covers everything from identifying your sink type to leak-testing the final installation, including smart tips like measuring with a cardboard template and upgrading to an adjustable P-trap.
Identify Your Sink Type Before You Start
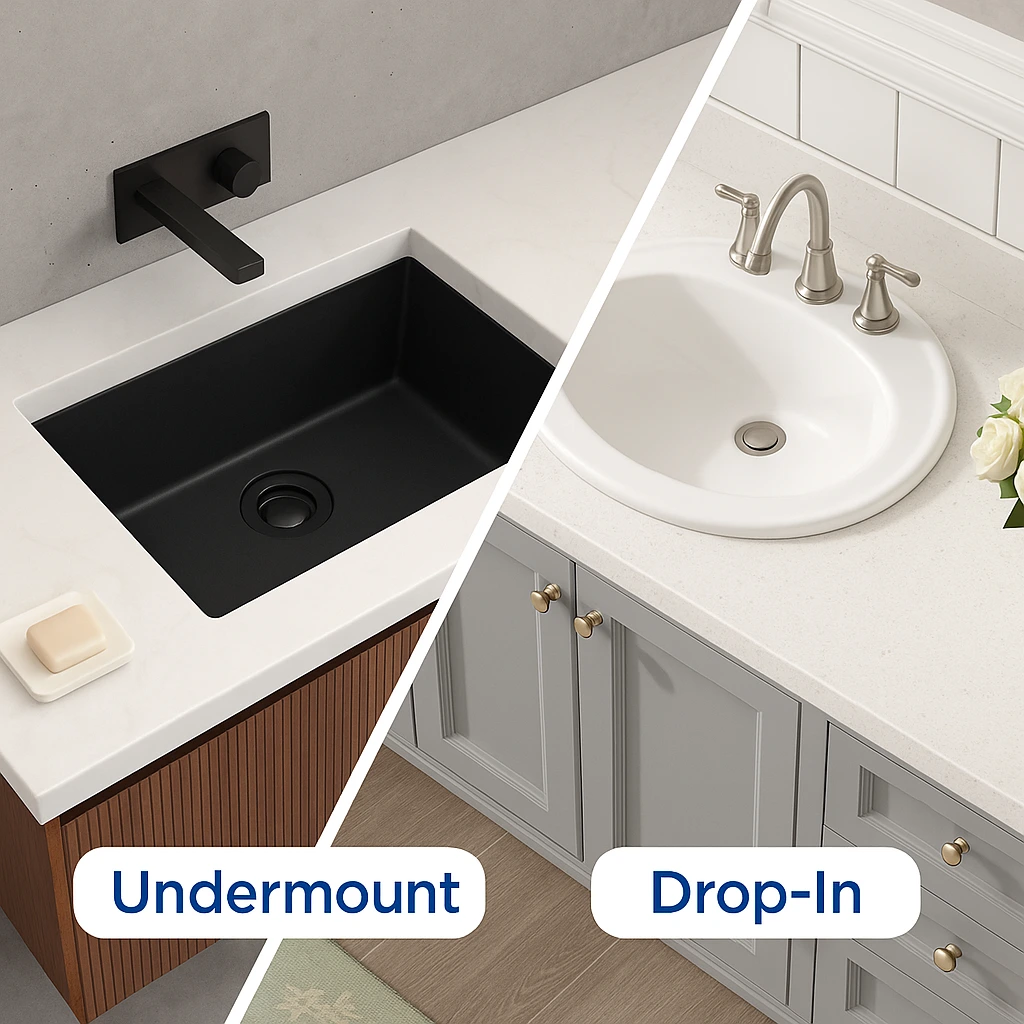
Knowing your sink type determines how difficult removal will be and what risks you face.
Drop-In Sinks Are Beginner-Friendly
A drop-in (or self-rimming) sink sits on top of the countertop with a visible rim that seals the edge. These sinks are secured with clips underneath and sealed with silicone or caulk. They are the easiest type to replace because they lift out without disturbing the countertop. If your sink rests on the counter with a metal lip around it, you have a drop-in model.
Undermount Sinks Require Extra Caution
An undermount sink attaches beneath the countertop, creating a clean, modern look. Many are epoxied or glued in place, and some rely on support brackets. Removing one without proper technique can crack stone, granite, or solid surface counters. If your sink has no rim and mounts from underneath, proceed carefully or call a professional.
Test the Seal Before Removing Anything
Use a putty knife or sharp blade to probe the seal between the sink and countertop. If the material feels soft and flexible, it is likely caulk, which removes easily. If it feels hard and brittle, it may be epoxy, which requires specialized tools. For undermount sinks, also look underneath for support brackets with screws. Mechanical fastening makes removal much safer.
Plan Before You Remove the Old Sink

One of the biggest DIY mistakes is removing the old sink before confirming the new one fits. Avoid ending up with an open hole and no working sink.
Find the Replacement Sink First
Buy or confirm availability of your new sink before starting removal. Even small size differences can make installation impossible without countertop modification. Standard dimensions like 16×20 inches are widely available, but custom or undermount models may require special ordering.
Create a Cardboard Template of the Opening
Rather than relying on measurements alone, make a precise template of the countertop hole:
- Tape a piece of cardboard over the sink opening
- Cut along the inside edge of the hole
- Bring the template when shopping to test fit new sinks
This method works for both drop-in and undermount replacements and guarantees a perfect fit, even with irregular shapes.
Check Faucet and Drain Compatibility
Verify the number and spacing of faucet holes, which are typically 4-inch, 8-inch, or widespread. Also check whether your new sink includes a drain assembly. Many modern sinks use push-down drains that eliminate the need for linkage hardware.
Shut Off Water and Disconnect the Supply Lines
Safety begins with cutting off the water supply and preparing for residual flow.
Turn Off the Shutoff Valves
Locate the hot and cold water valves under the sink. Turn them clockwise until fully closed. If the valves feel stiff or corroded, do not force them. Replace them later if needed.
Catch Residual Water
Place a shallow pan or paint roller tray under the supply lines. Even after shutting off the valves, pipes hold leftover water that can spill onto cabinets and floors.
Disconnect the Supply Lines
Use an adjustable wrench to loosen the nuts connecting flexible hoses to the shutoff valves. Keep a rag nearby to wipe up drips. Set the hoses aside and inspect them for cracks or bulges if you plan to reuse them.
Remove the Old Sink Safely
The removal process varies depending on your sink type.
Remove Drop-In Sink Clips
For drop-in sinks, locate the metal clips underneath the countertop that hold the sink in place. Loosen the screws and remove each clip. These clips usually slide into position from below and are adjustable.
Cut Through the Sealant
Even after removing clips, dried sealant bonds the sink to the countertop. Use a utility knife to carefully cut around the entire perimeter where the sink meets the counter. Work slowly to avoid scratching the surface.
Lift the Sink From Below
Once the seal is broken, lift the sink out from underneath. Never pull upward on the faucet because it can break. Have a helper support the sink while you guide it free.
Remove an Undermount Sink When Feasible
If your undermount sink has support brackets and a caulked seal:
- Shut off water and disconnect all plumbing
- Unscrew support brackets from beneath
- Have one person support the sink while another removes fasteners
- Gently lower the sink away from the countertop
If the sink is epoxied with no mechanical supports, do not attempt removal yourself. Contact a professional to avoid costly countertop damage.
Clean and Prepare the Countertop
A clean surface ensures a watertight seal for your new sink.
Scrape Off Old Sealant
Use a box knife or plastic scraper to remove old silicone, caulk, or adhesive from the countertop opening. Be gentle on delicate surfaces like marble or laminate.
Wipe With Isopropyl Alcohol
After scraping, clean the area with rubbing alcohol to remove residue and improve adhesion for the new sealant. Let the surface dry completely before proceeding.
Install the New Drain Assembly

Many modern sinks come with pre-installed or included drain assemblies, often using push-down mechanisms instead of traditional pop-up linkages.
Use a Rubber Washer, Not Plumber’s Putty
If your new drain uses a rubber washer and plastic nut, do not use plumber’s putty. These systems rely on compression seals, and putty can degrade rubber components.
Tighten With the Tapered Washer Facing Down
Insert the drain flange from the top, then secure it from below:
- Slide the rubber washer onto the tailpiece
- Make sure the tapered side faces down
- Thread on the large plastic nut and tighten firmly
The downward-facing taper compresses properly under load, which prevents leaks.
Mount the New Faucet
Faucet installation comes before setting the sink for most models.
Apply Silicone to the Gasket Groove
Many new faucets include a plastic gasket that requires a bead of silicone in its groove. This creates a watertight seal between the faucet base and sink deck.
- Squeeze a thin line of silicone into the gasket groove
- Press the gasket into place
- Insert the faucet stems through the mounting holes
Secure With Plastic Nuts
From underneath, slide plastic mounting nuts onto the faucet tailpieces and tighten with a wrench. Do not overtighten, because this can crack the plastic nuts or distort the gasket.
Clean Excess Sealant
Wipe away any squeezed-out silicone with a rag dampened in soapy water. This keeps the finish clean and prevents cured buildup.
Position and Set the Sink
Proper alignment ensures a professional look and functional fit.
Align With Tape Guides
For oval or asymmetrical sinks:
- Apply painter’s tape around the countertop opening, spaced evenly
- Lower the sink into place
- Adjust until gaps between the sink and tape are equal on all sides
Check alignment by measuring from the backsplash to the faucet handles. Both sides should match.
Mark the Final Position
Once aligned, mark the sink and countertop edges with a Sharpie. This allows you to remove the sink for sealing and then reposition it exactly.
Apply Sealant and Seat the Sink
A proper seal prevents water damage and mold growth.
Run a Bead of Silicone
Remove the sink and apply a continuous, moderate bead of 100% silicone sealant around the countertop opening. Avoid gaps or thin spots, because this is your primary defense against leaks.
Lower Into Place Carefully
Reinsert the sink using your Sharpie marks for alignment. Press down gently to compress the sealant. Do not slide the sink, because sliding breaks the seal.
Clean Up Excess
Peel off the tape and wipe away excess silicone with soapy water. Use mineral spirits only if needed, and avoid damaging the countertop finish.
Upgrade the P-Trap for Better Fit
Old cemented ABS traps often do not match new sink drains. Replace them with an adjustable PVC kit.
Cut Out the Old P-Trap
Use a hacksaw to remove the existing ABS or PVC trap. File the cut pipe ends smooth and chamfer the outer edges to aid insertion.
Install an Adjustable PVC Kit
Modern kits include PVC pipes with threaded ends, red tapered O-rings, pipe nuts, and extension tubes that you cut to length. These allow flexible alignment and easier future maintenance.
Connect With Tapered O-Rings
At each joint:
- Slide on the O-ring with the tapered side down
- Add the pipe nut
- Tighten securely
The beveled pipe end compresses into the O-ring, creating a watertight seal.
Use an Extension Tube If Needed
If there is a diameter mismatch or gap, insert a 16-inch double-ended extension tube. Cut it to fit and insert the beveled end into the O-ring.
Reconnect Water and Test for Leaks
Final steps ensure a safe, leak-free installation.
Flush the Faucet Before Use
Remove the aerator from the spout. Turn on both hot and cold water to flush debris from the supply lines. Let it run for 30 seconds to prevent clogs in the aerator.
Reattach Supply Lines
Reconnect flexible hoses to the shutoff valves. Use a crescent wrench to tighten, but do not overtighten, because this can damage compression washers.
Open Valves Slowly
Turn on shutoff valves gradually to avoid water hammer. If valves are stiff, use a second wrench to stabilize the valve body while opening.
Check All Connections
Inspect for leaks at supply line connections, the faucet base, the drain assembly, and P-trap joints. Wait several minutes and recheck. A few drops mean you need to tighten or reseat a joint.
Final Inspection and Maintenance Tips
A successful replacement lasts for years with proper care.
Verify Drain Operation
Test the push-down drain multiple times. It should seal tightly and release smoothly. Clean the mechanism annually to prevent buildup.
Confirm Straight Alignment
Ensure the sink has not shifted during installation. Misalignment looks unprofessional and causes uneven stress on the seal.
Schedule Preventive Checks
Every 6 to 12 months:
• Inspect the P-trap for leaks
• Retighten loose pipe nuts
• Check silicone seals for cracking or discoloration
• Clean under-sink area to prevent moisture damage
When to Call a Professional
While most drop-in sink replacements are DIY-friendly, some situations require expert help:
• Epoxied undermount sinks on stone or solid surface countertops
• Stiff or leaking shutoff valves that will not close
• Mismatched plumbing that needs pipe rerouting
• Countertop damage during removal
Attempting these without experience risks water damage, injury, or costly repairs.
Frequently Asked Questions About Replacing a Bathroom Sink
How long does it take to replace a bathroom sink?
Most drop-in sink replacements take just a few hours. Undermount sinks and projects requiring P-trap replacement may take longer.
Can I replace a bathroom sink without replacing the countertop?
Yes. Drop-in sinks are designed to fit existing countertop openings. Using a cardboard template ensures the new sink matches the current hole.
Do I use plumber’s putty on a new sink drain?
Only if your drain requires it. Modern drains with rubber washers and plastic nuts do not need plumber’s putty and can actually be damaged by it.
How do I know if my sink is drop-in or undermount?
A drop-in sink sits on top of the counter with a visible rim. An undermount sink has no rim on top and mounts from beneath the countertop.
Why should I flush the faucet before using the new sink?
Flushing clears debris from the supply lines. Skipping this step can clog the aerator and reduce water flow.
When should I hire a professional for sink replacement?
Hire a professional if your sink is epoxied to a stone countertop, if plumbing needs rerouting, or if shutoff valves are damaged and need replacement.
Key Takeaways for a Successful Bathroom Sink Replacement
Replacing a bathroom sink is a manageable DIY project when you plan carefully and proceed with caution. Start by identifying your sink type and confirming the replacement fits before removing the old one. Use a cardboard template to guarantee accurate sizing, and upgrade old cemented P-traps to adjustable PVC systems for easier future maintenance. Always flush the faucet before final use and check every connection for leaks. With the right tools and these steps, you will save money, improve functionality, and refresh your bathroom in a single afternoon.







