
Few things disrupt your morning quite like standing in a puddle of water while brushing your teeth. A clogged bathroom sink is frustrating, unsanitary, and stubbornly common. The culprit is almost always a mix of hair, soap scum, and grime hiding in the P-trap or stopper mechanism. The good news is you don’t need to call a plumber. This guide walks you through exactly how to fix a clogged bathroom sink using basic tools and proven techniques that target the real source of the blockage. In less than 30 minutes, you can restore full drainage and keep it that way.
Prepare Your Workspace and Gather Tools
A little prep prevents a messy disaster. Before touching any pipes, set up your work area properly so cleanup stays quick and easy.
Place a Bucket and Towel Under the Sink
Slide a bucket or Tupperware container directly beneath the P-trap. Lay an old towel under the work area to absorb spills and protect the cabinet floor. If your sink has shutoff valves, turn them off to prevent accidental water flow during disassembly.
Gather Essential Tools
Most clogs require only basic household tools. You will need:
– Channel locks or a wrench
– A Zip-It drain tool (about $3 at hardware stores)
– A drain auger or plumber’s snake
– Paper towels
– An old toothbrush
– Warm vinegar for soaking
Remove and Clean the P-Trap
The P-trap is the curved, U-shaped pipe directly under your sink. Its job is to hold a small amount of water that blocks sewer gases from entering your home. Unfortunately, that same design also makes it the #1 spot for bathroom sink clogs.
Loosen the Slip Nuts on the P-Trap
Locate the two slip nuts at each end of the P-trap. Use channel locks or a wrench to turn them counterclockwise. Hold the trap steady while loosening to avoid twisting the connected pipes. Once both nuts are loose, carefully lower the P-trap and let any standing water drain into your bucket.
Clean Out Hair and Gunk from the Pipe
Inspect the inside of the P-trap once it’s off. You will likely see a thick clump of hair, soap residue, and gray slime. Tap the pipe over the bucket to dislodge debris, then wipe the interior thoroughly with a paper towel. For sticky buildup that won’t budge, use an old toothbrush to scrub the walls.
Warning: The P-trap holds stagnant water and decomposing material. Expect foul odors and dark sludge. Wear gloves if you have sensitive skin.
Clean the Pop-Up Stopper and Pivot Arm
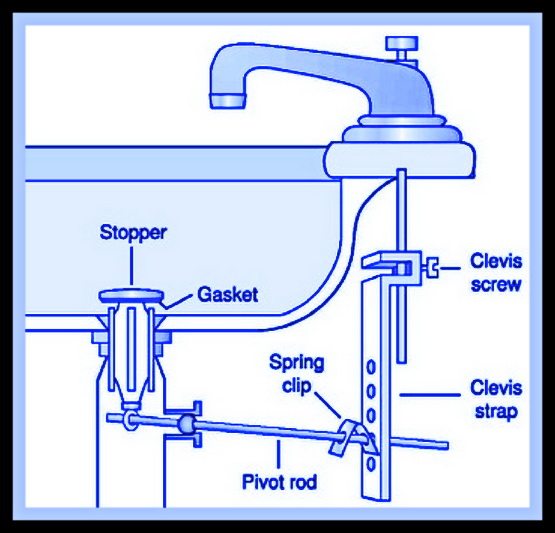
Even a clean P-trap won’t fix the problem if the pop-up stopper is packed with debris. This component catches hair before it travels deeper, which means it often becomes the primary blockage.
Disconnect the Pivot Arm
Find the pivot arm beneath the sink. It’s a small horizontal rod that connects the drain rod to the stopper mechanism. Use channel locks to loosen the pivot arm nut, then slide the rod out of the clevis strap. This frees the stopper so you can pull it straight up and out of the drain.
Remove and Scrub the Stopper
Pull the pop-up stopper out of the sink basin. It will likely be coated in a slimy layer of hair and soap residue. Wipe it down with a paper towel, then scrub the rubber seal and side crevices with an old toothbrush. For stubborn mineral buildup or lingering odors, soak the stopper in warm vinegar for 10 minutes before reinstalling.
Pro Tip: Run the toothbrush around the pivot arm opening too. Grime often hides in the clevis strap and slows the stopper’s movement.
Use a Zip-It Tool for Hidden Blockages
Sometimes the clog sits past the stopper and deep inside the drain pipe. A Zip-It tool is the cheapest and easiest way to pull out this hidden debris.
Insert and Work the Tool in the Drain
Slide the Zip-It tool into the drain opening until you feel resistance. This resistance is almost always a tangle of hair or compacted gunk. Gently work the tool up and down while twisting to hook onto the blockage.
Pull Out the Debris
Slowly retract the Zip-It tool. Expect a stringy, unpleasant mass of hair and sludge. Repeat the process 2 to 3 times until the tool slides in and out smoothly with no resistance. This is your sign that the drain is clear at this level.
Clear the Wall Pipe with a Drain Auger
If water still drains slowly after cleaning the P-trap and using a Zip-It tool, the clog is likely deeper in the wall pipe. A drain auger (plumber’s snake) is built for this job.
Feed the Auger Into the Wall Pipe
With the P-trap still removed, insert the tip of the auger into the wall pipe opening. Slowly crank the handle to feed the flexible coil deeper into the drain line. Keep pushing until you feel solid resistance.
Break Up or Retrieve the Blockage
Lock the auger in place and rotate the coil by hand or with a drill attachment. This motion either breaks up the clog or hooks onto it so you can pull it out. Retract the auger slowly. You will often see a large clump of hair wrapped around the end.
Pro Tip: Wrap a folded paper towel around the auger tip before reinserting. As you pull the tool back out, the paper towel acts like a wiper, removing residual grime from the pipe walls.
Reassemble the Drain System
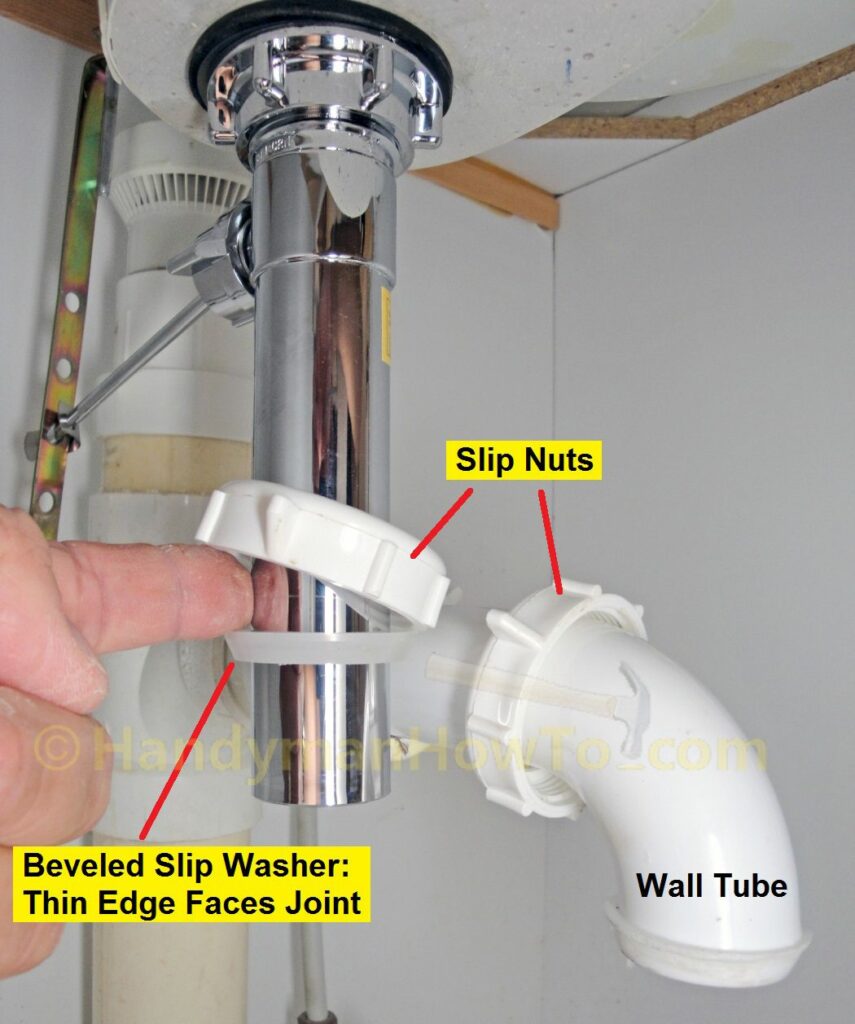
With all components clean, it’s time to put everything back together. Proper reassembly prevents leaks and keeps the stopper working smoothly.
Reconnect the Gooseneck and P-Trap
Slide the gooseneck back into the wall pipe, making sure the rubber washer is seated flush. Hand-tighten the slip nut, then give it a quarter turn with channel locks. Do not overtighten, as this can crack the fitting. Connect the P-trap to the gooseneck and drainpipe the same way, then hand-tighten both slip nuts and secure with a quarter turn of the wrench. Ensure the trap hangs level and the pipes align smoothly.
Reinstall the Pivot Arm and Stopper
Drop the pop-up stopper back into the drain opening. Slide the pivot arm through the hole in the stopper’s rod, reconnect it to the clevis strap, and tighten the pivot nut with a quarter to half turn. Test the stopper by moving the sink lever. It should open and close smoothly without sticking.
Test for Leaks and Proper Drainage
The final step confirms whether your repair was successful. A properly fixed sink drains fast and stays dry underneath.
Run Water for 1 to 2 Minutes
Turn the water supply back on and run warm water for 1 to 2 minutes. Watch how quickly the basin empties. A successful fix means the sink drains as fast as it did when new.
Check All Connection Points
Inspect these areas closely for drips:
– Slip nuts on the P-trap
– Wall pipe connection
– Pivot arm entry point
If you spot a leak, tighten the slip nut slightly, just a quarter turn more. If the leak persists, check that the rubber washer is seated properly and not damaged.
Done Right: Water drains quickly, no gurgling sounds occur, and zero moisture appears under the sink. Your bathroom sink is fully unclogged.
Prevent Future Clogs in Your Bathroom Sink
Knowing how to fix a clogged bathroom sink is useful, but preventing clogs in the first place saves even more time. A few simple habits keep your drain flowing freely.
Clean the Stopper Monthly
Pull out the pop-up stopper every 4 to 6 weeks and wipe it down with a paper towel. This quick step removes hair before it accumulates deep in the pipe.
Flush with Hot Water Weekly
Once a week, pour a kettle of boiling water down the drain. The heat melts soap scum and flushes light debris before it hardens into a blockage.
Avoid Chemical Drain Cleaners: Harsh chemicals corrode metal pipes and damage PVC over time. Stick to mechanical cleaning methods for safer, longer-lasting results.
Install a Sink Strainer
Place a drain strainer over the sink opening. It catches hair, toothpaste caps, and other debris before they enter the pipe. A $2 strainer can save you from a 30-minute repair.
When to Call a Plumber for a Clogged Sink
Most bathroom sink clogs are DIY-friendly, but some situations require professional help. Call a plumber if you notice any of these signs:
– Water backs up into another sink or tub when you drain the bathroom sink
– A foul sewer smell lingers after cleaning
– Multiple drains in the same bathroom run slowly at the same time
These symptoms often point to a main line clog or a venting issue that goes beyond the P-trap. A licensed plumber has the tools and expertise to diagnose and resolve deeper plumbing problems safely.
Frequently Asked Questions About Fixing a Clogged Bathroom Sink
What is the fastest way to fix a clogged bathroom sink?
The fastest DIY method is removing the P-trap, cleaning out hair and debris, and using a Zip-It tool to clear the drain pipe. This approach resolves most clogs in under 30 minutes without chemicals or special equipment.
Can I use boiling water to unclog a bathroom sink?
Yes, boiling water works well for minor clogs caused by soap scum. Pour a kettle of boiling water slowly down the drain once a week as preventive maintenance. For serious blockages, boiling water alone usually isn’t enough.
Why does my bathroom sink clog so often?
Bathroom sinks clog frequently because hair, soap residue, toothpaste, and skincare products collect in the P-trap and pop-up stopper. Regular monthly cleaning of these parts prevents most recurring clogs.
Is it safe to use chemical drain cleaners on a bathroom sink?
Chemical drain cleaners can damage metal pipes and PVC over time. They also pose health risks from fumes and skin contact. Mechanical cleaning methods like plungers, Zip-It tools, and drain augers are safer and more effective.
How do I know if the clog is in the P-trap or deeper in the pipe?
If water drains slowly but does pool, the clog is usually in the P-trap or pop-up stopper. If the sink barely drains or water backs up immediately, the blockage is likely deeper in the wall pipe and requires a drain auger to remove.
How often should I clean my bathroom sink’s P-trap?
Clean the P-trap every 3 to 6 months as part of regular maintenance. If you notice slow drainage or foul odors, clean it sooner. Routine cleaning prevents major clogs and extends the life of your plumbing.
Key Takeaways for Fixing a Clogged Bathroom Sink
Fixing a clogged bathroom sink is a straightforward project that almost anyone can complete with basic tools. Start by removing the P-trap to clear the most common clog site, then clean the pop-up stopper and pivot arm where hair and grime collect. For deeper blockages, a Zip-It tool or drain auger pulls out debris without damaging your pipes. After reassembling the drain system, test for leaks and confirm that water flows freely.
Your next step is simple: gather a bucket, channel locks, and a Zip-It tool, then spend 30 minutes giving your sink a thorough cleaning. Once you’ve completed the repair once, future maintenance will feel like second nature. With the approach outlined above, you’ll never need to call a plumber for a clogged bathroom sink again.







