

A leaky or improperly connected water supply line can turn a simple sink setup into a messy disaster. Whether you’re installing a new faucet or replacing old lines, knowing how to connect a water supply line to a faucet correctly ensures reliable performance, prevents water damage, and saves costly repairs down the line. This guide walks you through every step, from choosing the right supply line and matching fittings to making secure, leak-free connections using professional techniques.
You’ll learn about standard sizes, common connection types like compression and threaded fittings, and how to handle modern innovations like quick-connect systems. By the end, you’ll be able to confidently connect your faucet with precision and avoid the most common installation mistakes.
Choose the Right Supply Line for Your Faucet
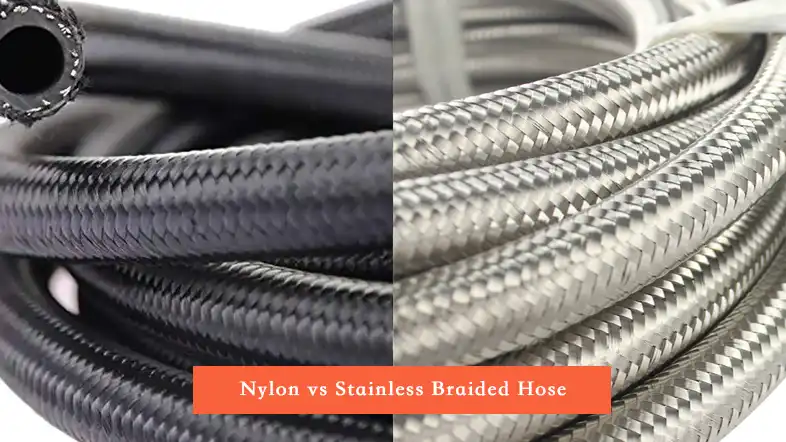
Selecting the correct water supply line is the foundation of a successful faucet installation. The wrong material, size, or length can lead to leaks, low pressure, or premature failure.
Match Material to Application
Braided stainless steel lines are the top choice for most residential installations. They combine a flexible inner tube with a durable stainless steel outer braid, offering high burst resistance up to 500 psi, kink resistance, and longevity of 10 to 15 years. These lines work well for both kitchen and bathroom faucets and are easy to install and replace.
Flexible nylon or polymer lines are lightweight and corrosion-resistant but less durable. Rated for about 150 psi and lasting 5 to 8 years, they’re best suited for low-pressure bathroom sinks, not kitchens with heavy use.
Avoid copper unless you’re making a permanent, soldered connection. While strong and long-lasting, copper is rigid and prone to kinking if bent improperly. It requires compression fittings or soldering, increasing complexity.
Never use PVC for faucet supply lines. PVC is designed for drain systems, not pressurized hot or cold water. It degrades quickly under heat and pressure, posing a serious leak risk and potentially voiding manufacturer warranties.
Pick the Correct Size
Faucet supply lines come in standard diameters. For kitchen faucets, use 1/2-inch lines to support high flow rates needed for filling pots and running dishwashers. Bathroom sinks typically use 3/8-inch lines, which are sufficient for handwashing and light use.
Check your faucet and shut-off valve specifications. Most modern fixtures accept 3/8-inch compression or 1/2-inch MIP connections. If there’s a mismatch, use a brass adapter like the WATTS LFA-124.
Select Proper Length
Standard supply lines come in 12, 18, 24, 30, and 40-inch lengths. Measure from the shut-off valve outlet to the faucet inlet and add 3 to 6 inches for looping and service access. Too short, and the line will be under tension. Too long, and it can kink or vibrate.
Pro tip: Install supply lines before mounting the faucet. This gives you more room to work and prevents awkward wrench angles later.
Identify Connection Types for Leak-Free Installation
Matching the correct fitting type between the shut-off valve, supply line, and faucet inlet is critical for a watertight seal.
Use Compression Fittings Correctly
Compression fittings are the most common in residential plumbing. They consist of a nut and a brass ferrule that compresses onto the pipe when tightened. These are typically 3/8-inch OD and connect to shut-off valves and faucet pigtails.
To install compression fittings:
• Slide the nut onto the pipe first, then the ferrule
• Insert the pipe into the valve or inlet
• Hand-tighten the nut, then use a wrench for 1.5 turns past hand-tight
Never overtighten. This can crack the ferrule or damage threads. If a leak occurs, disassemble and check that the ferrule is seated evenly and not cross-threaded.
Apply Teflon Tape on Threaded Fittings
For NPT connections common on older fixtures or rigid copper lines, use Teflon tape or pipe dope to seal the joint. Wrap the male threads clockwise, 3 to 5 layers, so the tape doesn’t unravel during tightening.
These fittings are often 1/2-inch MIP and require a female-threaded supply line or adapter. Common on faucet shanks or wall stub-outs.
Handle Quick-Connect Systems
Some modern faucets use fast-connect or push-fit systems. These require no tools. Just push the line into the diverter until it clicks. To connect, rotate the connector clockwise until hand-tight, then push upward firmly until you hear a click. Test by gently pulling down. No movement means it’s secure.
These systems speed up installation and reduce error, but require compatible components. Check if your faucet includes integrated supply lines. Many do, eliminating the need for separate connectors.
Mount the Faucet Before Connecting Lines
Installing the faucet before connecting the supply lines gives you better access and reduces strain on the connections.
Prepare the Sink Opening
For a 3-hole sink, use a metal deck plate to cover unused holes. For a 2-hole sink, use a mounting ring. Feed the supply lines and pull-out hose through the center hole. Clean the sink surface thoroughly to ensure a watertight seal.
Some faucets, like those with Pfister’s Tight Seal Technology, don’t require plumber’s putty or silicone. Just a dry, clean surface.
Secure the Faucet from Below
Under the sink, place the metal washer over the shanks, then thread on the lock nut. Use a manufacturer-provided quick install tool or a basin wrench to tighten without scratching.
Do not overtighten. This can crack the sink or distort the seal. The faucet should be snug and stable with no wobble.
Connect Pull-Out Hose to Diverter
If your faucet has a pull-out sprayer, connect the hose now before attaching the main supply lines.
Attach the Diverter Mechanism
The diverter directs water between the spout and spray head. On faucets like the Pfister Selia, it uses a fast-connect system.
Steps to attach the diverter:
1. Slide the hose onto the mounting post
2. Rotate the diverter clockwise until hand-tight
3. Push upward until it clicks into place
Test by gently tugging down. If it doesn’t detach, it’s secure.
Route the Hose Neatly
Loop the hose loosely to avoid kinks. Do not pinch it between the faucet body and sink deck. Ensure it retracts smoothly without binding.
If the hose doesn’t retract, the internal spring may be worn or debris may be blocking the channel. Replace the hose assembly if needed.
Attach Supply Lines to Shut-Off Valves

Now it’s time to make the final water connections. This step requires care to prevent leaks and cross-threading.
Match Hot and Cold Lines Correctly
Always connect the hot water line to the left faucet inlet and the cold water line to the right faucet inlet. Most lines have red and blue indicators to help you identify them.
Label the lines during installation to avoid confusion. Reversing them can reduce efficiency and damage internal components.
Connect to Shut-Off Valves
Shut-off valves come in straight or angle types. Match the valve type to your stub-out orientation for a straight-line connection.
To connect supply lines:
• Align the compression nut with the valve outlet
• Start threading by hand to prevent cross-threading
• Hand-tighten, then use an adjustable wrench for 1 to 1.5 turns
Use two wrenches. One to hold the valve body steady, the other to tighten the nut. This prevents stress on the valve and pipe joint.
Use Adapters When Needed
If your shut-off valve is 1/2-inch FIP and your faucet inlet is 3/8-inch OD, use a 1/2-inch MIP by 3/8-inch male compression adapter. These are widely available at hardware stores.
Install the adapter onto the valve first, then connect the supply line. Apply Teflon tape to the male threads.
Test for Leaks and Verify Function
After all connections are made, it’s time to turn the water back on and verify everything works.
Slowly Open Shut-Off Valves
Turn the valves counterclockwise slowly. Sudden pressure surges can cause water hammer or damage weak joints.
Watch all connections for drips, sprays, or seepage. If you see a leak, turn off the water immediately. Disassemble the joint, check the ferrule for proper seating, and re-tighten gently. Never force it. Overtightening is a leading cause of leaks.
Flush the Water Lines
Before using the faucet, flush the lines to remove debris and trapped air. Unscrew the spray head from the hose, turn on both hot and cold water for 15 seconds, then reattach the spray head.
This clears manufacturing residue and primes the aerator.
Test Faucet Operation
Check handle movement. It should be smooth, not stiff. Engage pull-out or push-button spray and verify it switches correctly. Pull out fully and release. It should retract smoothly.
If spray mode doesn’t engage, there may be air in the line or the diverter isn’t fully seated. Flush again and recheck the connection.
Troubleshoot Common Connection Problems
Even with careful installation, problems can arise. Here’s how to fix them fast.
Fix Leaking Connections
Most leaks happen at compression fittings due to cross-threading, damaged or misaligned ferrule, or overtightening.
Solution:
• Disassemble the joint
• Inspect the ferrule. Replace if cracked or unevenly compressed
• Reassemble, hand-tighten, then wrench-tighten 1 turn
If the leak persists, try a new supply line. Old lines may have worn seals.
Restore Low Water Pressure
Low pressure can be caused by a kinked supply line, clogged aerator, or undersized line. Fix by straightening any bends in the line, removing and cleaning the aerator, or upgrading to a 1/2-inch supply line for kitchen faucets.
Stop Vibration or Noise
Noisy pipes during use often mean loose connections, water hammer, or excessive water pressure over 80 psi. Solutions include tightening all fittings, installing a water hammer arrestor near the faucet, and testing home pressure at an outdoor spigot.
Maintain Your Water Supply Lines for Longevity
A well-installed supply line can last 10 to 15 years, but regular maintenance extends its life.
Inspect Monthly
Look for bulges or swelling in the line, corrosion on fittings, or drips or dampness under the sink. Replace any line showing cracks, stiffness, or discoloration.
Replace Every 5 to 10 Years
Even if no issues appear, proactively replace supply lines every decade. Braided stainless steel lines often come with lifetime warranties, but only if not overtightened or misused.
In hard water areas, consider a water softener to reduce mineral buildup in lines and faucet internals.
Clean and Flush Periodically
During renovations or upgrades, disconnect lines and flush with clean water to remove scale. Clean inlet screens and aerators. This maintains flow and prevents clogs.
Frequently Asked Questions About Connecting Water Supply Lines to Faucets
What size supply line do I need for a kitchen faucet?
Kitchen faucets typically require 1/2-inch supply lines to support high flow rates needed for filling pots and running dishwashers. Bathroom sinks can use 3/8-inch lines, which are sufficient for handwashing and light use.
Can I reuse old supply lines when replacing a faucet?
Only reuse braided stainless steel lines if they show no signs of damage, wear, or corrosion. Replace any poly, rubber, or damaged copper lines with new braided stainless steel lines for best results.
Why is my compression fitting leaking after tightening?
Leaking compression fittings are usually caused by cross-threading, a damaged ferrule, or overtightening. Disassemble the joint, inspect the ferrule for cracks or uneven compression, and reseat it properly. Hand-tighten first, then wrench-tighten just 1 to 1.5 additional turns.
How do I connect a quick-connect fitting properly?
Rotate the connector clockwise until hand-tight, then push upward firmly until you hear an audible click. Test by gently pulling down. No movement means the connection is secure.
What causes water hammer when using my faucet?
Water hammer occurs when pipes rattle during sudden shut-off, caused by loose connections, sudden pressure spikes, or excessive water pressure over 80 psi. Tighten all fittings, install a water hammer arrestor near the faucet, and test your home’s water pressure.
Key Takeaways for Connecting Water Supply Lines to Faucets
Connecting a water supply line to a faucet is a straightforward task when you match the right components and follow proper technique. Focus on using braided stainless steel lines, correct sizing, and secure compression or threaded fittings. Always test for leaks and flush the system before final use.
The most critical steps include selecting the right material and diameter for your application, properly mounting the faucet before connecting lines, using two wrenches to prevent stress on valves, and slowly testing all connections for leaks. Regular inspection and proactive replacement every 5 to 10 years will ensure your installation delivers reliable performance for years to come.







