
Is your faucet sputtering, clogged, or covered in white crusty buildup? You’re not alone. In homes with hard water, mineral deposits from calcium and magnesium accumulate quickly on spouts, aerators, and handles, reducing water flow, marring finishes, and even introducing bacteria. The good news is you can restore your faucet’s performance and shine in under an hour using just one kitchen staple: white vinegar.
Vinegar is a powerful, non-toxic, and affordable cleaner thanks to its 5% acetic acid content, which dissolves limescale, soap scum, and biofilm without harsh chemicals. This guide will show you how to clean a faucet with vinegar safely and effectively, without damaging the finish or voiding your warranty. You’ll learn step-by-step methods, ideal soak times, material-specific precautions, and pro tips to keep your faucet flowing like new.
Choose the Right Vinegar Solution
The best vinegar for cleaning faucets is white distilled vinegar with 5% acetic acid. This standard grocery store variety provides consistent acidity without added fragrances or thickeners that could leave residues.
Tailor your solution to the severity of buildup. For light to moderate deposits, mix equal parts vinegar and warm water. For heavy crust or low water pressure, use undiluted vinegar. For stubborn stains, make a paste with 1 part vinegar mixed with 2 parts baking soda.
Warm vinegar speeds up mineral breakdown. Heat it slightly, not to boiling, for faster results.
Check Faucet Finish Compatibility
Chrome and stainless steel faucets handle vinegar well. You can safely soak chrome for up to 2 hours and stainless steel for 30 to 60 minutes without damage.
Limit exposure on sensitive finishes. Brass, nickel, or gold-plated fixtures should soak no more than 30 minutes. Matte black or painted finishes may dull or strip with vinegar exposure, so use only a damp cloth and never soak these surfaces.
Always patch test first. Dab vinegar on a hidden area like the underside of the base. Wait 10 minutes. If no dulling or color change occurs, full application is safe.
Gather Essential Cleaning Supplies
Gather these basic tools before starting:
- White distilled vinegar
- Quart-sized plastic bag or small bowl
- Rubber band or twist tie
- Soft microfiber cloth
- Old toothbrush with soft bristles
- Mild dish soap
- Warm water
Optional but helpful items include baking soda for paste, an aerator removal tool for Moen or Delta models, an adjustable wrench wrapped in cloth, and olive oil for polishing matte black finishes after cleaning.
Avoid steel wool or abrasive pads. These scratch all finishes and permanently damage the appearance.
Soak the Faucet Head Using the Bag Method
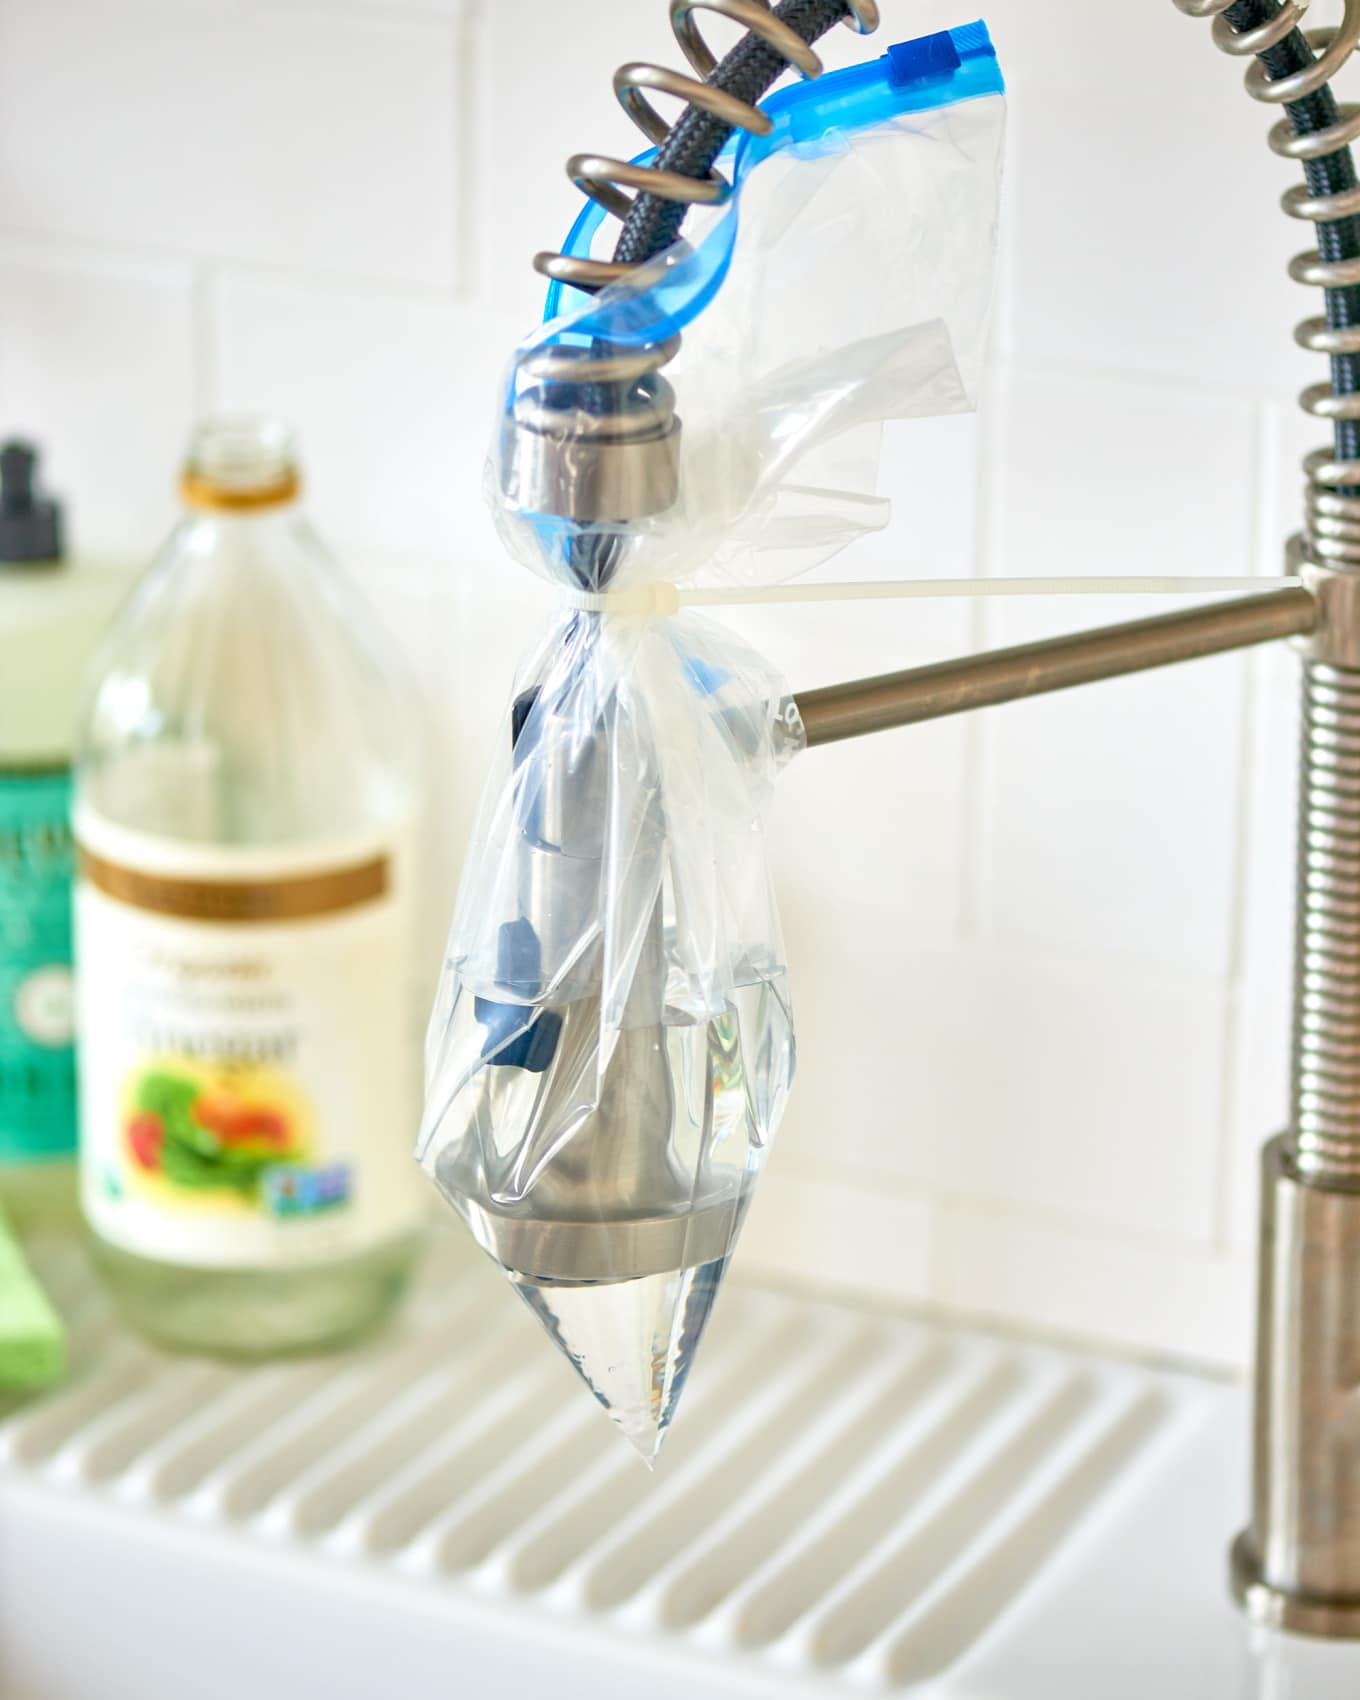
The bag method works well for kitchen or bathroom faucets where removing the aerator is tricky.
Fill a plastic bag with vinegar, ensuring enough liquid to submerge the spout tip. Place the bag over the faucet head, making sure the aerator is fully immersed. Secure with a rubber band or tape.
Let soak according to your finish type. Chrome allows 30 minutes to 2 hours. Brass, nickel, and matte finishes should not exceed 30 minutes.
Remove the bag and scrub the aerator with a toothbrush. Turn on the water to flush out loosened debris. Wipe dry with a microfiber cloth.
No bag available? Wrap a vinegar-soaked cloth around the spout and secure with a rubber band instead.
Remove and Soak the Aerator

The aerator is the most common clog point. Removing it allows for deep cleaning and the best flow restoration.
Turn off the water supply under the sink. Unscrew the aerator by hand. If stuck, wrap pliers in a cloth or use an aerator removal tool.
Disassemble the aerator into screen, washer, and housing if possible. Soak all parts in vinegar. Normal buildup needs 30 minutes. Heavy scale may require 1 hour or overnight.
Scrub each piece with a toothbrush, paying special attention to the screen holes. Rinse thoroughly under running water.
Reassemble and reinstall by hand. Do not overtighten, as this can crack the housing or strip threads. Turn the water back on and run for 30 seconds to flush the system.
Clean the Faucet Body and Handles
Even after aerator cleaning, mineral deposits linger around bases, joints, and handles.
Spray vinegar solution on the faucet body. Let sit 5 to 10 minutes to loosen grime. Scrub crevices with a toothbrush.
For tough stains, apply vinegar-baking soda paste. Gently scrub, then wipe clean. Rinse with water and dry completely.
For matte black finishes, use only a vinegar-dampened cloth. After drying, buff with a drop of olive oil on a soft cloth to protect the finish.
Rinse and Polish for Shine
Proper rinsing prevents new deposits and streaks from forming.
Run hot water through the faucet for 30 seconds to flush internal and external vinegar residue. Dry the entire faucet with a lint-free microfiber towel. Buff chrome or polished finishes for extra shine.
Daily tip: Wipe the faucet dry after each use to prevent water spots and mineral buildup from forming.
Alternative Natural Cleaners
When vinegar isn’t enough, these alternatives can help.
Citric acid soak works well for well water or extreme hard water. Mix ¾ cup citric acid powder in 1 gallon of boiling water. Soak the aerator for 30 minutes. This is more powerful than vinegar.
Lemon juice provides natural citric acid with a fresh scent. Use fresh lemon juice or mix 1 part lemon juice with 4 parts hot water. Apply via bag or cloth. Great for light cleaning.
Avoid CLR on drinking water faucets. Chemical residues may remain unless flushed extensively.
Clean Based on Water Hardness

Adjust your cleaning frequency based on water hardness for best results.
| Water Type | Cleaning Frequency |
|---|---|
| Soft water | Every 3-4 months |
| Moderate hardness | Every 2 months |
| Hard water or well water | Every 4-6 weeks |
Signs you need to clean sooner include reduced water pressure, sputtering spray, white chalky deposits, and cloudy water at startup.
Follow Manufacturer Guidelines
Delta and Moen both support vinegar cleaning for aerator maintenance. Use hand-tightening only when reinstalling parts. Keep the included aerator removal tool for future use. Avoid abrasive cleaners to maintain warranty coverage.
Roca endorses vinegar and baking soda for cleaning. They recommend daily wiping and quarterly deep cleaning. Avoid harsh chemicals on brass or stainless steel models.
Proper vinegar use does not void warranties. However, damage from over-soaking or abrasives may not be covered.
Avoid Common Mistakes
Prevent damage and rebuildup by avoiding these errors.
Soaking matte black too long dulls the finish. Mixing vinegar with bleach releases toxic gas. Using steel wool scratches chrome and nickel. Skipping the rinse leaves acid residue. Over-tightening the aerator cracks housing or strips threads.
Pro tip: Reuse filtered vinegar for drain cleaning. Nothing goes to waste.
Maintain Long-Term Performance
Regular cleaning prevents mineral intrusion that leads to leaks, corrosion, and handle failure.
Best practices include wiping the faucet dry daily, cleaning the aerator every 3 months, deep cleaning with vinegar every 3-4 months, and using a water softener in hard water areas.
Homeowners with water softeners report 70% less buildup and fewer cleanings overall.
When to Call a Professional
Vinegar fixes surface and aerator issues but not internal valve problems.
Call a plumber if you experience persistent leaks after cleaning, handle still stiff or wobbly, cracks in spout or base, or water discoloration beyond initial flush.
Vinegar won’t fix worn cartridges or broken seals. Only replacement will resolve these issues.
Frequently Asked Questions About Cleaning Faucets with Vinegar
Does vinegar damage faucet finishes?
Chrome and stainless steel handle vinegar well for extended periods. Brass, nickel, gold-plated, and matte black finishes require limited exposure. Chrome tolerates up to 2 hours, while sensitive finishes should soak no more than 30 minutes or use only a damp cloth application.
How long should I soak my faucet in vinegar?
Soak chrome fixtures 30 minutes to 2 hours depending on buildup severity. Limit brass, nickel, gold, and matte finishes to 30 minutes maximum. For heavy scale on aerators, soak 1 hour or overnight works best.
Can I use apple cider vinegar instead of white vinegar?
No. Apple cider vinegar contains sugars and pigments that leave residues and lack consistent acidity. Always use white distilled vinegar with 5% acetic acid for effective cleaning.
How often should I clean my faucet with vinegar?
Clean every 3-4 months for routine maintenance. In hard water areas, clean every 4-6 weeks. Watch for reduced pressure, sputtering, or white deposits as signs cleaning is needed sooner.
Why is my water pressure still low after cleaning?
If pressure remains low after thorough aerator cleaning, the issue may be internal. Worn cartridges, clogged supply lines, or valve problems require professional plumbing attention.
Can I mix vinegar with baking soda to clean my faucet?
Yes. Combine 1 part vinegar with 2 parts baking soda to form a paste for stubborn stains. Apply to affected areas, let sit 5-10 minutes, scrub gently, then rinse and dry thoroughly.
Key Takeaways for Cleaning Your Faucet with Vinegar
White vinegar is an effective, natural cleaner for most faucet finishes when used correctly. Always match your soak time and vinegar concentration to your specific finish type. Chrome and stainless steel tolerate longer exposure, while matte black and brass require minimal contact.
Regular maintenance every 3-4 months prevents mineral buildup and extends your faucet’s lifespan by 5 years or more. The bag method works for quick cleaning, but removing and soaking the aerator provides the best results for restoring water flow.
If problems persist after thorough cleaning, the issue lies internally and requires a professional plumber. With proper care and consistent maintenance, your faucet will perform better and last longer, naturally.


