

Is your shower leaving you shivering even with the handle cranked to hot? Or worse, does the water suddenly turn dangerously scalding? These frustrating scenarios often mean your shower’s temperature limit needs adjustment. Modern bathrooms feature safety mechanisms that restrict maximum water heat to prevent burns, but these can sometimes leave you with water that’s too cold for comfort. The good news: adjusting your shower faucet temperature is a straightforward DIY task that takes under 15 minutes. This guide walks you through identifying your valve type, accessing internal components, modifying temperature limits safely, and testing with precision to achieve your perfect shower temperature.
Identify Your Shower Valve Type
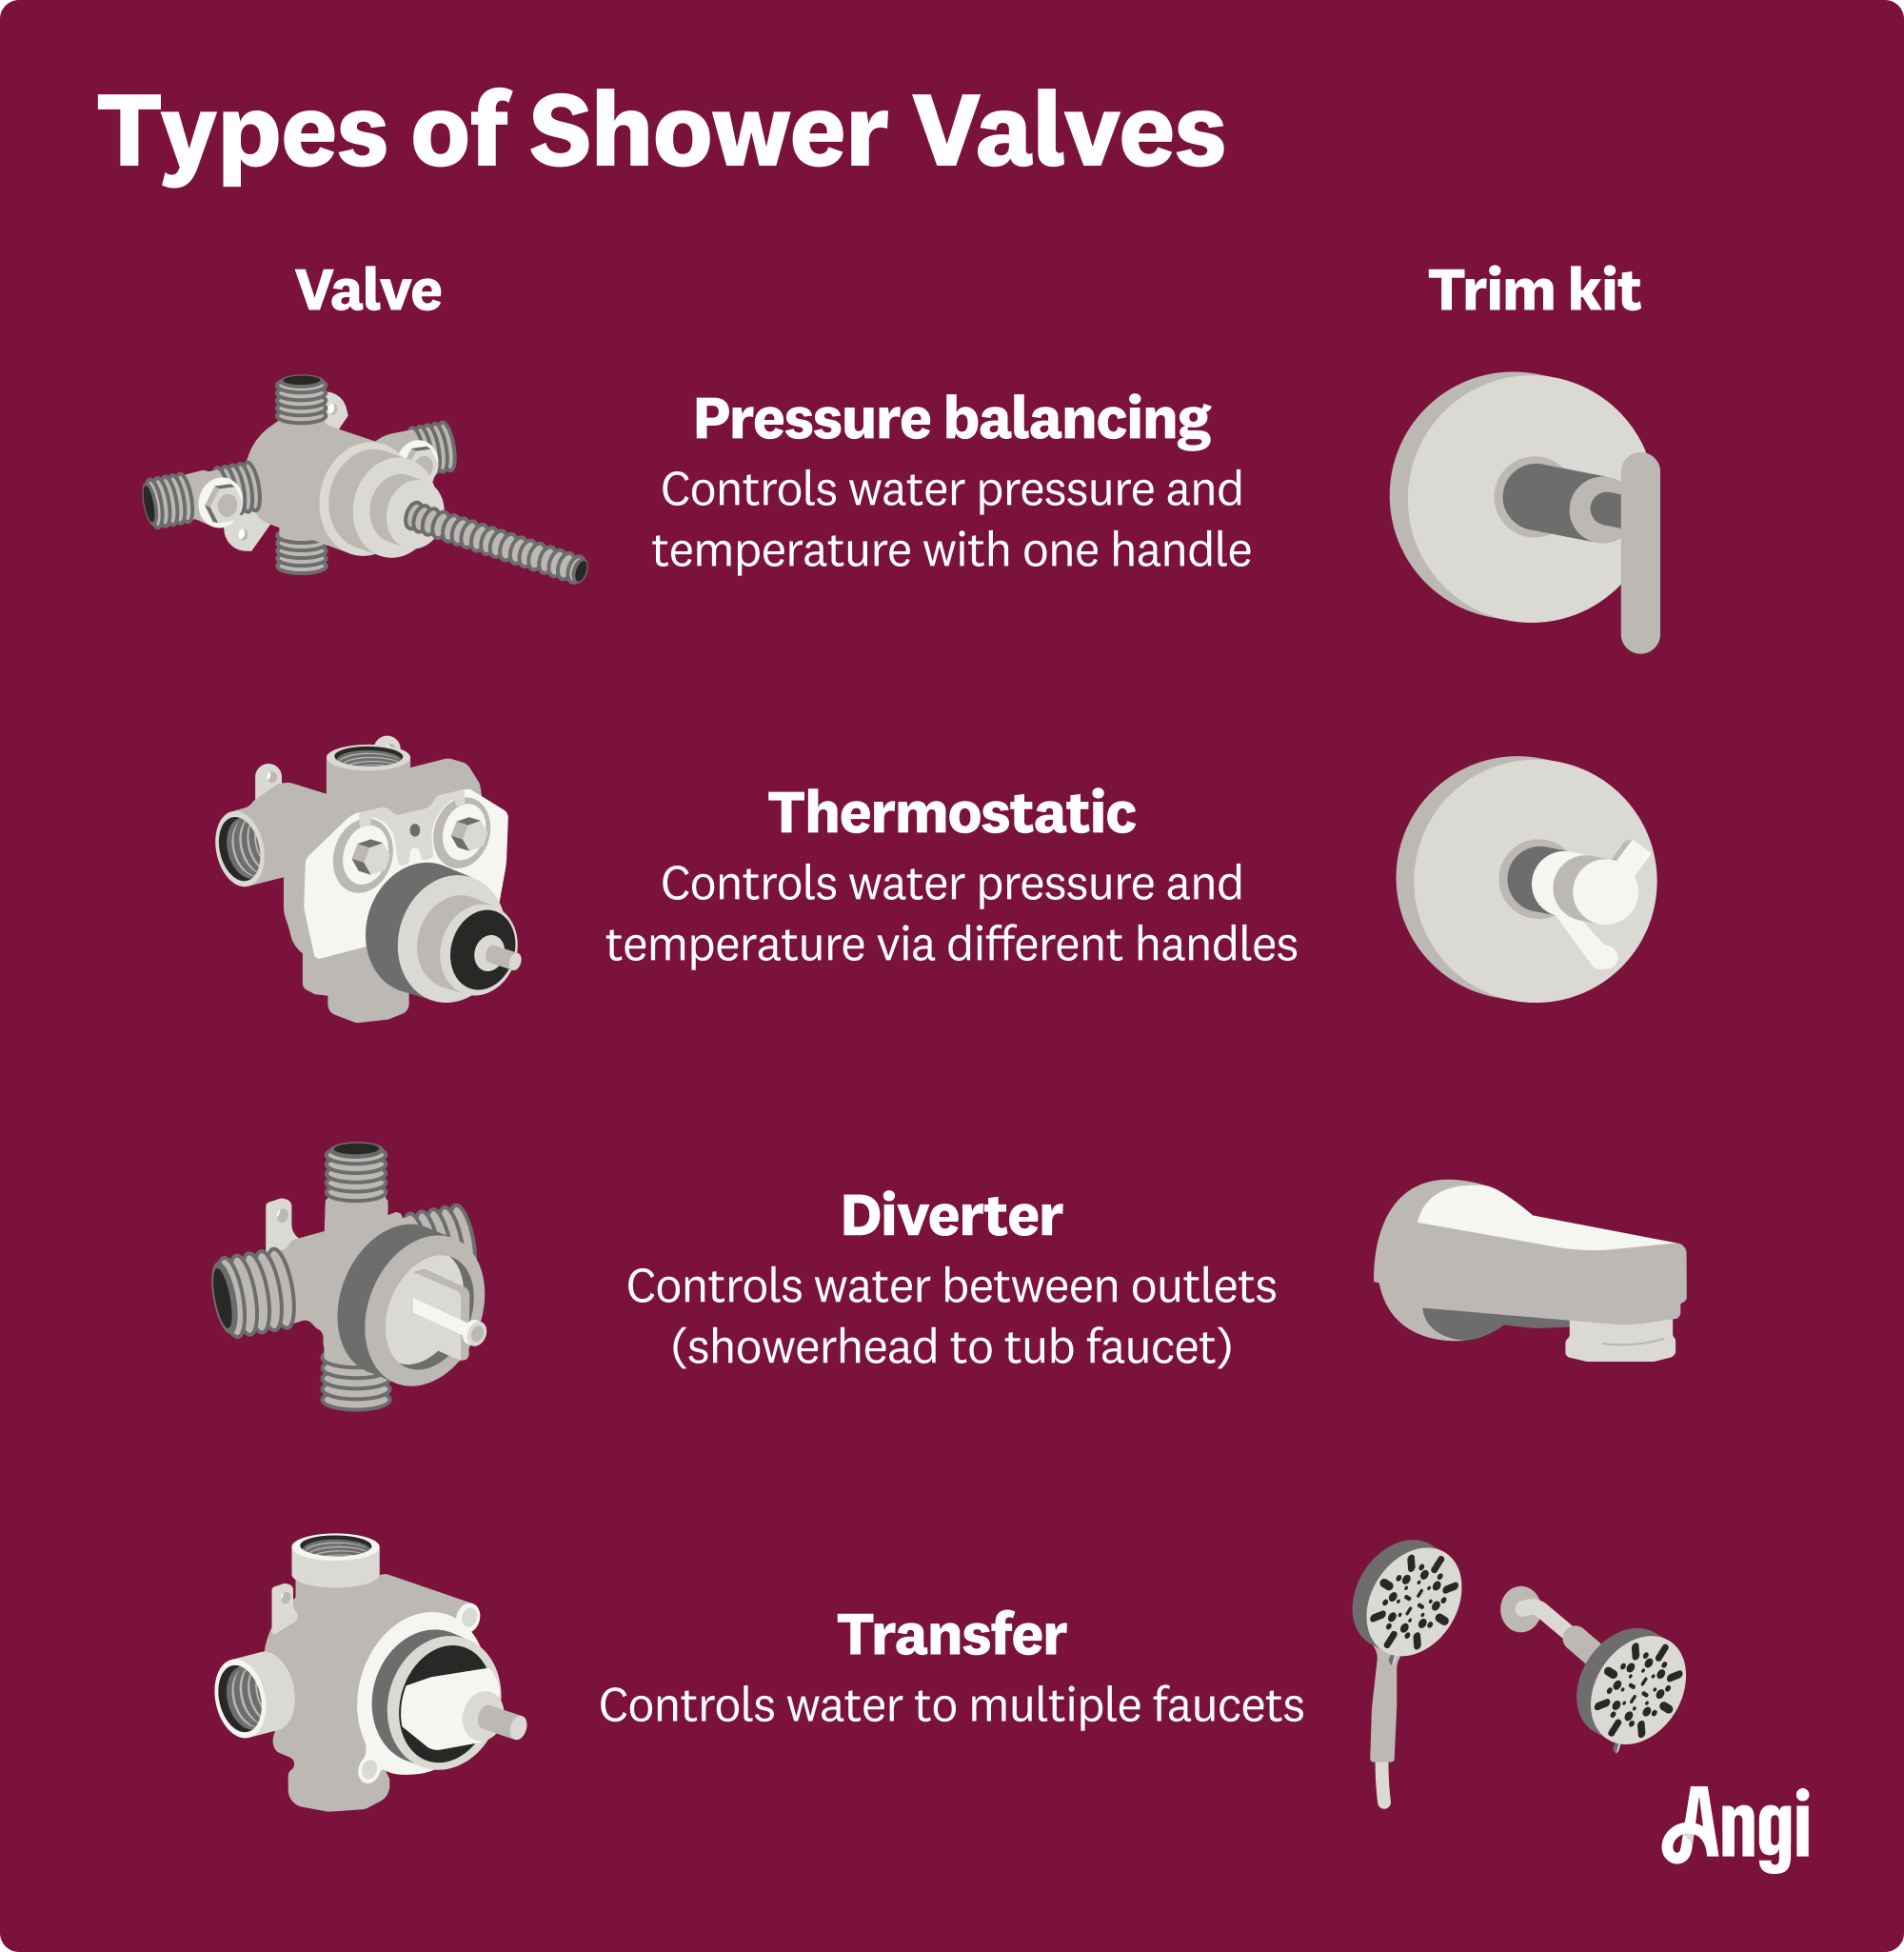
Before touching any tools, you need to understand what kind of valve controls your shower. Each type uses a different method for adjusting temperature limits, and choosing the wrong approach can damage your plumbing or void your warranty.
Single-Handle vs Dual-Handle Valves
Single-handle valves dominate homes built after 1990. One lever controls both flow and temperature by rotating side-to-side, mixing hot and cold water through an internal cartridge. These typically include a rotational limit stop that caps how far the handle can turn toward hot water. Delta, Moen, Kohler, and American Standard all use this design.
Dual-handle valves feature separate hot and cold knobs. Temperature is manually mixed by turning each handle. While they lack built-in anti-scald technology, many still have stop screws or stem pins that limit how far the hot handle can open.
Visual clue: One lever means single-handle with a limit stop. Two knobs suggest a dual-handle system requiring stem-level tweaks.
Thermostatic and Pressure-Balancing Valves
Thermostatic mixing valves automatically maintain a preset temperature even when water pressure fluctuates, such as when someone flushes a toilet. Found in high-end or commercial installations, they feature dials or digital readouts and often require a special key or screw to recalibrate. Brands like Grohe, Hansgrohe, and Pfister commonly use this design.
Pressure-balancing valves respond to sudden pressure drops but don’t maintain exact temperatures like thermostatic models. Most include manual limit stops similar to single-handle designs.
Pro tip: Look for a small dial, cap, or calibration mark behind the handle trim. This often indicates a thermostatic or adjustable pressure-balancing valve.
Access Internal Components Safely
To adjust temperature limits, you must remove the handle and expose the internal mechanism. Working carefully prevents damage to finishes and keeps small parts from disappearing down the drain.
Remove the Handle Cap and Set Screw
Start by turning off the water supply at the main shutoff or bathroom isolation valves. Then follow these steps:
- Pry off the decorative cap on the handle using a flathead screwdriver. It may be red and blue, marked with “H/C,” or colorless.
- Expose the set screw beneath the cap. This secures the handle to the valve stem.
- Loosen the set screw with a Phillips screwdriver or Allen wrench. Common sizes are 1/8″ or 5/64″.
- Pull the handle straight off the stem without twisting or forcing it.
Warning: Over-tightening the set screw during reassembly can crack plastic handles. Snug is enough.
Extract the Handle Adapter and O-Ring
Once the handle is removed, you’ll see a hex-shaped handle adapter secured by a small screw.
- Remove the adapter screw.
- Gently pull out the handle adapter.
- Lift off the O-ring, the small rubber seal that prevents leaks.
Now you can access the rotational limit stop or cartridge, depending on your valve model.
Pro tip: Place all screws and small parts on a towel laid in the tub to avoid losing them.
Adjust Rotational Limit Stops by Brand
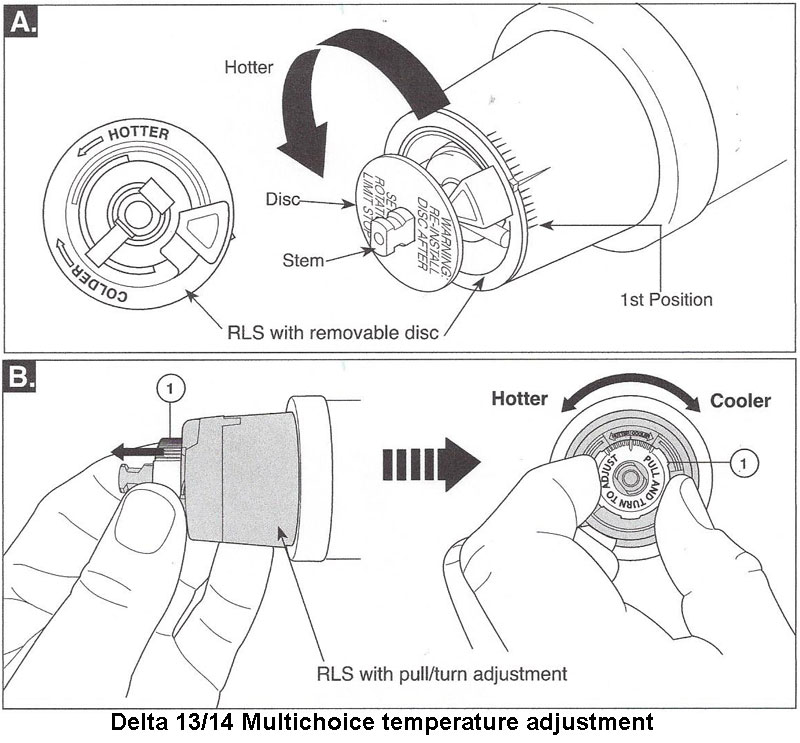
The rotational limit stop is a plastic or brass plate that physically blocks the handle from turning too far into the hot zone. Adjusting it changes the maximum water temperature your shower can produce.
Delta: Turn Counterclockwise for More Heat
On Delta valves, rotate the limit stop counterclockwise to allow more hot water. Each notch typically increases temperature by 5 to 10 degrees Fahrenheit.
- Hold the stop with markings facing you.
- Rotate it one notch counterclockwise.
- Reinsert and reassemble temporarily for testing.
Note: Delta’s design allows fine-tuned control without replacing parts. Use cartridge model RP46074 if worn.
Allen + Roth: Rotate Clockwise to Increase Heat
Allen + Roth valves, sold at Lowe’s, work in reverse. Turn the adapter plate clockwise to let the handle move further into the hot range.
- Remove the Phillips screw securing the plate.
- Rotate the plate clockwise while keeping it engaged with the brass fitting.
- Do not fully tighten until after temperature testing.
Model confirmation: This method applies to Allen + Roth #2517117 and similar units.
Universal Method for Moen, Kohler, and American Standard
Most other brands follow a clockwise rotation to increase hot water access.
- Locate the plastic stop ring or metal plate on the valve stem.
- Rotate it clockwise as viewed from above to extend hot-side travel.
- Some models let you flip the stop for preset positions, such as “cool” or “hot” mode.
Caution: Never force the stop. Misalignment causes handle binding and potential damage.
Test Temperature Accurately
Never rely on hand testing. Water at 120°F feels warm but can cause third-degree burns in two minutes. Always use a digital waterproof thermometer for accurate results.
Follow a Standard Testing Protocol
- Wait 1 to 2 hours after heavy water use to ensure your water heater has fully recovered.
- Set the shower to full hot and let it run for 60 to 90 seconds.
- Hold the thermometer in the direct water stream at full flow.
- Record the reading after 30 seconds.
- Repeat twice and average the results.
Target range: 105 to 120°F. Never exceed 120°F at the fixture.
Recognize Scald Risk Levels
Water temperature determines how quickly burns occur. At 125°F, skin burns in 2 minutes. At 130°F, burns happen in just 30 seconds. At 140°F, injury occurs in just 5 seconds.
Safety standard: The CPSC and American Academy of Pediatrics recommend 104°F or lower in homes with children.
Recalibrate Thermostatic Mixing Valves
If your shower maintains a precise temperature automatically, it likely has a thermostatic mixing valve. These are common in luxury homes and commercial settings.
Access the Calibration Dial
- Remove the handle and trim plate.
- Look for a hidden dial, screw, or cap behind the faceplate.
- Some models, such as Grohe and Hansgrohe, require a special calibration key.
Make Small Incremental Changes
- Turn the dial clockwise for hotter settings.
- Adjust in 1 to 2°F increments.
- Wait 2 to 3 minutes for the system to stabilize.
- Test with a thermometer.
Example models: Grohe Tempesta, Hansgrohe Raindance, and Pfister Pfromance all support recalibration via concealed dials.
Lock the Setting
Many thermostatic valves have tamper-resistant caps or screws to prevent accidental changes. Reinstall these after adjustment, especially in homes with children.
Standard compliance: ASSE 1017 requires thermostatic mixing valves to maintain ±3°F accuracy and shut off if failure occurs.
Fix Dual-Handle Temperature Limits
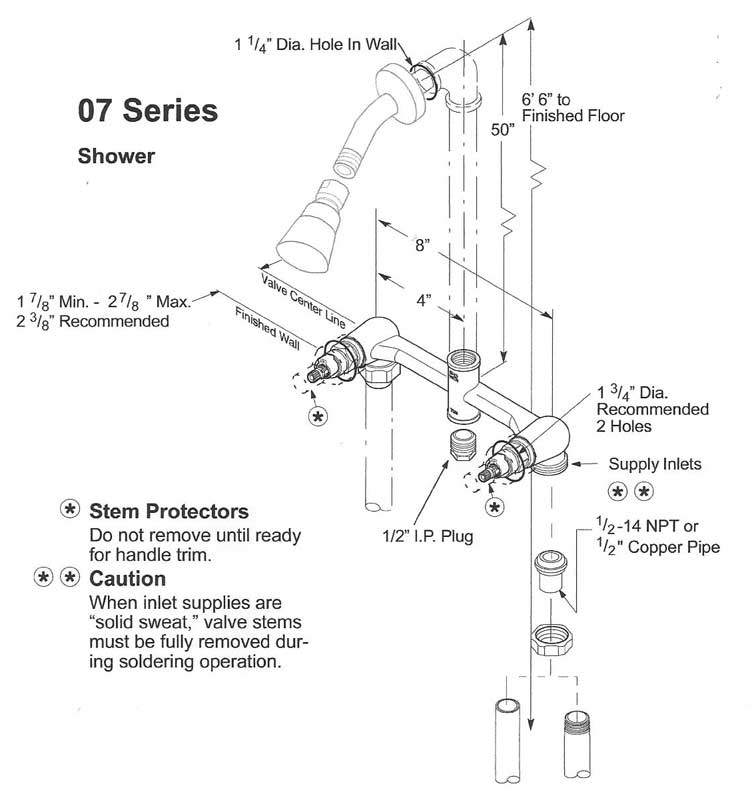
For older two-knob showers, maximum heat is controlled by the hot water stem’s rotation limit.
Locate the Stop Mechanism
- Remove the red “H” cap and handle screw.
- Lift off the handle to expose the valve stem.
- Look for a stop screw, pin, or washer that limits how far the stem can turn.
Modify for Greater Hot Water Flow
- Loosen the stop screw and reposition it to allow more open travel.
- Replace the washer with one that permits greater rotation.
- In metal-stem models, file down the stop slightly, but never remove it completely.
Warning: Always preserve cold water functionality. You must still be able to mix and cool the stream.
Troubleshoot Common Adjustment Issues
Even with correct steps, problems can arise. Here’s how to fix them fast.
Water Still Too Cold After Adjustment
Cause: Limit stop not rotated enough or misaligned.
Fix: Recheck the position and rotate another notch. Ensure the stop is fully seated in its groove.
Handle Binds or Feels Stiff
Cause: O-ring or adapter misaligned during reassembly.
Fix: Disassemble and realign the components. Apply silicone grease to the O-ring before reinstalling.
Leaks Around the Handle
Cause: Damaged O-ring or loose connections.
Fix: Replace the O-ring with an EPDM or nitrile rubber equivalent. Tighten all screws securely, but avoid over-tightening.
Sudden Temperature Swings
Cause: Failing cartridge or pressure imbalance.
Fix: Replace the cartridge with the correct model, such as Moen 1222 or Delta RP46074. Check for clogged pipes or low cold water pressure.
Scalding Despite Adjustment
Cause: Faulty anti-scald mechanism or disabled limiter.
Fix: Replace the cartridge or consult a licensed plumber. Never disable safety features.
Maintain Optimal Performance Long-Term
Regular maintenance keeps your shower safe, efficient, and responsive.
Inspect Every 6 to 12 Months
- Check handle tightness and screw condition.
- Clean mineral buildup from the adapter plate and stem, especially in hard water areas.
- Re-test temperature to ensure settings haven’t drifted.
Replace Cartridges Every 5 to 10 Years
Cartridges wear out over time, causing erratic temperature control, leaks inside the wall, and gritty or loose handle feel. Always shut off water before removal and use the exact replacement part.
Popular models: Delta RP46074, Moen 1222, and Kohler K-304.
Set Water Heater to 120°F
Even with fixture adjustments, your water heater thermostat sets the upper limit. The ideal range is 120 to 130°F. Higher temperatures kill bacteria like Legionella but increase scald risk.
Energy tip: Every 10°F increase raises energy use by 5 to 10%. Balance comfort with efficiency.
Follow Safety and Best Practices
Adjusting shower temperature isn’t just about comfort. It’s a safety-critical task that requires precision and care.
Always Use a Thermometer
Hand testing is unreliable. Skin sensitivity varies, and dangerous temperatures may feel only warm. A digital waterproof thermometer is essential.
Make Incremental Changes
Adjust in 1/8-turn increments and test after each change. Over-rotation can create a scald hazard.
Document Original Settings
Before disassembling, take a photo or sketch of the limit stop position. This lets you reset if something goes wrong.
Never Disable Anti-Scald Features
These are legally required in most jurisdictions. Instead, adjust within safe limits up to 120°F at the fixture.
Install Tamper-Resistant Caps
In homes with kids or elderly users, use locking caps or screws to prevent unauthorized changes.
Final advice: When in doubt, especially with thermostatic or pressure-balancing valves, call a licensed plumber. Safety comes first.
Frequently Asked Questions About Adjusting Shower Faucet Temperature
Can I adjust my shower temperature without removing the handle?
Most single-handle valves require handle removal to access the rotational limit stop. Some thermostatic valves have external dials that allow adjustment without disassembly, but these are typically found in premium installations.
Why does my shower get cold when someone flushs a toilet?
This indicates a pressure-balancing valve that isn’t working properly. The valve should automatically compensate for pressure changes. If it fails to do so, the cartridge may need replacement.
What temperature is safest for a household with children?
The CPSC recommends 104°F or lower. At this temperature, water is comfortable but unlikely to cause burns, even if a child encounters it unexpectedly.
How long does it take to adjust a shower faucet temperature?
Most adjustments take 10 to 15 minutes. Testing and reassembly may add another 10 minutes, for a total of approximately 20 to 30 minutes.
Will adjusting my shower faucet affect the water heater settings?
No. The adjustment only changes the maximum temperature allowed at the fixture. Your water heater setting remains independent and should stay at 120°F for safety and efficiency.
Key Takeaways for Adjusting Your Shower Faucet Temperature
Adjusting your shower faucet temperature is a simple yet powerful way to improve comfort and safety in your bathroom. By identifying your valve type first, you can determine exactly which adjustment method applies to your situation. Whether you’re working with a Delta rotational limit stop, an Allen + Roth adapter plate, or a thermostatic mixing valve, the principles remain the same: access the temperature control mechanism, make small incremental adjustments, and verify results with a thermometer.
Always test with a digital thermometer rather than relying on hand feel, as skin sensitivity varies widely. Never exceed 120°F at the fixture, and consider setting your water heater to 120 to 130°F for the optimal balance of safety and efficiency. If your valve is complex or you’re unsure about any step, calling a licensed plumber is the smart choice. With this knowledge, you can achieve the perfect shower temperature while keeping your household safe.







