
Faucet handles are touched dozens of times a day, making them one of the germiest surfaces in your home. Research shows these handles can harbor up to 229,000 germs per square inch, creating a breeding ground for bacteria, hard water deposits, and grime. Beyond hygiene concerns, neglected handles can become stiff, discolored, or damaged over time due to mineral buildup and corrosion.
This guide covers everything you need to know about how to clean faucet handles, from quick daily wipe-downs to deep cleaning that removes stubborn limescale. You’ll learn the best tools, safest cleaners for each finish type, and step-by-step methods to restore smooth operation without damaging your fixtures.
Daily Disinfection Routine
Wiping your faucet handles daily takes less than two minutes but dramatically reduces germ transmission, especially in busy households. This quick habit prevents the buildup of bacteria, viruses, and everyday grime that accumulates from repeated touching.
Quick Wipe with Disinfecting Wipes
Use disinfecting wipes daily for fast, effective germ control in high-traffic areas.
Steps:
1. Pre-clean any visible debris with a damp cloth
2. Wipe the entire handle surface, base ring, and pivot points
3. Let the solution sit for 4 to 10 minutes per product label
4. Dry with a microfiber towel to prevent moisture retention
Keep a pack of disinfecting wipes near your sink for quick cleaning after cooking or using the bathroom. This habit works especially well in homes with children or multiple occupants.
Avoid using standard disinfecting wipes on oil-rubbed bronze or matte black finishes unless the product specifically states it’s safe for these surfaces.
Weekly Surface Cleaning
A more thorough weekly cleaning removes fingerprints, water spots, and light soap residue that daily wiping might miss. This routine maintains your faucet appearance and prevents grime from hardening into permanent buildup.
Gentle Soap and Water Method
This method works safely on all faucet finishes.
Steps:
1. Mix a few drops of dish soap in warm water
2. Dip a microfiber cloth, wring well, and wipe the handle thoroughly
3. Pay extra attention to crevices and the base where grime collects
4. Rinse with a clean damp cloth
5. Dry immediately with a microfiber towel to prevent water spots
Vinegar Spray for Chrome and Polished Finishes
White vinegar effectively dissolves mineral deposits on chrome, stainless steel, and polished brass.
Steps:
1. Mix equal parts white vinegar and water in a spray bottle
2. Spray onto the handle and let sit for 1 to 2 minutes
3. Wipe clean with a soft cloth
4. Rinse and dry thoroughly
Never use vinegar on oil-rubbed bronze, matte black, or unlacquered brass. The acid can strip protective coatings and cause permanent discoloration.
Deep Clean with Handle Removal
Even regular wiping misses hidden grime accumulating under the handle base and around the stem. Removing the handle every 3 to 6 months allows complete access to these areas, preventing long-term corrosion and stiffness.
Tools You Will Need
Gather these items before starting:
- 3/32 inch hex key (Allen wrench)
- Flathead screwdriver or butter knife
- Soft toothbrush
- Microfiber cloths
- Small bucket or towel to catch small parts
- Rubber gloves for cleaning solutions
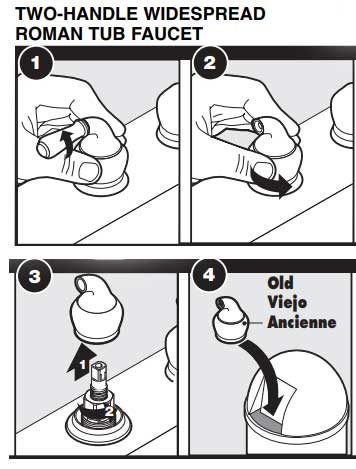
Step-by-Step Handle Removal
Steps:
1. Turn off the water supply valves under the sink
2. Pry off the decorative cap on top of the handle using a flathead tool
3. Locate the set screw beneath the cap
4. Loosen the set screw counterclockwise with the hex key
5. Pull the handle straight off the stem
6. Set aside the cap and screw in a safe place
If the handle sticks due to mineral buildup, gently wiggle it rather than forcing it. Forcing can damage the stem or crack the handle.
Look for white, chalky residue or green corrosion around the stem. These are clear signs of mineral buildup or oxidation that needs addressing.
Soak and Scrub Internal Parts
With the handle removed, you can now target the limescale and grime that causes stiffness and poor operation. Soaking dissolves mineral deposits, while scrubbing reaches into threads and crevices.
Vinegar Soak for Light to Moderate Buildup
Steps:
1. Fill a bowl with distilled white vinegar (5% acidity)
2. Submerge the handle and stem for 15 to 30 minutes
3. For stubborn deposits, extend soaking to several hours or overnight
4. Scrub with a soft toothbrush, focusing on threading and contact points
5. Rinse thoroughly under running water
6. Dry completely before reassembly
Warming the vinegar slightly (without boiling) speeds up mineral breakdown. Do not use hot vinegar, as it can damage some finishes.
CLR for Heavy Buildup
Commercial descalers work faster than vinegar on thick calcification.
Steps:
1. Apply CLR directly to heavily scaled areas or soak parts per label instructions
2. Wait 10 to 15 minutes maximum
3. Scrub gently with a toothbrush
4. Rinse thoroughly to remove all residue
Always wear gloves and eye protection when using CLR. Never mix CLR with vinegar or bleach, as this creates toxic fumes.
Fix Sticky or Stiff Handles
A stiff handle usually stems from either limescale on the stem or worn-out packing material. Identifying the cause saves time and prevents unnecessary repairs.
If Limescale Is the Problem
Follow the vinegar soak or CLR method described above. After thorough cleaning and drying, reassemble and test the handle. Most stiffness caused by mineral deposits resolves with descaling.
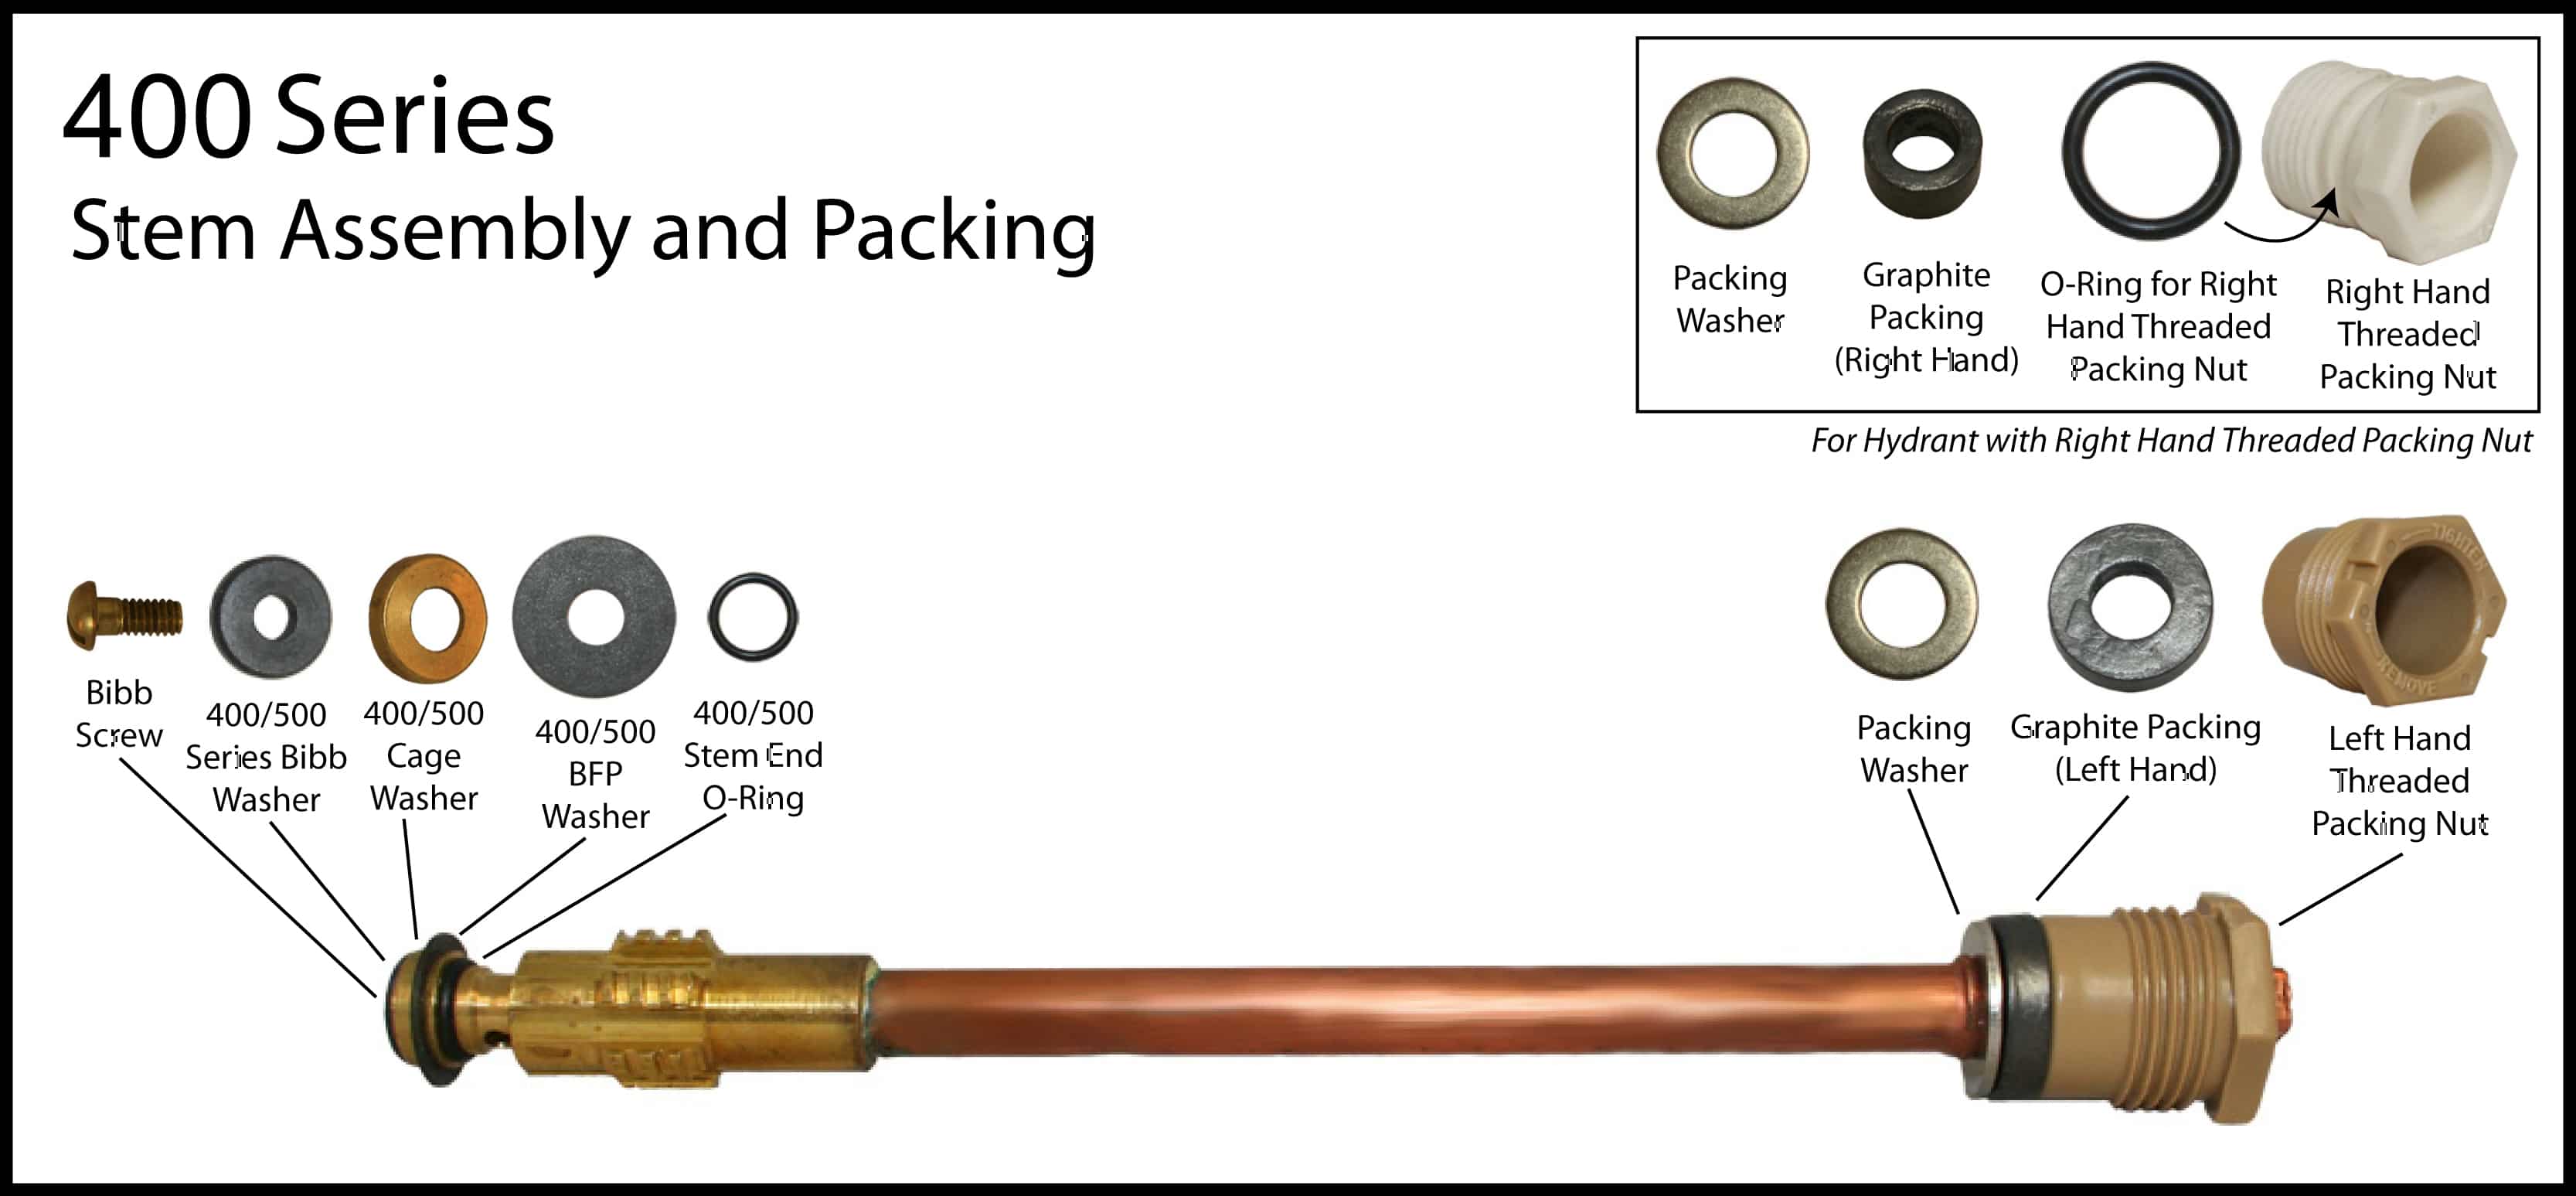
If Worn Packing Is the Problem
Older compression faucets often develop stiffness from dried-out O-rings or washers.
Repair Steps:
1. Turn off the water supply
2. Remove the handle and locate the packing nut
3. Pull out the old fibrous packing or rubber washer
4. Replace with a new packing kit, or wrap the stem with 2 to 3 wraps of Teflon tape
5. Apply a small amount of pipe dope for lubrication
6. Reinstall the packing nut, tightening just enough to stop leaks while allowing smooth turning
This adjustment restores free movement without dripping.
Clean Non-Removable Handles
Some faucet designs don’t allow handle removal. The vinegar wrap method reaches buildup without disassembly.
Vinegar Cloth Wrap Technique
Steps:
1. Soak a paper towel or cloth in white vinegar
2. Wrap it tightly around the base and stem
3. Cover with plastic wrap to slow evaporation
4. Leave for several hours or overnight
5. Remove, scrub with a toothbrush, rinse, and dry
This method works well for globe-style or integrated handles that resist removal. Test a small hidden area first to ensure the finish tolerates prolonged vinegar exposure.
Prevent Hard Water Stains
Hard water leaves calcium carbonate deposits that dull finishes and clog mechanisms. Acting fast prevents permanent damage.
Immediate Solutions
Several products work quickly against fresh mineral buildup:
- Lysol Power Bathroom Cleaner: Spray, wait 15 to 20 seconds, wipe clean
- Vinegar spray (50/50): Effective for chrome and stainless steel
- CLR: For rapid results on severe scaling
White crust around the base, cloudy finish, and reduced water flow indicate hard water problems.
Long-Term Prevention
Install a water softener if your area has hard water. Wipe handles dry after each use. Choose faucets with SpotShield or Brilliance finishes, which resist spots and corrosion naturally.
Care for Your Faucet Finish
Using the wrong cleaner permanently damages faucet finishes. Always match your cleaning method to the specific finish type.
Chrome, Stainless Steel, and Polished Brass
Safe options include Windex, diluted vinegar, and Formula 409. Avoid steel wool, abrasive pads, and bleach. Always dry after cleaning to prevent water spots.
Oil-Rubbed Bronze and Matte Black
Use only manufacturer-recommended cleaners. Avoid vinegar, ammonia, and acidic solutions entirely. These cleaners strip protective coatings and cause fading.
Delta SpotShield and Brilliance Finishes
These proprietary finishes resist water spots, fingerprints, and corrosion. They tolerate most non-abrasive cleaners and come with lifetime warranties against tarnish and discoloration.
Test any new cleaner on a small, hidden area before using it on visible surfaces.
Reassemble and Test
Proper reassembly ensures your faucet operates correctly and doesn’t leak.
Steps:
1. Slide the handle back onto the stem, aligning properly
2. Insert and tighten the set screw snugly without over-tightening
3. Snap the decorative cap back into place
4. Turn the water supply back on
5. Test handle movement and check for leaks
Before turning water back on, confirm all parts are rinsed and dry, the handle is fully seated, and no tools remain in the sink.
Maintenance Best Practices
Consistent care prevents major problems. Establish a routine that matches your household’s usage level.
Recommended Schedule
Daily: Wipe with disinfecting wipes and dry after use
Weekly: Clean with soapy water or vinegar (finish-permitting)
Monthly: Check for leaks, looseness, or stiffness
Every 3 to 6 months: Remove handles for deep cleaning and inspect internal components
In hard water areas, increase descaling treatments to weekly or biweekly.
When to Replace Instead of Repair
Some damage cannot be fixed with cleaning alone.
Signs You Need a New Faucet
Replace if you notice base corrosion spreading into the valve body, flaking or peeling plating, a handle that won’t turn even after descaling and repacking, or no replacement parts available for your model.
Modern faucets with Touch-Clean technology or SpotShield finishes require far less maintenance and resist buildup naturally. In many cases, replacement costs less than professional restoration.
Frequently Asked Questions About Cleaning Faucet Handles
How often should I clean my faucet handles?
Clean daily with disinfecting wipes and perform a thorough weekly cleaning. Remove handles for deep cleaning every 3 to 6 months, or more frequently in hard water areas.
Can I use vinegar on all faucet finishes?
No. Vinegar damages oil-rubbed bronze, matte black, and unlacquered brass finishes. Use it safely only on chrome, stainless steel, and polished brass.
Why does my faucet handle feel stiff after cleaning?
Stiffness usually comes from limescale buildup on the stem or worn packing material. Soak in vinegar to dissolve deposits, or replace the O-ring and packing with Teflon tape.
What is the fastest way to remove hard water stains?
CLR or Lysol Power Bathroom Cleaner work fastest on heavy scaling. Apply, wait 10 to 15 minutes, scrub gently, and rinse thoroughly.
Should I call a plumber for a sticky faucet handle?
Try descaling and repacking with Teflon tape first. If the handle still won’t move smoothly, or if you see corrosion inside the valve body, call a plumber to assess whether repair or replacement makes more sense.
Do SpotShield finishes really need less cleaning?
Yes. SpotShield and similar technologies repel water spots and fingerprints, reducing cleaning frequency. They still benefit from regular disinfection but resist the staining that comes from hard water.
Key Takeaways for Cleaning Faucet Handles
Regular cleaning keeps faucet handles hygienic, functional, and looking new. Daily disinfection with wipes controls germs, while weekly soapy cleaning removes everyday grime. Removing handles every few months allows you to reach hidden buildup that causes stiffness and corrosion.
Always match your cleaner to your finish type, and address hard water stains immediately to prevent permanent damage. For sticky handles, diagnose whether limescale or worn packing is the culprit, then treat accordingly. When cleaning can’t restore function, modern replacement faucets with advanced finishes offer easier long-term maintenance.
Start today by wiping down your faucet handles and scheduling a deep clean for this weekend. Your fixtures will stay smoother, cleaner, and more hygienic for years to come.


