
Nothing ruins a kitchen routine faster than a sputtering spray head. If your faucet spray mode is weak, uneven, or blocked, mineral buildup and biofilm are likely the culprits. The good news is that cleaning a faucet spray head is simple, affordable, and often takes less than an hour. Using just distilled white vinegar, a toothbrush, and a few household items, you can restore full water pressure and keep your faucet hygienic. This guide covers every safe, effective method tailored to your faucet finish, water hardness, and design so you clean right without damaging your fixture.
Vinegar Soak for Full Descaling
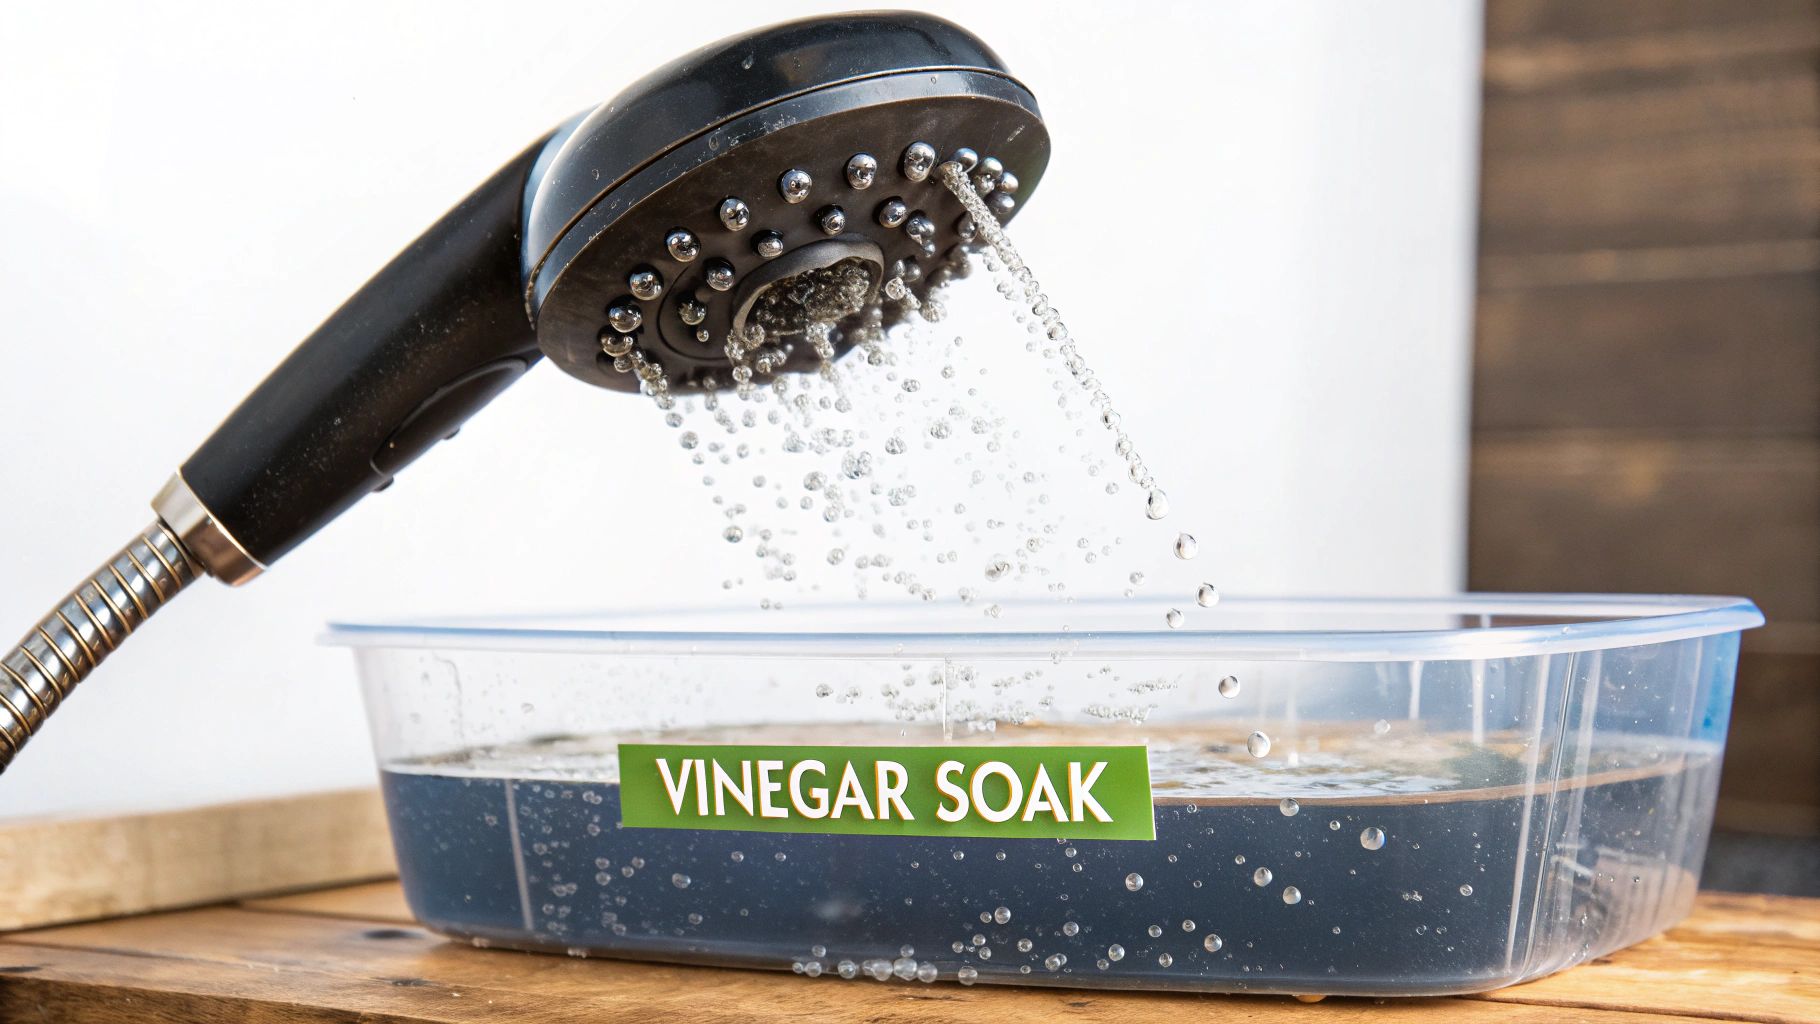
The vinegar soak is the most reliable way to dissolve limescale and unclog spray nozzles. This method works especially well on pull-down and pull-out kitchen sprayers where water sits and evaporates, leaving behind calcium and magnesium deposits.
Submerge the Spray Head in Vinegar
Fill a small bowl or plastic bag with distilled white vinegar. Place the spray head face-down so all nozzles are fully submerged. If using a bag, secure it around the faucet base with a rubber band. For best results, use a binder clip or chip clip to gently hold the spray trigger open. This allows vinegar to flow into internal channels.
Soak for 1 Hour and Repeat if Needed
Let the spray head soak for 60 minutes. Vinegar naturally breaks down mineral deposits and biofilm. After the first hour, remove it and scrub the surface with a soft toothbrush or plastic brush. Focus on clogged nozzles and crevices. If flow is still restricted, repeat with a second soak using fresh vinegar.
Rinse and Test Water Flow
Turn on the faucet and flush the spray head with clean water for 30 seconds. This removes loosened particles and residual vinegar. Remove the clip, then test the spray. A restored, even stream means the job is done.
Pro Tip: For silicone-tipped nozzles, rub them with your finger after soaking. Mineral deposits pop out easily.
Quick Surface Cleaning for Routine Maintenance
For daily maintenance, a quick wipe keeps your spray head clean and reduces buildup between deep cleans. This 10-minute method prevents long-term accumulation.
Wipe With Soapy Water and Microfiber
Dampen a soft cloth with warm, soapy water using mild dish soap. Wring it out well and wipe the entire spray head, handles, and base. Pay extra attention to the underside where moisture collects and grime sticks.
Treat Water Spots With Vinegar Solution
Mix equal parts white vinegar and water. Apply to water spots with a cloth or spray bottle. Let sit for 2 to 3 minutes, then wipe clean. This dissolves light mineral film without risking damage to compatible finishes.
Sanitize Handles With Alcohol
To reduce germs, wipe handles with a 70% isopropyl alcohol wipe. Let air-dry with no rinsing needed. This step is especially useful after handling raw food or when someone is sick in the household.
Time-Saver: Keep a vinegar-soaked cloth in a zip-top bag under the sink for quick wipe-downs throughout the week.
Baking Soda Paste for Stubborn Gunk

When soap and vinegar are not enough, baking soda adds gentle abrasion to lift tough residue. This method works well for soap scum and oxidized minerals.
Make a Thick Cleaning Paste
Mix 3 parts baking soda with 1 part water until it forms a spreadable paste. Avoid making it too runny, as it will not adhere to vertical surfaces.
Apply and Scrub Lightly
Dab the paste onto clogged nozzles or discolored areas. Wait 1 to 2 minutes, then gently scrub with a soft toothbrush. The mild abrasiveness helps remove soap scum, biofilm, and oxidized minerals without damaging the finish.
Use With Vinegar But Rinse First
For maximum effect, use vinegar first, rinse thoroughly, then apply baking soda paste. The two react with a fizz that helps break apart debris. Never apply them at the same time. Excessive foaming can push grime deeper into the nozzles.
Warning: Do not scrub vigorously. Even gentle abrasives can scratch matte or brushed finishes.
Citric Acid for Severe Limescale
In hard water areas, citric acid is a powerful yet safer alternative to vinegar. This is especially true when odor is a concern or when vinegar has proven ineffective.
Prepare a Citric Acid Solution
Mix 1 to 2 tablespoons of citric acid powder with 1 cup of warm water. Stir until fully dissolved. Warm water speeds up the descaling process significantly.
Soak for 10 to 20 Minutes
Submerge the spray head or place the solution in a bag secured with a rubber band. Soak for no longer than 20 minutes. Citric acid effectively dissolves calcium carbonate without the strong smell of vinegar.
Scrub and Rinse Thoroughly
After soaking, lightly brush the nozzles and rinse under running water. Citric acid leaves no oily residue, but incomplete rinsing can attract dust and create new buildup.
Best For: Faucets with visible chalky buildup or homes with water hardness over 7 grains per gallon.
Clean the Aerator for Complete Flow Restoration

A clogged aerator can mimic a faulty spray head. Cleaning it restores full pressure and prevents future issues throughout the faucet system.
Remove and Disassemble the Aerator
Unscrew the aerator from the faucet spout. Use an aerator key or rag-wrapped wrench if it is tight. Take a photo before disassembling. This helps with correct reassembly and prevents lost parts.
Soak in Vinegar Solution
Place all parts including screen, flow regulator, and housing in a 1 to 1 vinegar-water mix for 15 to 30 minutes. Rinse under running water to flush out debris from every component.
Reassemble and Reinstall
Put components back in the correct order. Add a tiny dab of plumber’s grease to the threads to prevent seizing. Screw the aerator back on by hand, tightening securely but not overforcing.
Flow Still Low? Replace the flow restrictor. They cost under $5 and often cause blockages in hard water areas.
Flush Internal Faucet Lines
Mineral particles and biofilm can hide inside supply lines, recontaminating your faucet even after you clean the spray head. This step ensures complete restoration.
Shut Off Water and Relieve Pressure
Turn off the water supply valves under the sink. Open the faucet to release pressure and drain remaining water completely.
Remove Aerator and Flush
With the aerator off, turn the water back on briefly and let it run into a bucket for 10 to 15 seconds. This clears sediment from internal pipes that feed the faucet.
Reinstall and Test
Screw the aerator back on and turn the water supply back on. Check for leaks at all connections and test spray performance for even flow.
When to Do This: Quarterly, or whenever you notice cloudy water or gritty particles coming from the faucet.
Protect Sensitive Faucet Finishes

Not all faucets can handle vinegar. Using the wrong cleaner can dull, spot, or permanently etch the surface. Always match your method to your specific finish.
Chrome and Stainless Steel: Vinegar-Safe
These durable finishes tolerate short vinegar soaks of 10 to 30 minutes. Always dilute vinegar 1 to 1 with water and dry immediately after cleaning to prevent water spots.
Brushed Nickel and Matte Black: Avoid Acids
Never soak these finishes in vinegar or citric acid. The protective coating can degrade, leading to permanent spotting or corrosion. Use only mild soap and water for cleaning.
Oil-Rubbed Bronze and Unlacquered Brass: Gentle Only
Acids strip the sealant and alter the natural patina on these finishes. Clean with a damp microfiber cloth and dry promptly. Avoid alcohol and hydrogen peroxide on these materials.
Golden Rule: Spot-test any cleaner on a hidden area first. Wait 5 minutes, then check for discoloration before proceeding.
Prevent Buildup With Smart Habits
Regular maintenance beats deep cleaning every time. A few simple habits go a long way toward keeping your spray head clear.
Wipe After Every Use
Keep a dry microfiber towel under the sink. A quick wipe after washing dishes prevents water spots and mineral accumulation on all surfaces.
Dry the Spray Head
After use, shake excess water from the hose and hang the spray head properly. Moisture breeds bacteria and accelerates limescale formation significantly.
Install a Water Softener
If you live in a hard water area, a whole-home softener reduces mineral content across all plumbing. Alternatively, use a point-of-use filter at the kitchen sink for targeted protection.
Pro Tip: Look for faucets with anti-scale aerators or silicone nozzles. These resist clogs and are easy to clean when maintenance is needed.
Sanitize Handles the Right Way
Cleaning removes dirt, but sanitizing kills germs. This is especially important in high-touch areas like kitchen faucets.
Use 70% Isopropyl Alcohol
Wipe handles with an alcohol wipe or cloth dampened with 70% isopropyl alcohol. Keep the surface wet for 1 full minute, then let air-dry completely.
Try Hydrogen Peroxide as an Alternative
Use 3% hydrogen peroxide as an alternative. Apply, wait 1 minute, then air-dry. Both methods align with CDC sanitation guidelines for kitchen surfaces.
Never Mix Chemicals: Residual vinegar combined with bleach creates toxic chlorine gas. Always rinse thoroughly between different cleaning products.
When to Call a Professional Plumber
If cleaning does not fix the issue, deeper problems may exist that require professional attention.
Persistent Dripping or Leaks
Check the O-ring and aerator tightness first. If the drip continues, the cartridge or valve seat may be worn. This requires professional repair or replacement.
Internal Corrosion or Staining
If the finish is pitted or water stains will not come off, the faucet may be failing internally. A plumber can assess whether replacement is the better option.
Uncertain About Disassembly
If you are uncomfortable removing internal parts, call a licensed professional. One wrong turn can cause leaks or irreversible damage to your plumbing.
Note: Faucets under warranty should be serviced by the manufacturer or an approved technician to maintain coverage.
Test Your Water for Long-Term Solutions
Frequent clogs may mean your water is harder than you think. Understanding your water quality helps prevent recurring issues.
Check Local Water Reports
Visit your city water quality report online. Look for hardness levels measured in grains per gallon. Over 7 gpg means you likely need a softener for your entire home.
Use a Home Test Kit
Inexpensive kits measure pH, chlorine, lead, and hardness. They help identify whether filtration or treatment is necessary for your specific situation.
Replace Filters on Schedule
If you use a filtered faucet, change the cartridge as recommended by the manufacturer. Old filters can trap bacteria and release contaminants back into your water.
Sign You Need a Softener: White, chalky buildup returns within weeks of cleaning despite your best efforts.
Maintenance Schedule for Spotless Performance
Stick to this simple routine to avoid clogs and extend your faucet life significantly.
Daily, Weekly, Monthly, and Quarterly Tasks
Daily: Wipe with a dry cloth to prevent water spots and mineral film from forming.
Weekly: Wash handles, spout, and spray head with mild detergent and a soft brush.
Monthly: Use a 2 to 3 minute vinegar-water soak on chrome or stainless steel parts. Check for uneven spray patterns.
Quarterly: Deep clean the aerator and spray head with a 15 to 30 minute vinegar soak. Flush supply lines and inspect O-rings for wear.
Yearly: Inspect internal components including hoses, cartridges, and seals. Replace any worn parts before they fail.
Set Reminders: Use your phone calendar or smart home app to schedule cleanings and stay consistent.
Frequently Asked Questions About Cleaning Faucet Spray Heads
Does Baking Soda and Vinegar Really Clean Faucets?
Yes. Vinegar dissolves mineral deposits while baking soda lifts soap scum and grime. Use them sequentially, vinegar first, then a light baking soda paste for best results. Rinse thoroughly between steps to prevent residue buildup.
How Do You Clean the Inside of a Faucet?
Start by removing and soaking the aerator or spray head in vinegar. If buildup persists, shut off water supply, remove the aerator, and flush supply lines into a bucket for one minute. Reassemble carefully, applying plumber’s grease to threads if needed.
How Long Should You Soak a Faucet in Vinegar?
For chrome and stainless steel, 10 to 30 minutes is sufficient. Avoid long soaks on brushed nickel, bronze, matte black, or unlacerated brass. These finishes require mild soap and water only to prevent damage.
Will Vinegar Damage the Finish on a Faucet?
It can if left too long or used undiluted on sensitive finishes. Always spot-test first, limit contact time, and dry immediately. For routine cleaning on delicate finishes, mild soap and water are safer alternatives.
How Do You Remove Gunk From a Faucet?
Gunk is typically a combination of biofilm, soap scum, and mineral deposits. Start with warm soapy water and a soft brush. For tougher buildup, use a short vinegar soak on compatible finishes, followed by a gentle baking soda paste. Rinse and dry thoroughly.
What Is the Fastest Way to Clean a Spray Head With Hard Water Stains?
Soak a cloth in warm 1 to 1 vinegar-water solution and press it onto stained areas for 5 to 10 minutes. Wipe clean, rinse well, and dry immediately. For stubborn spots, follow with a baking soda paste scrub.
Key Takeaways for Cleaning Your Faucet Spray Head
Cleaning a faucet spray head does not require expensive tools or harsh chemicals. With vinegar, baking soda, citric acid, and consistent care, you can maintain strong water flow and a hygienic kitchen. Always match your cleaning method to your faucet finish. Chrome and stainless steel tolerate diluted vinegar soaks, while brushed nickel, matte black, oil-rubbed bronze, and unlacerated brass require only mild soap and water. Prevention is always easier than cure. Wipe your faucet dry after each use, especially in hard water areas, and schedule quarterly deep cleans to keep mineral buildup at bay. A few minutes of regular maintenance saves hours of frustration and preserves your faucet for years to come.


