

A grimy bathroom sink can throw off your entire morning routine. Toothpaste streaks, soap residue, and chalky water spots build up faster than most people expect. The good news is that knowing how to clean a bathroom sink properly takes just minutes once you know the right technique. With a few household staples and a simple 1:5 bleach-water mix, you can knock out daily grime in under 5 minutes or restore a stained sink in under 30 minutes. This guide covers everything from choosing the right cleaner for your sink material to tackling the faucet aerator and preventing future buildup.
Below, you’ll learn how to match your cleaner to the level of soiling, remove hard water stains safely, protect delicate finishes, and keep your sink looking fresh with minimal effort. Whether you have porcelain, ceramic, or enamel, these methods work without expensive specialty products.
Assess Your Sink Before Cleaning
Jumping straight in with the strongest cleaner can damage delicate finishes. A quick evaluation saves time and protects your sink.
Match the Cleaner to the Soiling Level
The right product depends on how dirty your sink actually is:
- Light daily grime: Dish soap with a sprinkle of baking soda
- Heavy soap scum or discoloration: Bar Keepers Friend or a cream cleanser
- Stubborn stains or mineral deposits: Pre-treat for 5–10 minutes before scrubbing
- Hard water scale or calcium crust: 1:5 bleach-water solution with a 15-minute dwell time
Inspect Key Problem Areas
Before scrubbing, check these commonly missed zones:
- Basin surface for etching or discoloration
- Drain and overflow for trapped hair and sludge
- Faucet base and handles for hand oils and toothpaste residue
- Aerator tip for reduced water flow from mineral clogs
Also, identify your sink material. Knowing whether you have porcelain, ceramic, enamel, or natural stone determines which cleaners are safe to use.
Choose the Right Cleaning Solution

One cleaner does not fit every situation. Using the wrong product can scratch finishes or fail to remove stains entirely.
Mild Cleaners for Routine Wipe-Downs
These safe, everyday options handle light buildup without risk:
- Dish soap and baking soda: Mix a few drops of dish soap with a tablespoon of baking soda to form a paste. Gently scrub with a sponge for daily cleaning.
- Soapy water: Ideal for general rinsing and light grime.
- White vinegar: Natural descaler that wipes clean on faucet surfaces.
Bleach-Water Solution for Hard Water Stains
When mineral deposits won’t budge, a 1:5 bleach-to-water solution dissolves calcium, lime, and magnesium deposits on porcelain, ceramic, and most enamel sinks. It costs pennies per use and outperforms most store-bought lime removers.
How to mix it:
- Pour 50ml of thick bleach into a 400ml spray bottle
- Fill with 300ml of water (¾ full)
- Shake well to combine
How to apply:
- Spray the entire sink, including the basin, faucet, and base
- Let it sit 15 minutes to activate
- Scrub lightly with a sponge or brush
- Rinse thoroughly with clean water
⚠️ Never use this mix on natural stone or unsealed surfaces. Never combine bleach with vinegar or ammonia.
Commercial Cleaners for Heavy Buildup
- Bar Keepers Friend: Cuts through rust, stains, and baked-on grime. Apply with a damp sponge and rinse completely.
- Finish-safe cleaners: Required for matte black, brass, or polished faucets. Always read the label first.
The 5-Minute Sink Cleaning Method
For regular maintenance, this fast process keeps your sink looking fresh every day.
Apply Cleaner and Pre-Treat
Spread or spray your chosen cleaner across the basin. Focus extra product on stained areas like the drain lip or faucet base. Let the cleaner sit 5–10 minutes if you’re using baking soda paste or Bar Keepers Friend.
Scrub All Surfaces
Use the right tool for each zone:
- Basin: Scrub in circular motions using the abrasive side of a sponge
- Drain and overflow: Use an old toothbrush to dislodge hair and soap scum
- Faucet base: Wipe around the base where hand oils and toothpaste collect
Avoid abrasive pads on delicate finishes. Soft cloths or sponges protect matte black, brass, and polished chrome.
Rinse Everything at Once
Don’t rinse section by section. Wait until the end to rinse everything at once. This saves time and prevents re-soiling cleaned areas with dirty rinse water.
Dry for a Streak-Free Shine
After rinsing, dry the entire sink with a high-quality microfiber cloth. This final step eliminates water spots and delivers a polished, professional look that separates a good cleaning from a great one.
Remove Hard Water Stains in 30 Minutes
For sinks with visible mineral rings, chalky deposits, or cloudy faucet finishes, this deep-cleaning method restores brightness fast.
Prepare and Apply the Bleach Solution
Mix the 1:5 bleach-water solution in a spray bottle following the instructions above. Spray it liberally over the entire sink, focusing on stained zones and around the faucet base.
Let the Solution Dwell for 15 Minutes
Allow the bleach to sit undisturbed. During this time, the bleach oxidizes and breaks down calcium and lime scale. No scrubbing is needed yet. Chemistry does the work.
Scrub Gently and Rinse
After 15 minutes, lightly agitate the surface with a soft brush or sponge. Watch stains lift effortlessly. Then:
- Rinse thoroughly with clean water
- Wipe with a damp microfiber cloth to remove residue
- Dry completely for a bright, refreshed finish
Clean the Faucet and Aerator
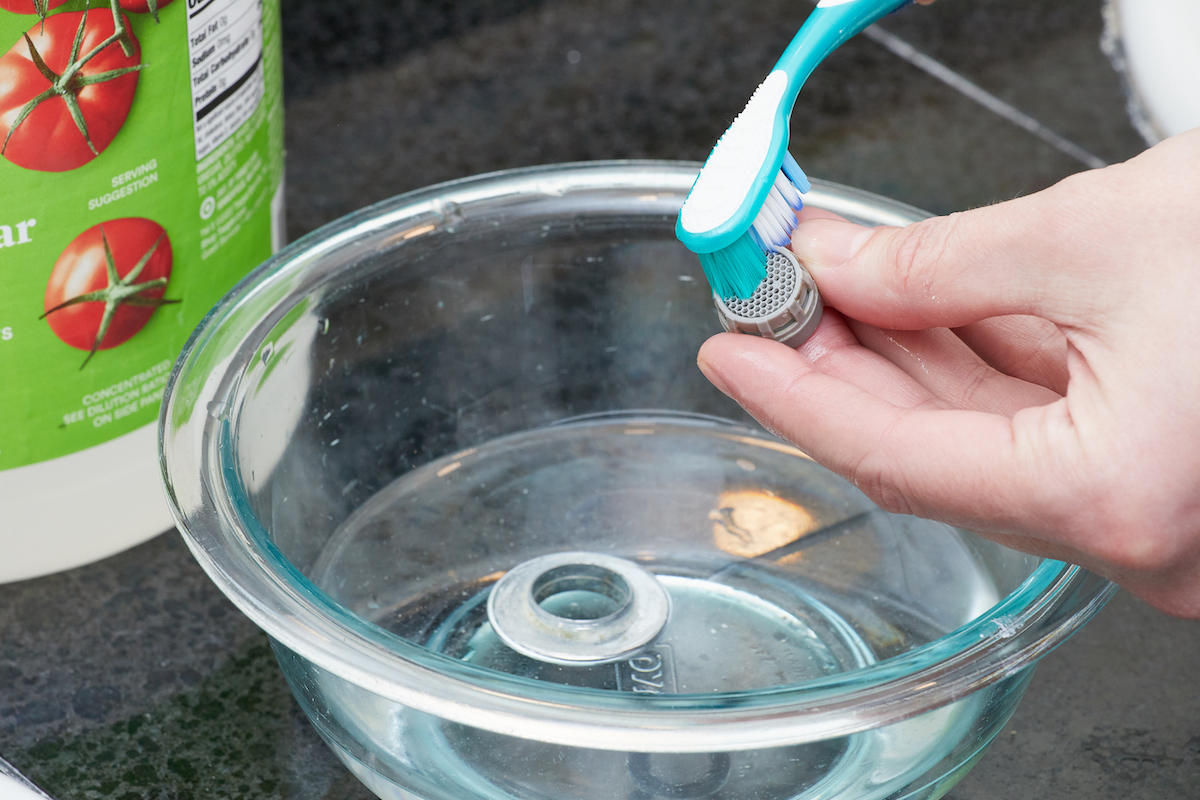
A shiny faucet starts with attention to detail, especially the often-overlooked aerator.
Wipe Faucet Surfaces Safely
Dampen a microfiber cloth with white vinegar or mild soapy water. Wipe down the faucet, including handles and the base where grime builds up.
✅ Safe for most finishes
❌ Never use abrasives on matte black, brass, or polished chrome
Remove and Soak the Aerator
The aerator, the small tip at the end of the faucet, traps minerals that reduce water pressure.
Steps:
- Check if your aerator requires a special wrench (some models do)
- Unscrew carefully by hand, or use pliers wrapped in cloth
- Soak in white vinegar overnight
- Scrub away crusty deposits with a toothbrush
- Rinse and reattach
This simple step restores full water flow and prevents future clogs.
💡 Can’t remove it? Wrap a vinegar-soaked cloth around the tip and leave it for 1–2 hours to dissolve deposits in place.
Prevent Future Buildup
The easiest way to keep your sink clean is to stop grime before it accumulates.
Dry the Sink After Use
Wipe down the basin and faucet with a dry towel after each use. This prevents water spots and slows mineral buildup significantly.
Schedule a Weekly Deep Clean
Even with daily wipe-downs, schedule a full 5-minute clean once a week to catch buildup before it becomes a problem.
Address Hard Water at the Source
If you live in a hard water area:
- Install a water softener for long-term results
- Use vinegar-based sprays regularly on faucet surfaces
- Soak aerators every 1–2 months to maintain flow
Use the Right Tools

Having the correct tools makes cleaning faster, safer, and more effective.
Essential Cleaning Tools
| Tool | Best For |
|---|---|
| Scrubby sponge | Basin scrubbing (abrasive side for tough spots) |
| Toothbrush | Drain, overflow, aerator, tight crevices |
| Microfiber cloth | Final wipe, polishing, streak-free drying |
| Scrubbing brush | Large surface cleaning with bleach method |
| 400ml spray bottle | Bleach solution mixing and application |
| Soft cloth | Gentle wiping of delicate finishes |
Recommended Upgrade
The Makers Clean Duo microfiber cloth delivers a flawless, streak-free shine on sinks and faucets. It’s a small investment that makes a noticeable difference in the final result.
Protect Delicate Finishes
Not all sinks and faucets tolerate strong cleaners. Know what to avoid before you start scrubbing.
Sensitive Finishes to Watch
- Matte black: Avoid all abrasives and harsh chemicals. Use only finish-safe cleaners.
- Brass or polished chrome: Vinegar and bleach can tarnish these metals. Stick to mild soapy water.
- Natural stone: Never use bleach or acidic cleaners like vinegar. Opt for pH-neutral stone cleaners.
Always test any new product on a hidden area first when working with unfamiliar finishes.
Avoid These Common Cleaning Mistakes
Even experienced cleaners slip up on these. Don’t let them ruin your results.
Using Abrasives on Delicate Surfaces
Steel wool, harsh scrub pads, and powdered cleansers can scratch matte finishes and chrome. Use soft tools instead.
Skipping the Final Rinse
Residue from baking soda, cream cleansers, or bleach attracts dirt and dulls the shine. Rinse thoroughly every time.
Mixing Cleaning Chemicals
Never combine bleach and vinegar. This creates toxic chlorine gas. Use one product at a time and rinse completely between applications.
Ignoring the Aerator
A clogged aerator reduces water pressure and spreads dirty water back onto the sink. Clean it every 1–2 months.
Troubleshoot Persistent Problems
Even with the right technique, issues can arise. Here’s how to fix them quickly.
Stains Won’t Come Off
If regular cleaners fail:
- Try Bar Keepers Friend with a 10-minute dwell time
- Apply the bleach solution for 15 minutes
- Repeat if needed. Some deposits require two rounds
Water Spots After Cleaning
Cause: Incomplete drying or mineral-laden water.
Fix:
- Rinse with distilled water if available
- Dry immediately with a microfiber cloth
- Wipe with a damp microfiber cloth to remove remaining droplets
Aerator Won’t Budge
Some models require a special aerator wrench. Never force it. Check your faucet brand first. If stuck, soak in place with a vinegar-soaked rag for 1–2 hours to loosen mineral deposits.
Bleach Smell or Residue
Rinse the sink multiple times with clean water. Once the bleach is fully rinsed, wipe with a vinegar-dampened cloth to neutralize any lingering odor, then rinse again.
Save Time and Money
Professional results don’t require expensive specialty products.
Cost-Effective Solutions
- Bleach-water mix: Less than $0.05 per use
- White vinegar: Under $3 per gallon for soaking and descaling
- Baking soda: Multipurpose and inexpensive
Skip overpriced specialty cleaners. Household staples work just as well and last longer.
Time-Saving Shortcuts
- Gather all supplies before starting
- Apply cleaner first, then clean other bathroom areas while it works
- Rinse everything at once at the end
- Use the right tool for each job to avoid rework
Key Takeaways for Cleaning Your Bathroom Sink
Start by assessing your sink’s condition and matching the cleaner to the soiling level. For daily maintenance, dish soap and baking soda handle light grime in under 5 minutes. For hard water stains and mineral deposits, the 1:5 bleach-water solution with a 15-minute dwell time dissolves buildup without harsh scrubbing. Don’t overlook the faucet aerator; soaking it in white vinegar overnight restores water flow and prevents future clogs. Protect delicate finishes like matte black, brass, and natural stone by avoiding abrasives and acidic cleaners. Dry everything with a microfiber cloth at the end for a streak-free, professional finish.
Pick one method from this guide and try it on your sink tonight. You’ll likely be surprised how much grime comes off with the right technique, and how fast the whole process becomes once you’ve done it once.
Frequently Asked Questions About Cleaning a Bathroom Sink
What is the best cleaner for a bathroom sink?
The best cleaner depends on the type of grime. Dish soap with baking soda works for daily cleaning. For hard water stains, a 1:5 bleach-water solution (50ml bleach to 300ml water) is highly effective and safe for porcelain, ceramic, and most enamel sinks. For delicate finishes like matte black or brass, use only finish-safe cleaners.
How do you remove hard water stains from a bathroom sink?
Mix 50ml of thick bleach with 300ml of water in a 400ml spray bottle. Spray the entire sink, especially stained areas and around the faucet. Let it sit for 15 minutes to dissolve calcium and lime deposits. Scrub gently, rinse thoroughly, and dry with a microfiber cloth.
Can you use bleach to clean a bathroom sink?
Yes, bleach is safe for porcelain, ceramic, and most enamel sinks when diluted properly. Use the 1:5 bleach-to-water ratio and a 15-minute dwell time. Never use bleach on natural stone or unsealed surfaces, and never mix it with vinegar or ammonia.
How often should you clean your bathroom sink?
Wipe down the basin and faucet with a dry towel after each use to prevent water spots. For deeper cleaning, do a full 5-minute clean once a week. Soak the faucet aerator in white vinegar every 1–2 months to maintain water flow.
How do you clean a bathroom faucet aerator?
Unscrew the aerator from the faucet tip (check if your model requires a special wrench). Soak it in white vinegar overnight, then scrub away crusty deposits with a toothbrush. Rinse thoroughly and reattach. This restores water pressure and removes mineral buildup.
What should you avoid using on matte black or brass faucets?
Avoid all abrasives, including scrub pads, steel wool, and powdered cleansers. Also avoid bleach and vinegar on brass or polished chrome, as these can tarnish the finish. Use only mild soapy water or a finish-safe commercial cleaner with a soft microfiber cloth.







