
If you’re dealing with a leaky diverter, corroded finish, or planning a bathroom upgrade, knowing how to remove bathtub faucet components is essential for any homeowner. Despite the common name, “bathtub faucet” typically refers to the tub spout, which is the most accessible part of the system and the component most often replaced. This guide covers removing all major spout types, including threaded, slip-on, and hybrid models, without causing damage to your pipes or wall.
You’ll learn to identify your specific spout type, gather the right tools, avoid costly mistakes, and handle stubborn cases that require extra patience. Most spout removals take under 15 minutes when done correctly. Let’s get started.
Identify Your Spout Type Before Removal
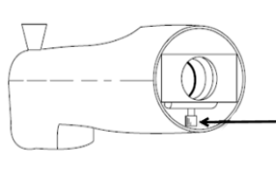
Determining how your spout attaches is the critical first step. Using the wrong removal method risks damaging the pipe inside the wall, which can lead to expensive water damage repairs.
Check for a Set Screw
Most modern spouts are slip-on models secured by a small hex set screw located underneath near the wall. Use a flashlight to inspect the underside carefully. If you see a screw, you’ll need a 5/32-inch or 1/8-inch Allen wrench to loosen it. Never attempt to turn or pull the spout until the set screw is fully disengaged.
Test for Threaded Attachment
If there’s no visible set screw, your spout is probably threaded. These screw directly onto a ½-inch brass nipple from the wall. Try gently turning the spout counterclockwise. If it moves, continue unscrewing. Always cut any caulk at the wall first with a utility knife to prevent resistance and ensure smooth removal.
Handle Hybrid Models Carefully
Some spouts appear threaded but have a hidden set screw beneath the heel or behind trim pieces. Inspect thoroughly before applying force. Forcing a hybrid spout can strip internal threads and damage the pipe. When in doubt, check for a set screw first before treating it as a threaded model.
Prepare for Safe Removal
Proper preparation prevents scratches, stuck parts, and pipe damage. Taking a few minutes to set up correctly saves time and frustration later.
Cut All Sealant First
Caulk, silicone, or pipe dope creates a strong seal that resists turning or pulling. Run a utility knife completely around the base where the spout meets the wall. Score deeply to break the bond completely. Skipping this step leads to unnecessary force and potential pipe damage.
Cover the Drain Area
Small screws or tools can easily slip and fall into the drain. Place a rag or magnetic tray over the tub drain to catch anything that drops. This simple step prevents lost hardware and potential drain clogs.
Gather Essential Tools
You will need these core tools for most removal jobs:
- Allen wrench in 5/32-inch or 1/8-inch size for set screws
- Strap wrench to grip without scratching the finish
- Adjustable pliers or channel locks for threaded spouts
- Flashlight and small mirror for inspecting hidden areas
- Penetrating oil such as WD-40 or PB Blaster for stuck parts
Optional but helpful items include a hold-back wrench, heat gun, and hacksaw for extreme cases.
Remove a Slip-On Spout
Slip-on spouts slide over a smooth copper stub and are secured by a set screw. The removal process is straightforward as long as the screw isn’t corroded in place.
Loosen the Set Screw
Insert the correct Allen wrench and turn counterclockwise. Back the screw out 3 to 5 full turns, but do not remove it completely. Keeping the screw in place prevents it from getting lost and allows the internal sleeve to release properly.
Pull the Spout Straight Off
Once the screw is loose, pull the spout straight toward you. It should slide off smoothly. Use slight wiggling if needed, but avoid prying against the wall, which can crack tile or damage the pipe behind it.
Free a Stuck Slip-On Spout
If the spout won’t budge, first recheck that the set screw is fully disengaged. Spray penetrating oil where the spout meets the copper pipe and wait 1 to 24 hours for it to penetrate. Try again with a strap wrench for better grip. For extreme cases, a relief cut may be necessary.
Remove a Threaded Spout
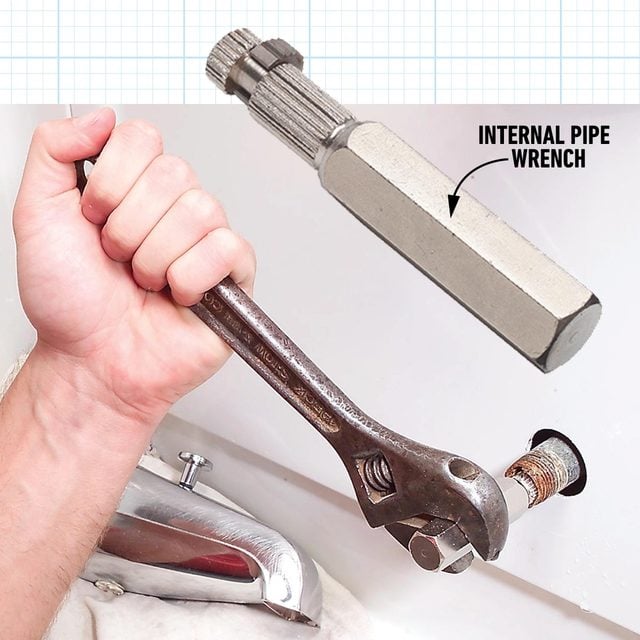
Threaded spouts screw onto a brass nipple and require turning rather than pulling. These are common in older homes and require more careful handling.
Use Proper Gripping Technique
Wrap the spout with a cloth or use a strap wrench to protect the finish. Never use toothed pliers directly on the spout, as they can crush or scratch chrome and brass finishes permanently.
Turn Counterclockwise
Apply steady, even pressure to turn the spout counterclockwise. Avoid jerking motions, which can twist the pipe inside the wall. If the spout is tight, use channel locks with padding, but exercise caution.
Prevent Pipe Damage
If you feel the wall pipe starting to twist, stop immediately. Use a hold-back wrench on the brass nipple behind the wall to keep it stable. Twisting can break solder joints and cause leaks inside the wall, leading to costly repairs.
Free a Seized Threaded Spout
Apply penetrating oil at the wall-spout joint and wait several hours or overnight. Reapply oil every few hours for best results. Try again with increased leverage. If still stuck, a relief cut may be necessary as a last resort.
Handle Stuck or Corroded Spouts
Corrosion, old sealant, and mineral buildup can fuse spouts in place. Never force a stuck spout, as the risks outweigh the benefits.
Apply Penetrating Oil Liberally
Penetrating oil is the number one solution for stuck spouts. Spray WD-40 or PB Blaster into the seam and around the set screw area. Let it soak for 1 hour for light corrosion or 6 to 24 hours for severe cases. Reapply every few hours for maximum effectiveness.
Use Heat to Break Bonds
A heat gun on low setting can expand the metal and break adhesive bonds. Apply gentle, even heat to the spout base while avoiding melting caulk or damaging nearby materials. This method is not recommended near flammable surfaces.
Make a Relief Cut (Last Resort)
When oil and heat fail, carefully cut the spout open. Slide a metal putty knife between the spout and wall to protect tile. Use a fine-tooth hacksaw or oscillating tool to make a lengthwise cut along the underside. Cut only through the spout and stop before hitting the copper or brass pipe. Use pliers to peel the spout open, releasing pressure, then unscrew the remaining collar by hand.
Inspect After Removal
Once the spout is off, check the pipe for damage and prepare for reinstallation. This inspection determines whether you need replacement parts.
Check the Brass Nipple (Threaded)
For threaded spouts, inspect the ½-inch NPT brass nipple carefully. Look for ovaling, deep nicks, or corrosion. Ensure the threads are intact and verify the length, which should typically be 3 inches. Replace the nipple if damaged before installing a new spout.
Examine Copper Stub (Slip-On)
For slip-on spouts, check the copper stub-out thoroughly. It must be round and smooth without burrs. Deburr with fine sandpaper or a copper brush if needed. Ensure it extends far enough, typically 3 to 3.5 inches. If too short or bent, cut and re-solder a new section.
Clean the Wall Area
Remove all old caulk, silicone, or plumber’s putty from the wall. Wipe with a damp cloth and allow to dry completely. A clean surface ensures proper sealing with the new spout and prevents moisture problems.
Temporarily Cap the Pipe
If you won’t reinstall immediately, screw on a threaded cap for brass nipples or wrap the end tightly with plumber’s tape and a plastic bag. Avoid using the shower until the new spout is installed, as water behind the wall can cause mold or rot.
Avoid Common Mistakes
Even small errors can lead to leaks, damage, or repeated repairs. Learning what not to do is just as important as knowing the correct steps.
Never Skip Caulk Removal
Old sealant creates friction that prevents turning or pulling. Always cut all caulk completely before applying any force. This one step prevents most stuck spout problems.
Don’t Force a Stuck Spout
Forcing risks twisting the pipe, which can break solder joints inside the wall. Use penetrating oil, wait patiently, and use a hold-back wrench to prevent pipe movement. The extra time saves expensive repairs.
Protect the Finish
Never use toothed pliers directly on the spout. Always wrap with a cloth or use a strap wrench designed for finished surfaces. Scratches and dents are permanent and reduce the value of your bathroom.
Watch for Hidden Set Screws
Some set screws are recessed or hidden behind decorative elements. Always inspect with a mirror, especially on hybrid models. Forcing a spout with an engaged set screw damages both the spout and the pipe.
Don’t Over-Tighten
For slip-on spouts, tighten the set screw just enough to hold securely. Over-tightening strips the screw or cracks the spout. For threaded spouts, hand-tighten first, then use a wrench for only one-quarter to one-half turn more.
Seal Only the Top Edge
Apply silicone sealant only to the top edge of the new spout where it meets the wall. Sealing underneath traps moisture and can cause wall rot and mold problems over time.
Install the Replacement Spout
Matching the new spout to your pipe type ensures a leak-free installation. Follow the specific steps for your configuration.
For Threaded Spouts
Clean the brass nipple threads thoroughly. Wrap Teflon tape clockwise around the threads, applying 2 to 4 layers. Add a thin coat of pipe dope for extra sealing. Hand-start threading to avoid cross-threading, then tighten with a strap wrench until flush. Test the diverter function but never engage it under water pressure.
For Slip-On Spouts
Ensure the copper stub is smooth and burr-free. Optionally apply plumber’s grease to the O-ring. Back out the set screw and slide the spout on straight. Tighten the screw snugly, then add only one-quarter to one-half turn maximum. Apply silicone to the top edge only.
When to Call a Professional
Some situations require expert help. Stop and call a licensed plumber if the pipe twists inside the wall, threads are stripped or the nipple is damaged, water leaks behind the wall, or the spout is fused and relief cuts are too risky. Also shut off the water supply if the valve drips, you plan to cut the spout, or you suspect internal damage.
Maintain Your New Spout
Prevent future problems with simple regular care. Proper maintenance extends the life of your investment.
Care for the Diverter
Always disengage the diverter before turning off the water. This reduces washer wear significantly. Never leave the diverter pulled up when not in use. Replace the spout if diverter leaks persist, as this could indicate a valve issue.
Inspect Periodically
Every 6 to 12 months, check set screws for looseness. Clean weeps holes if present and inspect O-rings for wear. Reapply silicone sealant every few years if the top edge shows cracks.
Key Takeaways for Removing Your Bathtub Faucet
Removing a bathtub faucet, specifically the tub spout, is a manageable DIY task with the right knowledge and tools. Always identify your spout type first, whether slip-on or threaded, and cut all caulk before attempting removal. Use penetrating oil generously for stuck spouts and wait patiently for best results. Never force a stuck spout, as twisting the pipe causes expensive water damage. Protect finishes with cloths or strap wrenches, and seal only the top edge when reinstalling. With preparation and patience, you can complete this project successfully and avoid costly professional repairs.
Frequently Asked Questions About Removing Bathtub Faucets
How do I know if my tub spout is slip-on or threaded?
Look for a set screw on the underside near the wall. If present, it’s a slip-on spout. If absent, try gently turning the spout counterclockwise. If it moves, it’s threaded. Always inspect with a flashlight and mirror to confirm.
Do I need to turn off the water to remove a bathtub spout?
Usually no. The spout itself doesn’t require water shutoff. However, turn off water if the valve drips, you plan to cut the spout, or you suspect internal damage. Otherwise, you can proceed with the water on.
What if the spout won’t come off even after using penetrating oil?
Apply penetrating oil and wait up to 24 hours for severe corrosion. Reapply every few hours. If still stuck, use a strap wrench for more grip. As a last resort, carefully make a relief cut with a hacksaw, being careful not to damage the pipe.
Can I reuse my old spout after removing it?
Yes, if it’s in good condition and the finish is acceptable. Clean thoroughly, inspect the threads or O-ring, and test the diverter mechanism. However, if corroded or damaged, replacement is usually more cost-effective.
Why is water leaking behind my wall after removal?
This indicates pipe damage, usually from twisting. Stop immediately if you feel the pipe move. Use a hold-back wrench to prevent rotation. If leaking persists, call a plumber to inspect and repair the damage before installing a new spout.







