

Is your faucet sputtering, spraying unevenly, or barely trickling out water? You are not alone. A clogged faucet aerator is one of the most common plumbing issues in homes, and the good news is that it is usually quick and easy to fix. In most cases, cleaning or replacing the aerator restores full water flow in under 30 minutes. This guide walks you through every step from diagnosing the clog to preventing future buildup.
Whether you are dealing with hard water scale, sediment, or a misassembled unit, this complete fix will get your faucet flowing like new. You will learn how to remove the aerator safely, clean each component using vinegar or commercial cleaners, and reassemble it correctly for optimal performance.
Confirm the Aerator Is Clogged
Before tearing anything apart, verify the problem is actually in the aerator. This simple test prevents wasted effort and misdiagnosis.
Run Water Without the Aerator
Unscrew the aerator from the faucet tip and turn on the faucet fully. If water flows strong and steady, the aerator is clogged. If flow remains weak, the issue may be in the supply lines, shut-off valves, or faucet cartridge instead.
Recognize Common Clog Symptoms
Watch for these clear signs of a clogged aerator. Low water pressure despite full handle opening is one of the most obvious indicators. Sputtering or spitting water stream often accompanies mineral blockage. Uneven spray patterns or water shooting sideways point to blocked mesh screens. Visible white or chalky buildup around the spout indicates hard water deposits. Intermittent flow that stops and starts suggests debris is partially blocking water passage.
Gather the Right Tools
Using proper tools avoids damaging your faucet finish or internal components. Having everything ready ensures the job goes smoothly.
Essential Tools and Supplies
You will need an adjustable pliers or wrench for tight aerators. Wrap plier jaws with electrical tape or cloth to protect chrome finishes. Gather a soft-bristled toothbrush, white vinegar, a small bowl, a sewing needle or toothpick, and a towel to protect the sink.
Never use steel wool or abrasive pads as they scratch chrome and brass finishes permanently.
Optional but Helpful Items
An aerator removal key helps with recessed models. Needle-nose pliers work well for pull-out sprayer aerators. Commercial descaler products like CLR or Lime-A-Way handle heavy buildup more effectively than vinegar alone.
Remove the Faucet Aerator
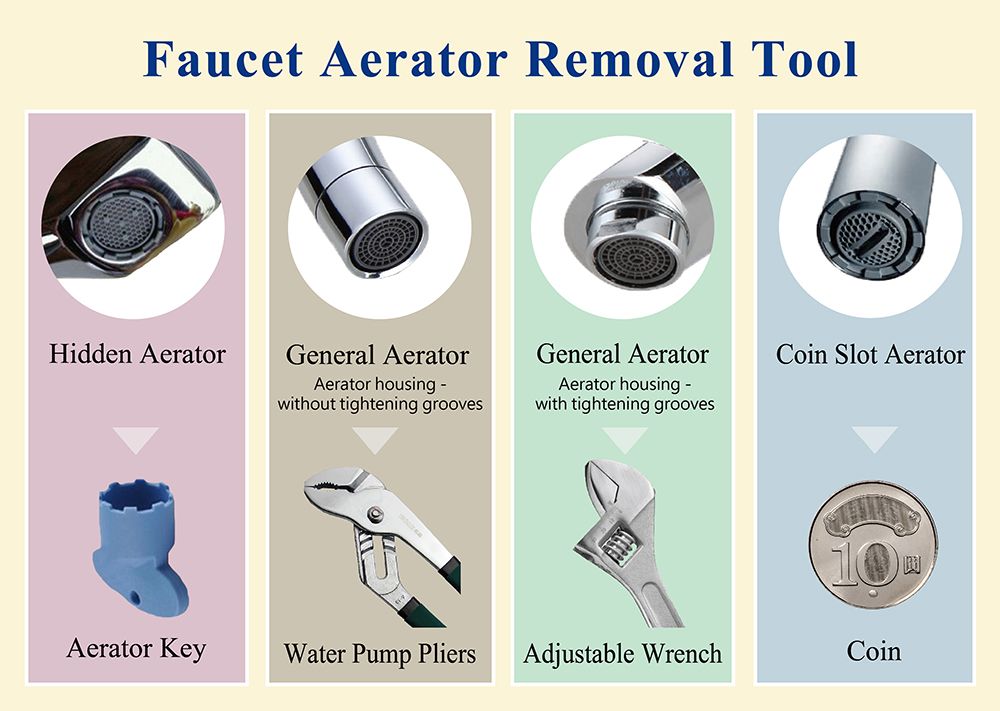
Getting the aerator off safely is the first real step toward restoring your faucet flow. Take a photo before disassembly to remember the part order.
Unscrew by Hand First
Grip the aerator at the base and turn counterclockwise. Many standard aerators come off easily by hand without requiring any tools.
Use Taped Pliers for Stuck Units
Wrap plier jaws with electrical tape or a cloth to prevent scratches. Gently apply pressure to loosen stubborn aerators. Avoid excessive force that could damage the finish or strip the threads.
Handle Recessed or Special Models
Some aerators sit inside the spout and require a special removal key. Pull-out sprayers may have flat spots for wrench grip or need brand-specific tools. Check your faucet manufacturer website for diagrams if standard methods do not work.
Clean the Faucet Spout Opening
Skipping this step is a top reason for immediate re-clogging after reinstalling the aerator. A dirty spout re-clogs new or cleaned aerators fast.
Inspect and Clear Debris
Shine a flashlight into the spout opening. Look for white crusty deposits or trapped particles. Use a toothpick or small screwdriver to gently scrape out buildup from the opening.
Flush the Spout
Plug the drain to catch any debris. Briefly turn on the water to flush loose particles from inside the spout. Turn off immediately to avoid making a mess in the sink.
Disassemble the Aerator
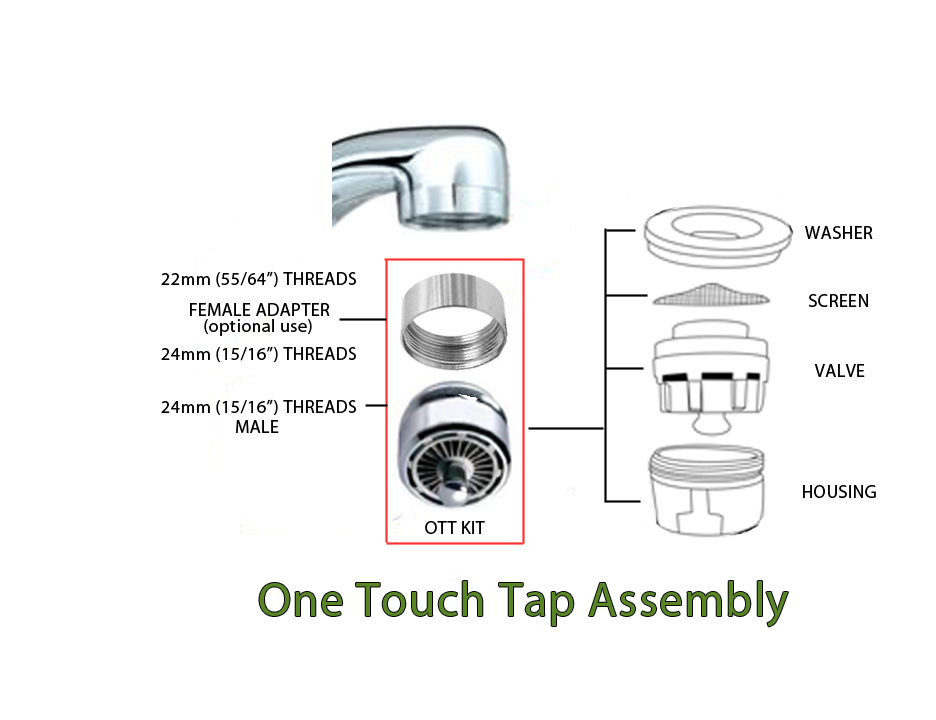
Most aerators contain multiple internal parts that must be handled carefully during cleaning. Not all aerators fully disassemble, as some are sealed units.
Common Internal Components
Aerators typically contain an outer housing, rubber washer, mesh screen, flow restrictor disc, mixer or flow straightener, and retaining rings or spacers. Each layer serves a specific function in creating the aerated water stream.
How to Take It Apart
Lay parts in exact order on a towel so you can reassemble them correctly. Use a toothpick or needle to gently pry layers apart. Take a top-down photo before cleaning to help with reassembly.
Soak Parts in Vinegar
Vinegar dissolves mineral buildup naturally without damaging components. This is the most recommended method for regular maintenance.
Use White Vinegar for Best Results
Fill a small bowl with white vinegar and submerge all metal and plastic parts. Avoid prolonged soaking for rubber washers as they may degrade. Soak for 15 to 30 minutes for light buildup, 2 to 3 hours for moderate scale, or overnight for heavy deposits.
The acetic acid in vinegar breaks down calcium and lime effectively.
Alternative No-Removal Soak Method
Fill a plastic bag with vinegar and place it over the faucet tip. Secure with a rubber band and soak for 1 to 2 hours. This method does not allow internal cleaning or spout inspection, so it is less effective than full removal.
Use Commercial Descaler for Tough Buildup
When vinegar is not enough, stronger cleaners can handle severe mineral deposits. Follow product instructions carefully.
Try CLR or Lime-A-Way
Follow the product instructions exactly. Soak parts for 15 to 30 minutes only, as longer exposure damages components. Rinse parts thoroughly afterward to remove all residue.
Never mix vinegar and commercial descalers together. Toxic fumes can result from the chemical reaction. Use one or the other, never both in sequence without full rinsing between.
Scrub and Clear Every Hole
After soaking, physical cleaning ensures every hole is fully open. This step is crucial for restoring proper flow.
Use a Soft Toothbrush
Gently scrub each component with a soft-bristled toothbrush. Focus extra attention on the mesh screen and flow restrictor disc where buildup accumulates most.
Clear Holes with a Needle
Poke each tiny hole in the screen and disc with a sewing needle or toothpick. Hold the screen up to light to check that every pore is visible and unobstructed. If light shines through all holes, the cleaning is complete.
Inspect and Replace Damaged Parts
Even clean parts fail if worn, cracked, or warped. Check each component carefully before reassembly.
Check for These Issues
Look for cloudy or warped plastic that indicates age damage. Check for cracked or brittle rubber washers that may cause leaks. Watch for fused or corroded components that cannot be separated.
Replace What Is Worn
Swap out old washers or buy a new aerator. Replacement aerators cost $5 to $15 at hardware stores. Bring the old aerator to the store for a perfect match. Replace aerators every 2 to 3 years in hard water areas.
Modify for More Water Flow
Many aerators include flow restrictors to meet water conservation rules. Removing them increases flow significantly.
Identify the Flow Restrictor
Look for a small white or translucent plastic disc with tiny holes. It is often labeled as a flow limiter. This piece restricts water to 1.5 GPM or less in most modern aerators.
Remove It to Boost Flow
Leave out the restrictor during reassembly to increase flow by 50 to 100 percent. Keep the mesh screen and washer for filtration and sealing. Many users report doubling flow with no splashing after removal.
Check local regulations before removing restrictors in drought-prone areas, as it may violate water conservation codes.
Reassemble the Aerator Correctly

Wrong assembly order ruins performance even if every part is perfectly clean. Follow the exact reverse order of disassembly.
Follow Reverse Disassembly Order
Reassemble in this sequence: retaining ring, mixer disc, flow restrictor if keeping it, mesh screen, washer, then outer housing. Ensure the screen lies flat and the washer is fully seated in its groove.
Common mistakes include installing the screen backward or misaligning components, which causes poor flow. Do not force parts together as cracks happen easily with plastic components.
Reinstall and Test Performance
The final step puts everything back and shows the results of your work.
Screw It On by Hand
Turn clockwise until snug by hand. Use taped pliers for a slight extra quarter turn. Do not overtighten as this strips threads or cracks the housing.
Turn On Water and Observe
Check for strong, even flow without sputtering or spitting. Verify no leaks appear at the base. Run water for 30 seconds to flush any remaining loose particles. Compare flow with and without the aerator to confirm improvement.
Troubleshoot If Flow Is Still Low
Even after thorough cleaning, some issues persist. Check these common causes.
Verify Shut-Off Valves Are Fully Open
Under-sink valves must be turned all the way counterclockwise. Partially closed valves mimic aerator clogs and are easy to overlook.
Inspect Supply Lines
Look for kinks, cracks, or corrosion in flexible hoses. Replace hoses if over 5 years old or showing wear. Disconnect and flush lines into a bucket to check for internal debris.
Check for Inlet Screen Clogs
Pull-out faucets have an inlet screen at the hose connection end. Remove it with a dental pick and soak in vinegar to clear sediment.
Consider Whole-House Issues
If all faucets have low pressure, check the main water valve, municipal supply, or whole-house filter. Contact your water utility if pressure is low throughout the house.
Prevent Future Clogs
Stop clogs before they start with simple maintenance habits.
Clean Every 3 to 6 Months
Hard water areas require cleaning every 3 months. Soft water areas can go 1 to 2 years between cleanings. Always clean aerators after plumbing work to remove construction debris.
Install a Water Softener
Whole-house water softeners reduce calcium and magnesium in water. This cuts aerator cleaning frequency by 80 percent or more in hard water regions.
Use Point-of-Use Filters
Attach filters to faucets or under the sink. They trap sediment before it reaches the aerator, extending time between cleanings.
Know When to Replace the Aerator
Sometimes cleaning is not enough, and replacement is the better option.
Replace If You See These Signs
Cracked or stripped housing cannot be repaired. Fused internal parts that cannot be separated need replacement. Persistent low flow after thorough cleaning indicates internal damage. No improvement after cleaning and restrictor removal means the aerator is worn out.
Choose the Right Replacement
Universal models fit most standard threads (15/16″-27 male). Brand-specific aerators from Moen, Delta, or Kohler may require exact matches. Bring the old one to the store to ensure proper fit. Buy multi-packs to have replacements for all household faucets.
Final Tips for Long-Term Success
Keep your faucets running smoothly with these expert-backed habits.
Track Maintenance
Label aerators with cleaning date and location. Use a phone note or notebook to schedule next cleaning. This helps you stay ahead of buildup.
Keep Spares On Hand
Store extra aerators and washers in your plumbing kit. This saves time during future fixes and eliminates store trips when紧急.
Avoid Overtightening
Stripped threads are a common DIY mistake. Hand-tight plus a quarter turn with taped pliers is enough for a secure seal.
Document the Process
Take photos during disassembly and reassembly. This helps especially with complex models that have multiple internal components.
Frequently Asked Questions About Fixing a Clogged Faucet Aerator
How do I know if my aerator is clogged?
Signs include low water pressure, sputtering water, uneven spray patterns, and visible white buildup around the spout. The definitive test is removing the aerator and running the faucet. If flow improves dramatically, the aerator is clogged.
Can I clean my aerator without removing it?
You can soak the aerator in place using a plastic bag filled with vinegar secured with a rubber band. However, this method does not allow for internal cleaning or spout inspection, so it is less effective than full removal and disassembly.
How long should I soak aerator parts in vinegar?
Light buildup clears in 15 to 30 minutes. Moderate scale needs 2 to 3 hours. Heavy deposits may require overnight soaking of 8 to 12 hours. Rinse thoroughly after soaking.
Is it safe to remove the flow restrictor?
Removing the flow restrictor increases water flow by 50 to 100 percent. It is generally safe but may violate local water conservation codes in drought-prone areas. Check your local regulations before removing it.
Why does my faucet still have low flow after cleaning the aerator?
Check that shut-off valves are fully open. Inspect supply lines for kinks or damage. Look for clogs in pull-out sprayer inlet screens. If all faucets have low pressure, the issue may be in the main water line.
How often should I clean my faucet aerator?
In hard water areas, clean every 3 to 6 months. In average water conditions, clean every 6 to 12 months. In softened water areas, clean every 1 to 3 years.
Key Takeaways for Fixing Your Clogged Faucet Aerator
Fixing a clogged faucet aerator is one of the easiest and most effective plumbing repairs you can do yourself. With just vinegar, a toothbrush, and a few minutes, you can restore full water flow and avoid unnecessary plumber calls that cost $150 or more.
The most important steps are confirming the clog by testing flow without the aerator, cleaning the spout opening to prevent re-clogging, and reassembling parts in the correct order. Skipping the spout cleaning or misaligning the screen are the two most common reasons for immediate re-clogging.
Regular cleaning prevents 95 percent of low-pressure issues, especially in hard water areas. Consider installing a water softener if you cleanaerators frequently. Whether you choose to clean, modify, or replace, this fix puts you back in control of your faucet performance. Now that you know the full process, you are ready to tackle any clog quickly, safely, and effectively.







