
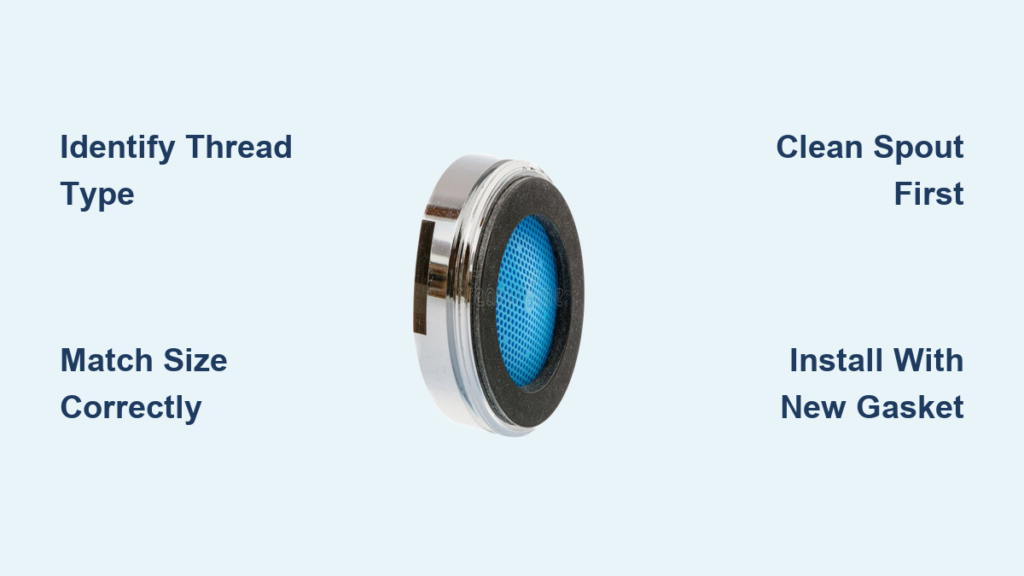
Is your kitchen or bathroom faucet producing a weak, sputtering stream? A clogged or worn faucet aerator is one of the most common causes of low water pressure in household faucets. The good news is that replacing it is a simple, low-cost fix that takes less than 10 minutes and requires minimal tools.
In this guide, you will learn how to diagnose aerator issues, identify your specific aerator type, remove the old unit safely, and install a compatible replacement without damaging your faucet. We will also cover tips for preventing leaks and ensuring a perfect fit.
Diagnose Aerator Problems First
Before grabbing tools, confirm that the aerator is actually causing your water flow issues.
Check for Common Symptoms
Low water pressure and flow problems often stem from aerator clogging. Watch for these telltale signs:
- Water pressure drops on both hot and cold settings equally
- The stream appears uneven, splashing, or sputtering
- Visible white crusty buildup or debris on the aerator screen
- Dripping occurs at the spout base after turning off the water
- You must turn the faucet handle fully open to get minimal flow
Rule Out Other Causes
The key clue pointing to the aerator is when both hot and cold water are affected equally. This suggests the problem is at the spout tip rather than inside the valve or supply lines. To confirm, turn off the water, remove the aerator, and run the faucet briefly. Strong flow without the aerator confirms the aerator is the culprit.
Identify Your Aerator Type

Choosing the right replacement starts with knowing exactly what you have installed.
Determine Thread Type
Aerators come in two thread configurations that must match your faucet:
- Male aerator: Features external threads that screw into the faucet spout. This is the most common type in U.S. homes.
- Female aerator: Has internal threads that fit over a male-threaded faucet tip.
You can identify yours by examining the faucet end. If threads are visible on the outside, you need a female aerator. If threads are inside the spout opening, you need a male aerator.
Match the Size
Standard sizes include:
- 15/16 inch (24mm): Male threads, matches a nickel
- 55/64 inch (22mm): Female threads
- Junior size: 13/16 inch male or 3/4 inch female, matches a dime
Place a coin on the spout tip to quickly find your size. A snug fit means you have identified the correct measurement.
Spot Special Designs
Some faucets use non-standard aerators that require specific removal methods:
- Recessed aerators: Sit deep inside the spout with no visible collar. You need a flathead screwdriver or special removal tool to engage internal notches.
- Rectangular aerators: Found on modern designer faucets. Some push in without screws, while others use a set screw requiring an Allen wrench.
- Coin-slot aerators: Designed for commercial use. You need a quarter or similar coin to remove and install them.
Gather the Right Tools
Using proper tools prevents damage to chrome or brushed finishes on your faucet.
Basic Tools
Keep these items handy before starting:
- Adjustable wrench with smooth jaws
- Channel-lock pliers wrapped in cloth
- Soft cloth or duct tape for grip and finish protection
- Flathead screwdriver for recessed types
- Needle-nose pliers to extract stuck gaskets
Specialty Tools
Depending on your aerator type, you may need:
- NEOPERL service key for specific models
- Allen wrench for rectangular aerators with set screws
- Coin for coin-slot models
- Aerator removal tool for stubborn units
Replacement Parts
Have these on hand before beginning:
- New aerator matching your size and thread type
- Replacement neoprene gasket (usually included)
- White vinegar for cleaning
- Teflon tape for hard water areas
Never reuse old gaskets, as they compress and crack, leading to leaks.
Remove the Old Aerator
For Standard Threaded Aerators
Follow these steps for most common aerators:
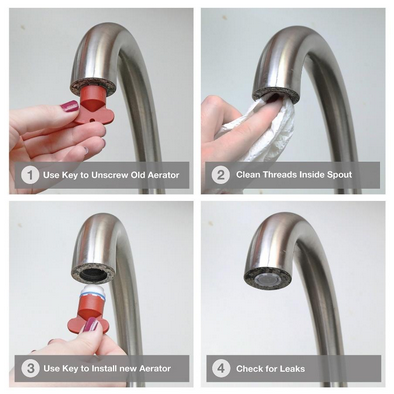
- Wrap the aerator with a soft cloth or duct tape to protect the finish.
- Try unscrewing by hand, turning counterclockwise.
- If stuck, use a cloth-wrapped wrench for gentle leverage.
- Turn counterclockwise until the aerator comes free.
Never force removal, as excessive pressure can strip the faucet threads.
For Recessed Aerators
Insert a flathead screwdriver into one of the notches on the aerator face. Gently twist or pry to loosen the unit. Alternatively, use a dedicated removal tool or NEOPERL key designed for your model. Pull out carefully once loose.
For Rectangular Aerators
Loosen the set screw at the back of the spout using an Allen wrench. Insert the service key into the aerator notch. Pull diagonally forward and down to release. Avoid twisting, as this can damage the housing.
Clean the Faucet Spout
A clean seat ensures a proper seal and prevents future clogs.
Flush Out Debris
Place a rag over the spout opening to catch any loose parts. Turn on the water briefly to flush out sediment, sand, or solder particles. Watch for discoloration or cloudiness, which confirms debris was present.
Inspect and Clean Threads
Wipe the threaded area with a damp cloth. Check carefully for corrosion, mineral buildup, or damaged O-rings. For stubborn limescale, soak a rag in white vinegar, wrap it around the threads for 15 to 30 minutes, then wipe clean.
Handle Gaskets and O-Rings
The seal is just as important as the aerator itself for preventing leaks.
Remove Old Gasket
After removal, the rubber washer often stays lodged in the faucet. Use needle-nose pliers to extract it carefully without scratching the seating surface.
Check O-Ring Condition
Some models have a non-removable O-ring inside the spout. Inspect it for cracks, flattening, or brittleness. Replace if damaged, as a degraded O-ring causes leaks at the base even with a new aerator.
Install the New Aerator
For Aerators with Housing
If your faucet has a separate housing, you can replace just the insert:
- Unscrew the old insert from the metal housing.
- Remove the old washer completely.
- Insert the new flow cartridge into the housing.
- Add a new rubber washer on top.
- Reattach using a service key, turning clockwise.
- Tighten until snug but never forced.
For Full Replacement Aerators
For units with integrated threads:
- Confirm thread compatibility matches your faucet.
- Wet the aerator slightly with water to lubricate the O-ring and threads.
- Start threading by hand to prevent cross-threading.
- Once seated, use a cloth-wrapped wrench to tighten gently.
For CACHE model faucets, screw in only until flush with the spout. Do not over-tighten.
For Rectangular Aerators
Align the grub screw hole with the internal set screw. Installing 180 degrees off can block flow entirely. Push in firmly for push-in types. For screw-secured models, tighten the Allen screw after insertion. Moisten the unit first for smoother installation.
Test the Installation
Turn On the Water
Open both hot and cold taps fully. Observe the water pressure, stream consistency, and check for sputtering or air bubbles. A successful installation produces smooth, aerated flow.
Check for Leaks
Look carefully at the base of the aerator. If water drips, turn off the water, reinstall ensuring the gasket is properly seated, and tighten slightly more. Stop when snug. Smooth flow with no leaks means the job is complete.
When to Clean Instead of Replace
When Cleaning Works
You can clean rather than replace when you notice minor flow reduction, visible but removable mineral buildup, and the aerator is less than two years old. Simply remove the aerator, soak components in 50/50 vinegar-water for 2 to 12 hours, scrub with a soft toothbrush, rinse thoroughly, and reinstall.
However, if flow does not improve after cleaning, the screen or restrictor is likely degraded and replacement is necessary.
Why Replacement Often Wins
New aerators cost only $5 to $6, and cleaning takes longer than straightforward replacement. Old units lose efficiency even when cleaned thoroughly. Given the low cost, replacement is the smarter choice for persistent issues.
Choose the Right Replacement
Match Key Specifications
Bring the old aerator to the store for exact matching. Ensure you match the thread type, size, design, flow rate, and finish. Standard flow rates include 1.0 GPM for ultra-low flow, 1.5 GPM for most bathroom faucets, and 1.8 to 2.2 GPM for kitchen use.
Brand-specific faucets from Moen, Kohler, or Delta may require proprietary aerators. Check the manufacturer website if you have a branded faucet.
Prevent Future Issues
Maintenance Schedule
Clean your aerator every 6 to 12 months, especially in hard water areas. Soak in vinegar to dissolve limescale. Replace gaskets each time you service the unit.
Extend Lifespan
Avoid harsh cleaners that degrade plastic components. Use Teflon tape during installation to reduce thread wear. Consider a whole-house water softener if scale buildup recurs frequently. With proper care, expect 2 to 5 years of performance.
Frequently Asked Questions About Replacing Faucet Aerators
How do I know if my faucet aerator needs replacing?
Signs include low water pressure on both hot and cold settings, sputtering or uneven water stream, visible mineral buildup, and dripping at the spout base. If cleaning does not restore flow, replacement is needed.
Can I replace just the aerator insert or do I need the whole unit?
It depends on your faucet design. Some aerators have a separate housing that remains on the faucet, allowing you to replace only the internal insert and washer. Others have integrated threads requiring full replacement.
What size aerator do I need for my faucet?
Most U.S. faucets use either 15/16 inch (male) or 55/64 inch (female) sizes. A nickel or dime placed on the spout tip provides a quick size check. Junior sizes exist for smaller faucets.
Why is my faucet still leaking after replacing the aerator?
A leaking aerator usually means the gasket is damaged, missing, or improperly seated. Turn off the water, remove the aerator, and ensure the new gasket is correctly positioned. Tighten slightly more if needed.
How often should I clean or replace my faucet aerator?
Clean every 6 to 12 months in hard water areas. Replace the aerator every 2 to 5 years or sooner if flow problems persist after cleaning.
Do I need special tools to remove a recessed aerator?
Yes, recessed aerators require a flathead screwdriver to engage internal notches or a dedicated removal tool.NEOPERL makes service keys specifically designed for their models.
Key Takeaways for Replacing Your Faucet Aerator
Replacing a faucet aerator is one of the easiest plumbing fixes you can tackle. The process involves diagnosing the problem by confirming both hot and cold water are affected, identifying your thread type and size, removing the old unit with proper tools, cleaning the spout, installing the new aerator with a fresh gasket, and testing for leaks.
Remember to match your replacement exactly to your faucet type, use a cloth to protect finishes, and never reuse old gaskets. With the right aerator in place, you will restore full water pressure, improve efficiency, and avoid unnecessary service calls. Keep a spare aerator on hand for quick fixes in the future.







