
A stuck faucet handle is one of the most frustrating plumbing problems in any home. What should be a simple twist to turn on water becomes a battle with a stubborn, immovable handle that refuses to cooperate. Whether in your kitchen or bathroom, a stuck faucet handle usually points to mineral buildup, dried-out O-rings, or corrosion hiding beneath the surface. The good news? You can fix this yourself with basic tools and a systematic approach.
This guide walks you through diagnosing the cause, safely removing a seized handle, cleaning internal components, replacing worn parts, and reassembling everything for smooth operation. You’ll learn exactly which tools to use, what lubricants work best, and how to prevent the problem from returning.
Identify Your Faucet Handle Type and Fastener
Before attempting to remove a stuck handle, you need to understand how it attaches to the stem. Using force without knowing the fastener type risks cracking plastic parts or stripping metal screws.
Locate the Decorative Cap
Most faucet handles hide their fastener under a small plastic cap. Look for caps marked with “H” for hot or “C” for cold, or colored red and blue. Use a flat-head screwdriver or tweezers to gently pry the cap off. These caps snap easily, so never use excessive force.
Find the Set Screw Type
After removing the cap, you’ll find one of two fastener types:
- Phillips-head screw – common in older faucets and Kohler models
- Hex (Allen) set screw – standard in Moen, Delta, and modern designs
If no screw is visible, your handle threads directly onto the stem. In this case, grip the base with an adjustable wrench and turn counterclockwise to unscrew it.
Handle Seized Fasteners
If the screw won’t turn, apply a few drops of penetrating oil to the screw head and wait 5 to 10 minutes. This breaks down rust and mineral deposits. Try again with a snug-fitting tool to avoid stripping the screw head.
Safely Remove a Stuck Handle

Even after removing the screw, the handle may remain fused to the stem due to mineral buildup or dried gunk. Use controlled methods to avoid damaging the faucet.
Pull the Handle Off by Hand
After screw removal, grasp the handle firmly and pull straight off the splined stem. If it doesn’t move, proceed to the next step.
Use Gentle Impact to Break Adhesion
Place wood blocks on either side of the handle base to protect the finish. Then tap upward gently with a rubber mallet, focusing on breaking the bond between the handle and stem. Alternate sides to apply even pressure.
Apply a Handle Puller for Persistent Cases
For handles that refuse to budge, thread a handle puller or gear puller kit into the screw hole. Turn the central bolt clockwise to generate steady upward force without damaging the faucet body.
Disassemble Internal Components
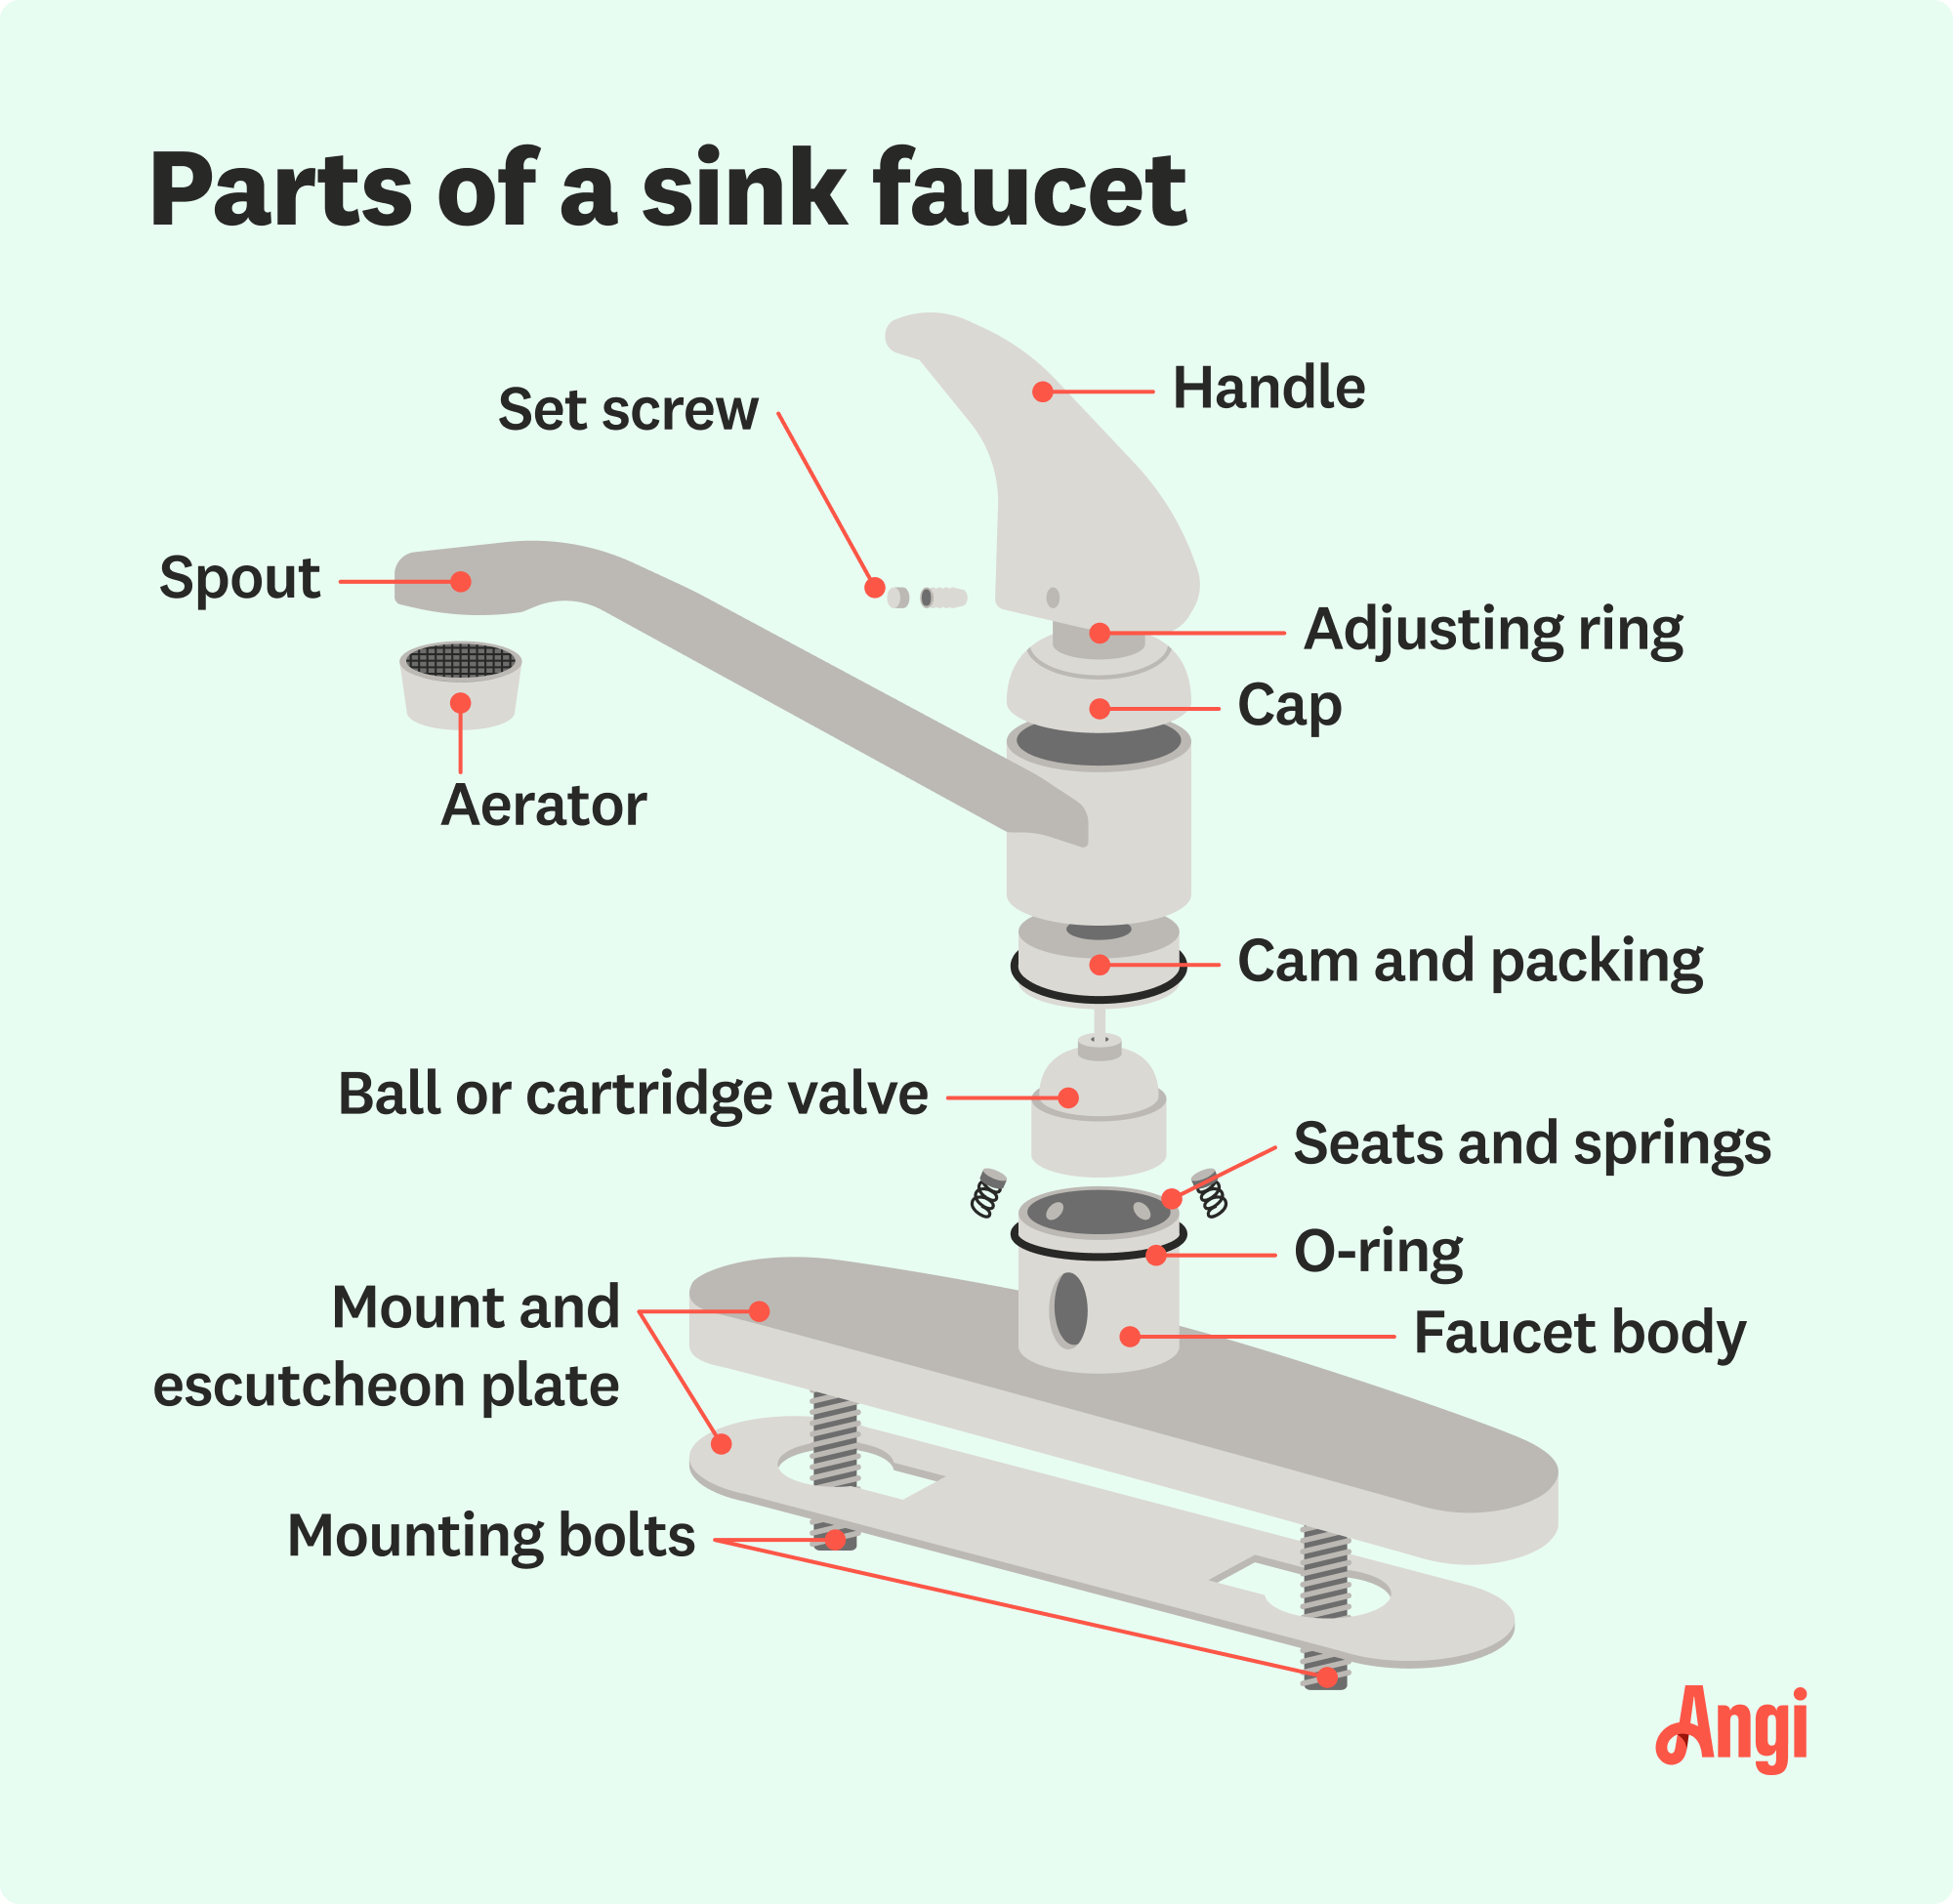
With the handle removed, you can access the internal mechanism for cleaning and inspection.
Remove the Bonnet Nut
Use a strap wrench to unscrew the bonnet nut or base collar. Turn counterclockwise by hand or with the strap wrench to protect chrome finishes from scratches. Lift off the bonnet and any trim ring beneath it.
Extract All Related Parts
Carefully remove the stem extension, friction ring, washer, and upper and lower O-rings. Lay all parts on a clean towel in the order you remove them. Take a photo before disassembly for reference.
Clean Parts with Vinegar Soak
Mineral buildup is the number one cause of faucet handle stiffness. Vinegar dissolves limescale effectively without damaging components.
Soak Metal Parts in White Vinegar
Fill a bowl with distilled white vinegar and submerge the stem extension, bonnet, trim ring, and other metal parts. Soak for 20 to 60 minutes, or several hours for heavy buildup. Use a soft toothbrush to scrub threads and crevices.
Wipe Down Valve Housing
Dampen a cloth with vinegar and clean the valve seat and cylinder wall. For stubborn film, use a non-abrasive chrome cleaner. Avoid steel wool or green scrub pads, which scratch finishes.
Flush Out Debris
Open the water supply briefly to flush loosened particles, then close it again before reassembly.
Inspect and Replace Worn Components
Cleaning alone won’t fix damaged parts. Replace anything showing signs of wear.
Replace Degraded O-Rings
Check both upper and lower O-rings for cracking, flattening, hardening, or swelling. Replace with plumbing-grade nitrile or EPDM O-rings from a universal faucet repair kit.
Examine the Washer
A worn washer causes leaks and binds motion. Replace if it has grooves, is misshapen, or shows rubber erosion. Use neoprene or rubber washers sized to match the original.
Assess the Cartridge or Valve Stem
For cartridge-style faucets common in Moen and Delta, look for pitting, corrosion, or deformed splines. If damaged, replace the entire cartridge. For compression stems, check for pitted brass or stripped splines.
Lubricate with Plumbing-Grade Silicone Grease
Proper lubrication prevents future sticking and ensures smooth operation.
Apply Grease to Key Contact Points
Use plumbing-grade silicone grease on both sides of the friction ring, inside the bonnet, on O-rings and their grooves, on the stem extension and splines, and on the washer seating surface. Apply a thin, even coat.
Why WD-40 Is Not a Long-Term Solution
WD-40 works only for initial loosening of stuck screws. It breaks down rubber over time, causing O-rings to crack. Never use WD-40 as a final lubricant.
Reassemble Without Over-Tightening
Putting the faucet back together incorrectly causes the same problem to return.
Follow the Correct Assembly Order
Slide the trim ring onto the bonnet, then insert the stem extension. Place the friction ring above the trim ring. Slide the handle onto the stem, aligning the splines. Insert and tighten the set screw until snug. Hand-tighten the bonnet nut and orient the handle outward away from the spout in the off position.
Secure the Handle Properly
Use the correct screwdriver or hex key for the set screw. Tighten just enough to prevent slipping, then reinstall the decorative cap.
Restore Water and Test Operation
Now verify the fix works and check for leaks.
Turn On Water Supply
Slowly open the shut-off valves under the sink. Let air purge from the line, which causes initial sputtering.
Operate the Handle Smoothly
Cycle the faucet on and off 5 to 10 times. Movement should be smooth and resistance-free with no grinding or stiffness.
Check for Leaks
Look at the base of the handle while operating. Any drip means the O-rings aren’t seated correctly or need replacement.
Fix Model-Specific Issues
Different brands have unique designs requiring specific approaches.
Kohler Faucets
Use a strap wrench on the flat-sided bonnet. These faucets include a friction ring, stem extension, and trim ring. Polish with Diamond Magic after cleaning for a smooth finish. The handle must face outward when in the off position.
Moen and Delta Faucets
These use hex set screws and often require cartridge replacement for persistent issues. Use Moen-specific silicone grease or equivalent for best results.
Prevent Future Handle Sticking
Simple maintenance extends faucet life significantly.
Lubricate Every 1 to 2 Years
Remove the handle annually or biannually, clean the components, and reapply silicone grease. This takes about 10 minutes and prevents major issues.
Flush the Aerator Regularly
Unscrew the faucet tip every 3 to 6 months and rinse out sediment and mineral chunks. This prevents debris from entering internal mechanisms.
Wipe Handles Dry
In hard water areas, moisture leaves scale behind. Drying handles after use reduces buildup.
Know When to Replace Instead of Repair
Sometimes repair isn’t worth the effort.
Replace the Cartridge
If the handle still sticks after cleaning and lubrication, the internal cartridge may be damaged. Replace with an OEM unit available online or at hardware stores.
Upgrade the Entire Faucet
Consider replacement if the valve body is cracked or corroded, splines are stripped, parts are obsolete, or leaks persist after repair.
Frequently Asked Questions About Fixing a Stuck Faucet Handle
Why won’t my faucet handle turn even after I remove the screw?
The handle may be seized to the stem due to mineral buildup or corrosion. Use wood blocks and gentle hammer taps to break the adhesion, or use a handle puller tool for stubborn cases.
Can I use WD-40 to lubricate my faucet handle?
No. WD-40 works for initial loosening but breaks down rubber O-rings over time. Use plumbing-grade silicone grease for long-term lubrication.
How long should I soak faucet parts in vinegar?
Soak metal parts in white vinegar for 20 to 60 minutes. For heavy limescale, extend to several hours, but never exceed 1 hour for plated parts to avoid etching.
What tools do I need to fix a stuck faucet handle?
You’ll need a Phillips-head screwdriver, hex key, flat-head screwdriver, adjustable wrench, strap wrench, rubber mallet, soft toothbrush, and plumbing-grade silicone grease.
Should I replace or repair a faucet with a stuck handle?
Try repair first through cleaning and lubrication. If the handle still sticks after replacing O-rings and the cartridge, or if the valve body is cracked, consider replacing the entire faucet.
How often should I lubricate my faucet handles?
Lubricate faucet handles every 1 to 2 years as part of regular maintenance to prevent mineral buildup and ensure smooth operation.
Key Takeaways for Fixing Your Stuck Faucet Handle
A stuck faucet handle is almost always caused by mineral buildup, dried O-rings, or lack of lubrication. The fix follows a clear pattern: turn off water, remove the handle, clean parts with vinegar, replace worn components, lubricate with silicone grease, and reassemble without over-tightening. Never force a stuck handle or use WD-40 as a long-term lubricant. Address the problem early to prevent permanent damage and avoid costly replacements. With basic tools and these steps, you can restore smooth operation to any stuck faucet handle and extend the life of your fixture.


