
You turn the faucet handle, and instead of a smooth flow of water, you are greeted with an ear-piercing squeak. It is annoying, distracting, and makes even the simplest kitchen or bathroom task feel unpleasant. The good news is that a squeaky faucet handle is almost never a sign of serious failure. It is typically caused by dry, gritty, or worn internal parts that can be fixed in under an hour with basic tools and a little know-how.
The root cause is usually internal friction from dried-out O-rings, mineral buildup, or lack of lubrication. This issue affects all major brands like Moen, Delta, and Kohler, especially in areas with hard water. The fix does not require replacing the entire faucet. It just needs cleaning, inspecting, and re-lubricating key components. In most cases, you will eliminate the noise without spending more than $10 or calling a plumber.
Shut Off Water Supply Before Starting
Before touching any tools, stop the water flow to avoid accidental flooding. This step is non-negotiable for safe faucet repair.
Locate Under-Sink Valves
Find the hot and cold shut-off valves beneath the sink. Turn both clockwise until tight. If they are stiff or leaky, wrap a cloth around the handle for better grip. If valves are missing or broken, shut off the main water supply to the house.
Drain Remaining Water
Turn on the faucet to release leftover pressure and water. Let it run until drops stop. This prevents spills when you remove internal parts.
Plug the Drain
Place a rag or sink stopper in the drain. Small screws and O-rings can easily slip and vanish into the pipe.
Pro Tip: Label the shut-off valves with tape if they are not marked. This helps during reassembly.
Remove the Faucet Handle to Access Internal Parts
The handle must come off to access the moving components causing the squeak. This process is straightforward with the right approach.
Find the Set Screw
Look for a small screw on the side, base, or underside of the handle. In many Moen and Delta models, it is hidden under a decorative cap labeled “H” and “C.” Gently pry the cap off with a flathead screwdriver.
Use Correct Allen Wrench
Insert a 3/32″ or 7/64″ hex key into the set screw and turn counterclockwise. Do not force it. If the screw is stuck, apply a drop of penetrating oil and wait 10 minutes.
Pull Handle Off Gently
Once the screw is out, pull the handle straight up. If it resists, rock it slightly side to side. Avoid prying with metal tools. Use a plastic handle puller if available.
Warning: Forcing the handle can crack plastic components or damage the cartridge.
Disassemble the Faucet Body

With the handle off, expose the moving parts responsible for the squeak. Working methodically keeps everything organized.
Unscrew the Collar or Bonnet
Twist the decorative collar by hand. If it is tight, use an adjustable wrench wrapped in a cloth to protect the finish. Turn counterclockwise to remove.
Remove the Retaining Nut
Use vice grips or a strap wrench to loosen the brass retaining nut. This holds the cartridge or stem in place. Protect chrome surfaces with tape or fabric to prevent scratches.
Extract the Cartridge or Stem
Pull out the cartridge in washerless faucets or the stem in older compression models. Some Moen cartridges have a small handle. Lift it to release.
Visual Cue: Look for cracks, warping, or white crusty deposits. These are signs of wear or mineral buildup.
Soak Components in Vinegar to Remove Mineral Deposits
Mineral deposits from hard water are a top cause of squeaking. Soaking dissolves them safely without damaging plumbing parts.
Prepare Vinegar Bath
Pour white vinegar into a small bowl or cup. Submerge the cartridge, stem, O-rings, and retaining nut completely.
Soak for 15 to 60 Minutes
Soak for 15 to 30 minutes for light buildup. Soak for 30 to 60 minutes for heavy scaling. Do not exceed 1 hour. Prolonged exposure may damage rubber seals.
Note: Vinegar’s acetic acid breaks down calcium and lime without harming plumbing parts.
Scrub and Inspect All Components
After soaking, clean and evaluate each piece thoroughly. This step determines whether parts can be reused or need replacement.
Use Soft-Bristled Brush
Take a clean toothbrush and gently scrub the O-rings, cartridge grooves, stem threads, and retaining nut interior. Focus on areas with visible grit or residue.
Rinse and Dry Completely
Wash all parts with clean water. Dry with a lint-free towel. Moisture can dilute lubricant and reduce effectiveness.
Check for Damage
Inspect for cracked or flattened O-rings, pitted or corroded stems, or warped cartridges. Replace any damaged parts. Moen cartridges like 1222 or 1225 cost $10 to $35 and are widely available.
Expert Note: Most squeaks are fixed with cleaning and lubrication. Cartridge replacement is rarely needed unless the faucet is leaking.
Apply Silicone-Based Grease for Smooth Operation
Lubrication is the most critical step in stopping and preventing squeaks. This is the actual fix for the problem.
Avoid Petroleum-Based Lubricants
Never use WD-40, Vaseline, motor oil, or household sprays. These degrade rubber, attract dirt, and wash away in water.
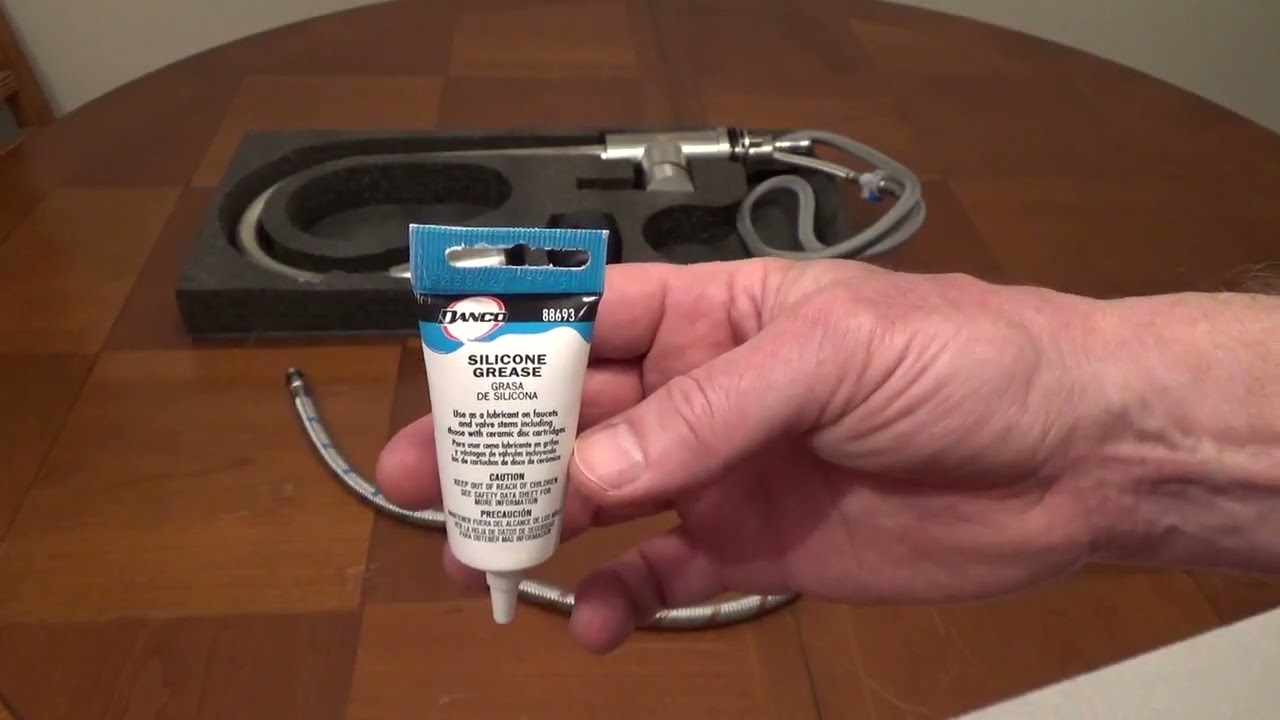
Use Plumber’s Silicone Grease
Choose a waterproof, non-petroleum lubricant such as Danco 88693 Plumber’s Grease, Moen Silicone Grease, or Super Lube with PTFE. All are safe for rubber and designed specifically for faucet use.
Lubricate Key Areas
Coat every O-ring with a thick layer of grease. Apply a thin, even film to the entire cartridge or stem surface. Cover sliding zones, threads, and contact points. Avoid blocking water flow paths.
Pro Tip: Over-lubrication is better than under-lubrication. Excess grease will not harm the system.
Reassemble the Faucet in Reverse Order
Now put everything back together carefully. Taking your time here prevents leaks and ensures proper function.
Insert Cartridge or Stem
Slide the cleaned and lubed part back into the faucet body. Ensure it is fully seated and aligned. Some cartridges have tabs that fit into specific slots.
Reinstall Retaining Nut
Screw the brass nut back on by hand first, then tighten gently with a wrench. Overtightening can crack the faucet body or compress seals too much.
Replace the Collar
Screw the bonnet back into place. Hand-tighten, then give a slight turn with a wrench if needed.
Reattach the Handle
Slide the handle on and secure it with the set screw. Tighten firmly but do not strip the threads. Moderate force is enough.
Troubleshooting Tip: If the handle will not go on, check that O-rings are not twisted or pinched.
Test for Silence and Leaks
Turn the water back on and verify the fix. Proper testing ensures the job is complete.
Restore Water Supply
Slowly open the shut-off valves. Watch for leaks under the sink.
Operate the Handle
Turn the faucet on and off several times. Listen for squeaking, grinding, or stiff movement. Check for leaks at the base of the handle, spout, and under-sink connections.
Success: Smooth, silent operation with full water flow means the job is done.
Prevent Future Squeaks with Regular Maintenance
A one-time fix lasts 12 months or more. Regular maintenance stops squeaks before they start.
Lubricate Every 1 to 2 Years
In soft water areas, apply silicone grease every 12 to 24 months. In hard water over 7 GPG, do it every 6 to 12 months.
Clean Internally with Vinegar
Disassemble and soak parts annually. Wipe the faucet body interior with a vinegar-dampened cloth.
Install a Water Softener
If your water is hard, a softener reduces mineral buildup in all plumbing fixtures, not just faucets.
Do Not Force the Handle
Use smooth, controlled motion when turning. Jerking or over-rotating wears out seals faster.
Pro Tip: Take photos during disassembly. They help during reassembly, especially in tight spaces.
Fixing Specific Faucet Brands
Different brands have unique designs. Knowing what you are working with speeds up the repair.
Moen Faucet Repairs
Moen single-handle models, especially 2021 and newer, are prone to squeaks due to dry O-rings, not faulty cartridges. Use Moen silicone grease and avoid petroleum products. Replace the cartridge only if it is cracked or leaking.
Outdoor Hose Bibb Repairs
Exposed to weather, outdoor faucets squeak from dry packing washers. Lubricate internal threads with silicone grease. Consider freeze-proof models in cold climates.
Specialty Brand Repairs
For Woodford or older brands, get a rebuild kit like the RK7 MH Model 17. It includes a packing washer, nut, and fittings. Take old parts to a plumbing supply store for exact matches.
Note: Even washerless faucets have seals. O-rings and cartridges wear out and cause noise.
When to Replace the Entire Faucet
Most squeaks are repairable, but replacement is needed in certain situations.
Replace the faucet if the body is cracked or leaking at the base, internal corrosion is severe, replacement parts are discontinued, repeated repairs fail, or under-sink space is too tight for safe work.
Expert Insight: “It might be necessary to replace the faucet but usually they can be rebuilt.” If replacing, choose a model with easy-access cartridges and silicone seals for longer life.
Avoid Common DIY Mistakes
Even experienced DIYers make errors that cause leaks or persistent noise.
Never Use WD-40 on Faucet Seals
WD-40 swells and cracks rubber O-rings. The squeak may stop temporarily, but damage follows.
Do Not Overtighten Nuts
Snug is enough. Over-tightening strips threads or cracks brass components.
Skip Abrasive Cleaners
Steel wool or harsh scrubbers scratch chrome and gouge seals. Stick to soft brushes and vinegar.
Remember to Turn Off Water
Always double-check. Water under pressure can flood cabinets in seconds.
Checklist: Before starting, confirm water is off, drain is plugged, tools are ready, and old parts are photographed.
Expected Results and Cost Savings
This fix works in over 90% of cases. No plumber is needed.
Time and Cost
Repair time is 30 to 60 minutes, including soak time. Cost is under $10 for grease and vinegar. You avoid a $50 to $150 service call.
How Long the Fix Lasts
A proper lubrication lasts 12 or more months. With annual maintenance, your faucet can stay silent for years.
User Experience
Verified DIYers report smooth handle motion restored, squeak gone in under 30 minutes, and an easy process with clear instructions.
Final Note: Lubrication is the number one fix. Most squeaks are solved without part replacement.
Frequently Asked Questions About Fixing a Squeaky Faucet Handle
Why does my faucet squeak when I turn it on?
The squeak comes from internal friction. Dry or degraded O-rings, mineral buildup from hard water, or worn cartridge components create resistance when the handle moves. This friction produces the high-pitched squealing sound.
Can I fix a squeaky faucet handle without replacing parts?
Yes. In most cases, the fix requires only cleaning and lubricating existing components. Vinegar removes mineral deposits, and silicone grease lubricates dry O-rings and stems. Cartridge replacement is rarely needed unless the faucet is leaking or the cartridge is visibly damaged.
What is the best lubricant for a squeaky faucet?
Use only plumber’s silicone-based grease. Products like Danco 88693, Moen Silicone Grease, or Super Lube with PTFE are waterproof and safe for rubber seals. Never use WD-40, petroleum jelly, or motor oil. These break down rubber and cause long-term damage.
How often should I lubricate my faucet to prevent squeaks?
Lubricate every 12 to 24 months in soft water areas. In hard water regions, do it every 6 to 12 months. Regular maintenance prevents the O-rings from drying out and keeps internal components moving smoothly.
Do I need special tools to fix a squeaky faucet handle?
You need basic tools. An Allen wrench set, adjustable wrench, flathead screwdriver, and soft-bristled brush handle most repairs. You also need white vinegar for soaking and plumber’s silicone grease for lubrication. No specialized plumbing tools are required.
Key Takeaways for Fixing Your Squeaky Faucet Handle
A squeaky faucet handle is a common but easily fixable issue. By shutting off the water, removing the handle, cleaning with vinegar, and applying plumber’s silicone grease, you will eliminate the noise and extend your faucet is life. The process takes 30 to 60 minutes and costs under $10. Over 90% of squeaky faucet handle issues are resolved with this method, without needing cartridge replacement or a plumber.
Perform this simple maintenance every 6 to 12 months, especially in hard water areas. Use only silicone-based lubricants and avoid petroleum products that damage rubber seals. Take photos during disassembly to make reassembly easier. With regular care, your faucet will stay smooth and silent for years.


