
Water seeping from the base of your faucet handle when the water is running? This common plumbing problem wastes water, increases your bills, and can damage cabinets if left untreated. The good news: fixing a leaking faucet handle is a DIY project that takes under 30 minutes and costs less than $10 in parts. This guide walks you through every step, from diagnosis to testing, with techniques that work across Delta, Moen, and Kohler models.
By the end of this article, you’ll know exactly how to identify the leak source, replace the faulty components, and prevent future problems. You’ll also learn which brand-specific tips can save you money on replacement parts.
Confirm Handle Leak vs. Spout Drip
Before grabbing your tools, verify the exact leak type. Misdiagnosis leads to wasted effort and unnecessary repairs.
Is It a Handle Leak?
A true handle leak occurs only when water is running. Look for these specific signs:
- Water beading or dripping from the back or base of the handle
- Moisture visible near the stem-body junction, not the spout
- Wetness under the sink around the valve assembly
Quick Test: Wrap a dry paper towel around the handle base. Turn on the faucet. If the towel wicks moisture, you have a handle leak that needs internal repair.
Spout Drip vs. Handle Leak
Different symptoms point to different problems. Here’s how to tell them apart:
- Water drips from spout when off: Worn washer, cartridge, or valve seat failure
- Water seeps from handle base when on: Failed O-ring, cartridge seal, or stem damage
- Both issues present: Multiple component failures requiring comprehensive repair
Focus on the handle leak repair in this guide only if water escapes at the handle during use.
Identify the Root Cause

Most handle leaks stem from failed internal seals. Understanding what typically goes wrong helps you fix it right the first time.
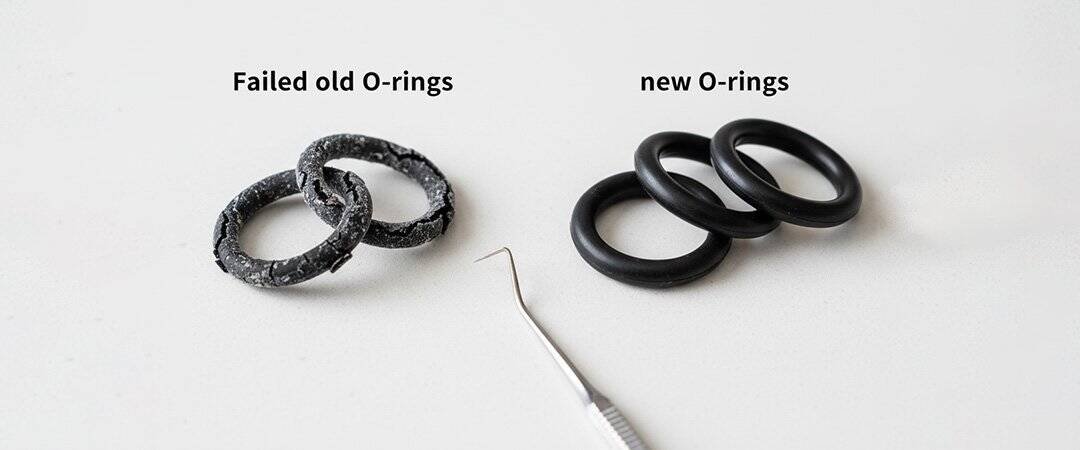
Worn or Damaged O-Ring
The O-ring sitting around the valve stem is the number one cause of handle leaks. This seal blocks pressurized water, but over time it flattens, cracks, and loses elasticity. Even minor wear breaks the seal and allows water to escape up the stem.
Corroded or Pitted Valve Seat
Located inside the faucet body, the valve seat supports the stem. If it becomes pitted or eroded, the stem cannot seat properly and water bypasses the seal. This cause is often missed during basic repairs.
Scored or Corroded Valve Stem
A rough stem surface shreds new O-rings during operation. Inspect for rust, scratches, or limescale buildup. Clean with fine steel wool or soak in vinegar to restore a smooth surface.
Failed Cartridge or Stem Assembly
Single-handle faucets from Delta and Moen commonly experience internal cartridge wear that isn’t visible externally. If O-ring replacement fails to stop the leak, the cartridge itself likely needs replacement.
Loose or Stripped Set Screw
The set screw holds the handle to the stem. If loose, handle movement damages the seals underneath. Tightening helps, but won’t fix seal-based leaks.
Mineral Buildup
Hard water leaves calcium deposits that prevent proper seating and accelerate seal wear. Soak parts in CLR or white vinegar for 30 minutes to dissolve buildup.
Shut Off Water and Prepare
Never skip preparation. One mistake can flood your cabinet and turn a simple repair into a plumbing emergency.
Turn Off Under-Sink Valves
Locate the hot and cold shutoff valves under your sink. Turn both clockwise until tight. Open the faucet to drain residual water and relieve pressure from the system.
Critical: If no shutoffs exist under the sink, turn off the main water supply to your house before proceeding.
Protect the Work Area
Plug the drain with a stopper or rag to prevent dropped screws from vanishing into the plumbing. Lay a clean towel to organize parts as you remove them. Take photos at each disassembly step for invaluable reference during reassembly.
Remove the Faucet Handle
Handle removal methods vary by brand, but the basic sequence remains similar.
Pry Off Decorative Cap
Use a flathead screwdriver to gently lift the cap on the handle top. These caps come in various finishes including chrome, brushed nickel, and matte black. Set the cap aside carefully.
Loosen the Set Screw
Insert the appropriate Allen wrench into the set screw. Delta faucets typically use a 3/32″ wrench, while other brands may need 1/8″ or 5/64″. Turn counter-clockwise to remove the screw. Some Moen models have no screw and the handle pulls straight off.
Stuck Handle?: Apply penetrating oil like WD-40, wait 10-15 minutes, then wiggle gently to free the handle.
Pull Off the Handle
Lift the handle straight up. If mineral-locked, rock slightly side-to-side until free. Underneath, you’ll see the cartridge, stem, or ball assembly that needs inspection.
Remove Retaining Nut and Extract Cartridge
Now you can access the internal components causing your leak.
Unscrew Bonnet or Retaining Cap
Some Kohler models have a bonnet cap that unscrews by hand. Delta and others use a retaining nut requiring an adjustable wrench. Turn counter-clockwise to loosen. If stuck, apply penetrating oil and wait before attempting again.
Remove Mounting Nut
Use an adjustable wrench or lock jaw pliers to turn the mounting nut counter-clockwise. Wrap the wrench jaws in tape to avoid scratching chrome finishes. Do not force the nut—excessive torque can crack the faucet body.
Pull Out the Cartridge or Stem
Grasp the cartridge or stem and pull straight up. Gentle rocking helps if seized. Inspect all removed parts for O-rings, springs, valve seats, and gaskets.
Rule: Replace any part showing cracks, warping, or corrosion—even if damage seems minor.
Inspect and Clean Components
Proper inspection determines whether you need a simple O-ring fix or full cartridge replacement.
Check the O-Ring
Remove the O-ring from the stem groove using needle-nose pliers or a small screwdriver. Look for these failure signs: flat or stretched shape, brittle texture, or visible cracks. Even if the O-ring looks okay, replace it since internal degradation isn’t always visible.
Examine the Valve Seat
The valve seat sits at the bottom of the faucet body. It should have a smooth, rounded top with a sharp edge below. If pitted or eroded, replace using a seat wrench—a damaged seat will quickly ruin new O-rings.
Clean the Valve Stem
Soak the stem in white vinegar or CLR for 30 minutes if limescale is present. Use fine steel wool to polish out light corrosion. The goal is a shiny, smooth surface that won’t shred new seals.
Inspect the Cartridge
Look for matching notch count, length, diameter, and flow orientation marks. Internal wear isn’t always visible. If O-ring replacement doesn’t solve the leak, replace the entire cartridge.
Best Practice: Bring the old cartridge to the hardware store to match the exact replacement.
Replace the O-Ring (First Fix)
Most leaking faucet handle issues end here with a simple O-ring replacement.
Choose the Right O-Ring
Match exact size and hardness. An O-ring that’s too small stretches and fails. One that’s too large won’t seat properly. Bring the old O-ring to the store for comparison.
Steps to Replace
Remove the old O-ring from the stem groove. Lubricate the new O-ring with silicone valve grease. Roll it into the groove slowly, starting from the bottom. Avoid twisting or pinching during installation. Ensure the O-ring forms a tight, continuous circle.
Never use petroleum-based grease—it degrades rubber and causes premature failure.
Replace Cartridge or Stem (If O-Ring Fails)
If the leak persists after O-ring replacement, upgrade to full assembly replacement.
When to Replace
Choose this option if the O-ring fix didn’t work, the stem is pitted, the cartridge shows wear, or you have a recurring or heavy leak.
Steps
Insert the spring into the housing with the tapered end facing up. Install the valve seat—it should spring back when pressed down. Align the notches or pegs on the new cartridge with the faucet body guides. Push down firmly until fully seated. Install any included plastic stopper to limit handle rotation.
Delta Tip: Stems are interchangeable between hot and cold positions—install in reverse if needed.
Reassemble with Care
One mistake during reassembly can undo all your repair work.
Lubricate Before Reassembly
Apply silicone valve grease to the O-ring groove, bottom and sides of the stem, top of the valve seat, and threads of the retaining nut. This prevents dry friction, eases installation, and extends seal life.
Insert Cartridge or Stem
Align pegs, notches, or grooves with internal guides. Push straight down without angling. The component should slide in smoothly. If not, remove and recheck alignment.
Install Retaining Nut
Thread clockwise by hand first. Turn slightly counter-clockwise to engage threads properly. Tighten with a wrench: finger-tight plus 1/4 to 1/2 turn. Over-tightening cracks plastic or strips threads.
Delta Note: The beveled side of the retaining nut faces upward.
Reattach Handle
Slide the handle onto the stem. Secure with the set screw, tightening just enough to stop wobble. Avoid over-torquing—plastic inserts strip easily.
Snap On Decorative Cap
Match the finish to your faucet. Press firmly until it clicks into place.
Test the Repair
The final step proves your work was successful.
Restore Water Supply
Slowly open the hot and cold shutoffs. Open the faucet to flush out any debris.
Operate and Inspect
Turn the faucet on and off 5-10 times. Watch the handle base for any seeping water. Check under the sink for wetness around the stem or nut.
Evaluate Results
No leak means success—the repair typically lasts 5+ years with basic maintenance. If the leak persists, recheck O-ring seating, verify cartridge alignment, or consider full stem or cartridge replacement.
Expert Move: If O-ring replacement failed, the cartridge is the real culprit. Replace it entirely.
Brand-Specific Tips
Delta Faucets
The common cartridge is RP25513. Use a 3/32″ Allen wrench. The retaining nut’s beveled side faces up. Check Delta’s website for free defective part replacements.
Moen Faucets
Moen uses a pull-off handle design with no set screw. The lifetime warranty covers cartridges—call Moen with your model number for a free replacement by mail. User reports confirm that O-ring-only fixes often fail, while cartridge swap succeeds.
Kohler Faucets
Use genuine Kohler parts only. Alignment pegs must match depressions in the faucet body. The bonnet cap often hand-tightens. Kohler offers a lifetime warranty against defects.
Troubleshoot Common Issues
Handle Won’t Come Off
Mineral lock is the usual cause. Apply penetrating oil, wait 10 minutes, then wiggle gently to free it.
Cartridge Won’t Seat
Misalignment or debris prevents seating. Clean the housing, realign notches, and push firmly.
Leak After Reassembly
Over-tightened nut or pinched O-ring causes this. Disassemble, re-lubricate, and reassemble carefully.
Wobbly Handle
A loose or stripped set screw creates wobble. Tighten gently—don’t over-do it on plastic inserts.
Prevent Future Leaks
Keep your faucet leak-free with simple maintenance.
Annual Maintenance
Remove the handle once a year. Clean the stem and seat with vinegar. Re-lubricate O-rings with silicone grease.
Replace O-Rings Proactively
Replace O-rings every 3-5 years even if not leaking. Cost is typically under $4.
Use Manufacturer Parts
OEM cartridges ensure perfect fit. Cheap knockoffs fail early and cost more in the long run.
Install Water Softener
If you have hard water, minerals accelerate wear on seals and components. A softener reduces limescale buildup and extends faucet life.
Frequently Asked Questions About Fixing a Leaking Faucet Handle
Why does my faucet handle leak only when the water is on?
This indicates a seal failure around the valve stem. When water pressure builds, it finds the path of least resistance—which is a worn O-ring or damaged cartridge allowing water to escape at the handle base.
Can I fix a leaking faucet handle without replacing the entire faucet?
Yes. In over 90% of cases, the fix is either a new O-ring (under $4) or a replacement cartridge ($10-25). Only the cartridge or stem assembly needs replacement when O-ring replacement fails.
How long does it take to fix a leaking faucet handle?
First-time DIYers typically complete the repair in 30-45 minutes. Experienced homeowners finish in 10-20 minutes. The time depends on how stuck the components are and whether you need to source replacement parts.
Do I need special tools to fix a leaking faucet handle?
Basic tools suffice: adjustable wrench, Allen wrenches (3/32″ for Delta), flathead screwdriver, and needle-nose pliers. A seat wrench is needed only if replacing the valve seat.
What’s the most common cause of a leaking faucet handle?
A worn or damaged O-ring causes approximately 90% of handle leaks. This rubber seal around the valve stem degrades over time and loses its ability to contain pressurized water.
Should I call a plumber or fix this myself?
DIY saves 95% compared to plumber costs of $150-300. Since the repair is straightforward with basic tools, attempting it yourself is worthwhile. Only call a professional if DIY attempts fail or the faucet body is damaged.
Key Takeaways for Fixing Your Leaking Faucet Handle
A leaking faucet handle is almost always caused by a failed O-ring or worn cartridge—problems you can fix yourself in under 30 minutes for under $25. The O-ring is the culprit in 90% of cases, so start there. If that doesn’t work, replace the entire cartridge. Always shut off water before starting, take photos during disassembly, and use silicone grease on all rubber components during reassembly. Brand-specific warranties from Moen and Delta can get you free replacement parts, so check before buying. With proper technique and annual maintenance, your repair will last 5+ years.


