
A loose faucet handle is more than just an annoyance. It can lead to leaks, internal damage, and wasted water over time. Whether the handle wobbles when you turn it on or spins freely without engaging the valve, fixing a loose faucet handle is usually a quick DIY job that takes under 30 minutes. The root cause is often a simple loose or stripped set screw, worn splines, or a wobbly base due to a loose mounting nut. This guide walks you through diagnosing the issue, tightening or replacing components, and preventing future looseness, whether you own a Moen, Delta, or older model.
Identify the Source of Looseness
Before grabbing tools, determine whether the problem is in the handle or the base. This diagnosis saves time and prevents unnecessary disassembly.
Handle-Only Wobble
If only the lever moves while the spout stays stable, the issue is internal to the handle assembly. Common causes include a loose or stripped set screw, worn splines on the handle or cartridge stem, or a damaged decorative cap. Test by wiggling just the handle. If movement is isolated, focus on internal fasteners.
Base Instability
If the entire faucet rocks, including the spout and escutcheon, the base is loose. The mounting nut under the sink may be loose, the gasket could be cracked or missing, or the sink hole may be oversized. Test by stabilizing the handle and pushing the spout side-to-side. Movement means the base needs tightening.
Remove the Decorative Cap and Locate the Set Screw
Most modern faucets have a decorative cap covering the fastener. Removing it exposes the set screw that holds the handle in place.
Pry Off the Color-Coded Cap
Most handles have a red hot or blue cold plastic or metal cap on top or the side. Use your fingernail or a small flathead screwdriver and gently pry from one edge to avoid scratching the finish. Set the cap aside safely, as caps can crack if forced. Avoid excessive force, especially on metal caps, which can dent.
Find the Fastener Type
Most modern faucets use one of these fastener types. An Allen hex set screw is common on Moen, Delta, and HOROW models. A Phillips head screw is found on older Maoen and Moen Brantford models. Some handles screw directly onto an adapter with no visible screw. Note that some Moen Brantford models have no set screw. Simply unscrew the entire lever counterclockwise after removing the cap.
Remove and Inspect the Handle
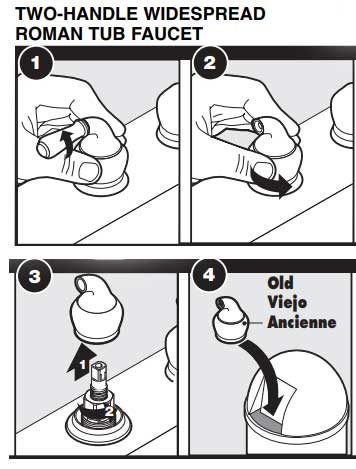
With the cap removed and fastener exposed, you can now remove the handle and check for damage.
Pull Off the Handle
After loosening the set screw, gently pull the handle straight off the cartridge stem. If stuck, tap lightly with a rubber mallet or twist gently. Keep a towel underneath to catch the small screw.
Check for Wear
Inspect these components for signs of damage. Check the splines, which are the teeth inside the handle and on the stem. Look for teeth that are worn, rounded, or stripped. Inspect the set screw head for stripping or thread damage. Examine the screw hole for corroded or stripped threads. Even if the screw is tight, worn splines will still make the handle feel loose.
Clean and Prepare Components
Dirty or corroded threads can prevent proper tightening and cause the problem to return.
Clean the Screw Hole
Use acetone to dissolve silicone-based grease. For regular grease, use gasoline in a well-ventilated area with no open flames. Scrub threads with a pipe cleaner or soft brush, then dry thoroughly before reassembly.
Clean the Cartridge Stem
Wipe with a vinegar-soaked cloth to remove mineral deposits. Use a toothpick to clear debris from spline grooves. Cleaning improves grip and prevents future corrosion.
Reassemble and Secure the Handle
With clean components, you can now put everything back together properly.
Apply Thread Locker (Optional)
For long-term stability on high-use kitchen and bathroom faucets, use Loctite Blue 242 on the set screw threads. This medium-strength thread locker prevents loosening without making future repairs impossible. Never use red permanent thread locker, as it makes disassembly extremely difficult. Avoid using thread locker on plastic parts, as it can cause cracking.
Reattach the Handle
Align the handle with the flat ledge on the stem and push down firmly until seated. Insert and tighten the set screw clockwise until snug. Do not overtighten, especially on plastic threads. Reinstall the decorative cap by pressing it back into place evenly. Test by turning the faucet through its full range. The handle should stop at endpoints without spinning freely.
Fix a Wobbly Faucet Base
If the entire unit rocks, you need under-sink access to tighten the mounting assembly.
Turn Off Water Supply
Shut off the hot and cold valves under the sink. Open the faucet to drain residual water. Place a bucket or towel to catch drips. If shutoff valves leak or won’t close, turn off the main water supply.
Tighten the Mounting Nut
Locate the basin nut, which is the large hex nut under the sink, or the side-mount clamps on either side in three-hole setups. Support the faucet body with one hand to prevent twisting. Use a basin wrench or deep socket to turn the nut clockwise. Tighten in small increments, testing stability after each turn. For side-mount brackets, tighten both screws evenly in alternating passes to prevent warping.
Replace Damaged Components

Sometimes tightening isn’t enough. Worn parts need replacement for a lasting fix.
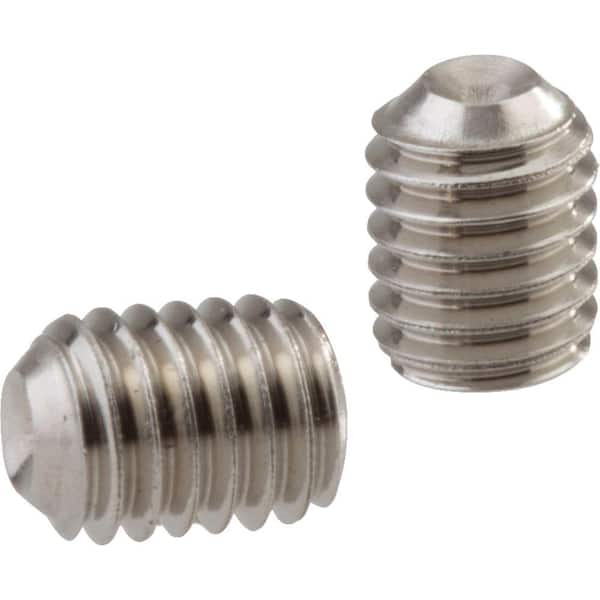
Replace a Stripped Set Screw
Remove the old screw with pliers or a screw extractor. Install a new stainless steel set screw in the same size, typically 3/32 inch, 1/8 inch, or 5/64 inch. Apply Loctite Blue if needed.
Replace Worn Handle or Cartridge
If the handle is tight but still wobbles, the splines are worn. Order a replacement handle and or cartridge. Moen and Delta both offer free replacement parts via their customer service when you call with your model number.
Replace a Failed Gasket
If the base wobbles despite a tight nut, the gasket is likely cracked, flattened, or missing. Remove the faucet, clean the base with vinegar, install a new rubber or fiber gasket, and re-tighten the mounting nut.
Troubleshooting Persistent Looseness
Some situations require additional steps beyond basic tightening.
| Symptom | Likely Cause | Fix |
|---|---|---|
| Handle wobbles after tightening | Worn splines | Replace handle or cartridge |
| Screw won’t stay tight | Stripped threads | Replace screw or use helical insert |
| Base wobbles after tightening | Damaged gasket | Replace gasket |
| Faucet rocks despite tight nut | Oversized sink hole | Use mounting plate or gasket kit |
| Nut won’t turn | Seized or cross-threaded | Apply penetrating oil, wait 15-30 minutes |
Brand-Specific Fixes
Different brands use different fastener types and may have unique repair considerations.
Moen Faucets
Moen faucets typically use a 5/64 inch or 3/32 inch Allen set screw. If the handle still wobbles after tightening the set screw, check the brass mounting nut under the sink. Moen offers free parts through customer service.
Delta PF Series
Delta faucets use a 3/32 inch or 1/8 inch Allen wrench. The process is similar to Moen. Start by tightening the set screw first. Delta also offers free replacement components.
Older Maoen Models
Older Maoen faucets may have a Phillips screw under the cap or a threaded base with no visible set screw. If there’s no set screw, tighten the base adapter clockwise. Parts may be hard to find for units over 15 years old, so consider replacement.
HOROW Faucets
HOROW faucets use a standard Allen wrench with a reinforced mounting nut and corrosion-resistant materials. They are less prone to recurring looseness.
Prevent Future Looseness
Regular maintenance keeps faucet handles secure for years.
How Tight Is Enough
Hand-tight plus a quarter turn with a wrench is sufficient. The goal is snug and stable, not rock-solid. Test after each small turn to avoid overtightening.
Routine Maintenance
Inspect the faucet every six months for looseness or leaks. Clean the aerator monthly by soaking it in vinegar and clearing debris with a toothpick. This prevents flow issues that strain the handle.
Anti-Loosening Tips
Use Loctite Blue on metal threads. Add friction washers under nuts. Never use thread locker on plastic, as it risks cracking.
Know When to Replace the Faucet
Sometimes repair isn’t worth the effort. Replace instead of repair if the mounting threads are stripped and can’t be fixed, the faucet base is cracked or warped, chronic leaks continue after installing new gaskets, the finish is corroded or hardware is seized, or the faucet is over 15 years old with no spare parts available. A new faucet costing 50 to 150 dollars may save long-term hassle and repeated repairs.
DIY vs. Hire a Pro
| Issue | Tools Needed | Time | Savings |
|---|---|---|---|
| Loose handle | Allen wrench, screwdriver | 5-10 min | $100-$200 |
| Loose base | Basin wrench, adjustable wrench | 10-30 min | $100-$200 |
A basin wrench costs 10 to 30 dollars and pays for itself in one repair. Call a plumber if access is too tight, water damage or mold is present, electronic or undermount sink systems are involved, or the faucet is under warranty requiring manufacturer protocol.
Final Test and Verification
After completing repairs, verify everything works properly. Reinstall the handle and cap. Turn the water back on. Operate through full range. Check for no wobble or play, smooth handle movement, proper stop positions at cold and hot, and no leaks at the base or under the sink. If stiffness or wobble remains, consider replacing the cartridge or upgrading to a new faucet.
Frequently Asked Questions About Fixing a Loose Faucet Handle
Why does my faucet handle keep getting loose?
The most common cause is a loose set screw, but worn splines can also cause recurring looseness. If tightening the screw doesn’t solve it, the handle or cartridge stem splines are likely worn and need replacement.
Can I use any thread locker on my faucet?
Use Loctite Blue 242, which is medium-strength and removable. Never use red permanent thread locker, as it makes future repairs extremely difficult. Avoid thread locker entirely on plastic parts, as it can cause cracking.
How do I know if the base is loose versus the handle?
Wiggle just the handle. If movement is isolated, the handle is the problem. If the entire faucet rocks when you push the spout side-to-side, the base is loose and needs tightening under the sink.
Do I need special tools to fix a loose faucet base?
A basin wrench is ideal for tight spaces under the sink. It costs 10 to 30 dollars. Alternatives include a tube spanner or swivel-head ratchet if clearance permits.
Should I call a plumber or fix it myself?
For a loose handle, DIY is straightforward and takes 5 to 10 minutes with basic tools. For a loose base, it takes 10 to 30 minutes. Call a plumber only if access is impossible, there’s water damage, or electronic systems are involved.
How often should I check my faucet for looseness?
Inspect your faucet every six months as part of routine maintenance. Regular checks catch looseness early before it leads to leaks or component damage.
Key Takeaways for Fixing Your Loose Faucet Handle
A loose faucet handle is usually a simple fix that takes less than 30 minutes with basic tools. The most common causes are a loose set screw, worn splines, or a loose mounting nut under the sink. Always diagnose whether the problem is in the handle or the base before starting repairs. Clean components thoroughly and apply Loctite Blue for long-term stability in high-use faucets. If tightening doesn’t solve the problem, worn splines or a damaged gasket likely need replacement. Brand-specific parts like Moen and Delta set screws are often available free through customer service. For persistent issues or faucets over 15 years old, replacement may be more cost-effective than repeated repairs.


