
A loose, wobbly, or broken faucet handle isn’t just annoying—it can lead to leaks, water waste, and even permanent fixture damage if ignored. Whether your handle spins freely, won’t stay on, or is stiff to turn, most issues are fixable with basic tools and a few minutes of effort. The good news? You don’t need to be a plumber. With the right steps, you can diagnose and repair nearly any faucet handle problem in under an hour.
This guide covers every common faucet handle issue, from tightening a set screw to replacing a worn cartridge. You’ll learn exactly what to do, what tools to use, and how to avoid the most common DIY mistakes. We’ll also show you how to leverage manufacturer warranties and keep your faucet running smoothly for years.
Tighten a Loose Faucet Handle
A wobbly handle is the most common faucet issue, and usually the easiest to fix. Most looseness comes from a loose set screw or mounting nut, not broken parts.
Tighten the Set Screw
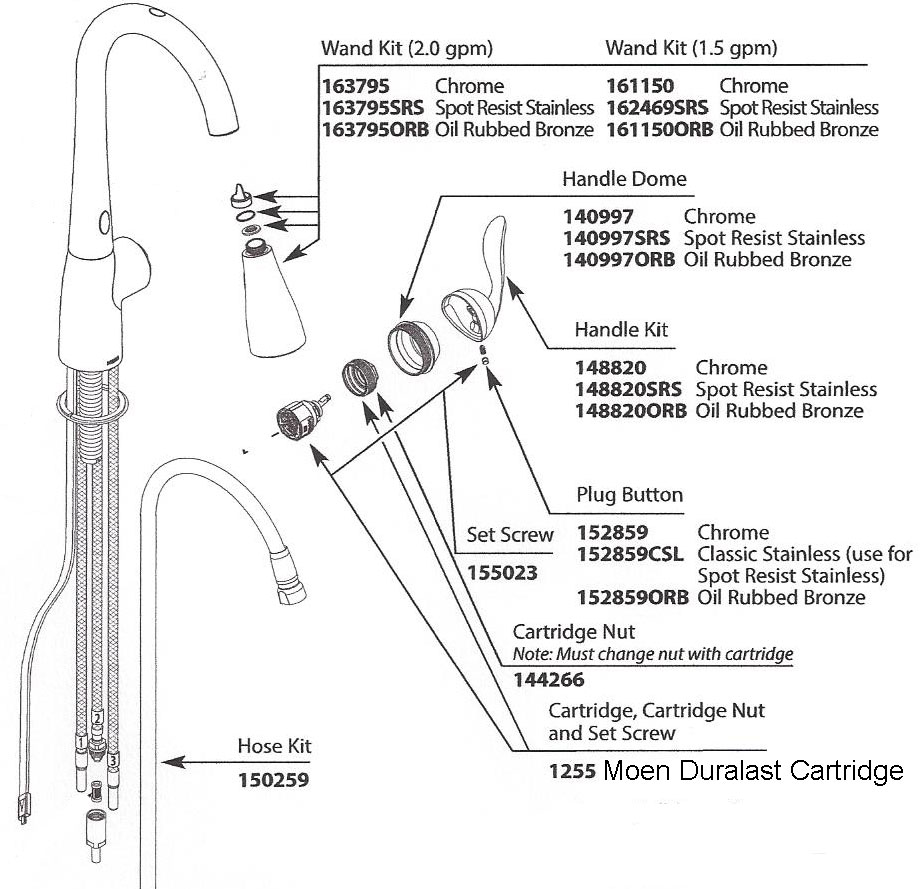
Many single-handle faucets, especially Moen and Kohler models, use a small set screw to secure the handle to the stem. Over time, this screw loosens due to daily use and thermal expansion.
Find the screw by looking for a small cap on the back or top of the handle. It may be black, red for hot, or blue for cold. Remove the cap by gently prying it off with a flat-head screwdriver. Insert a 5/64-inch Allen wrench into the exposed hole and turn clockwise to tighten. Do not over-tighten, as this can strip the screw or bind the handle. Test the handle, and if the wobble stops, snap the cap back on.
Check the Mounting Nut Under Sink
If the entire faucet wobbles when you move the handle, the problem is not the handle itself. It is the mounting nut under the sink.
Turn off the water supply valves. Use an adjustable wrench or 21mm socket to tighten the large nut securing the faucet base. Tighten just enough to stop movement, as over-tightening can crack the sink deck or distort the faucet body. Test from above to confirm stability.
Reattach a Detached Faucet Handle
If your handle came off completely, do not panic. This usually means a loose screw or broken internal adapter, not a dead faucet.
Identify the Faucet Brand and Model
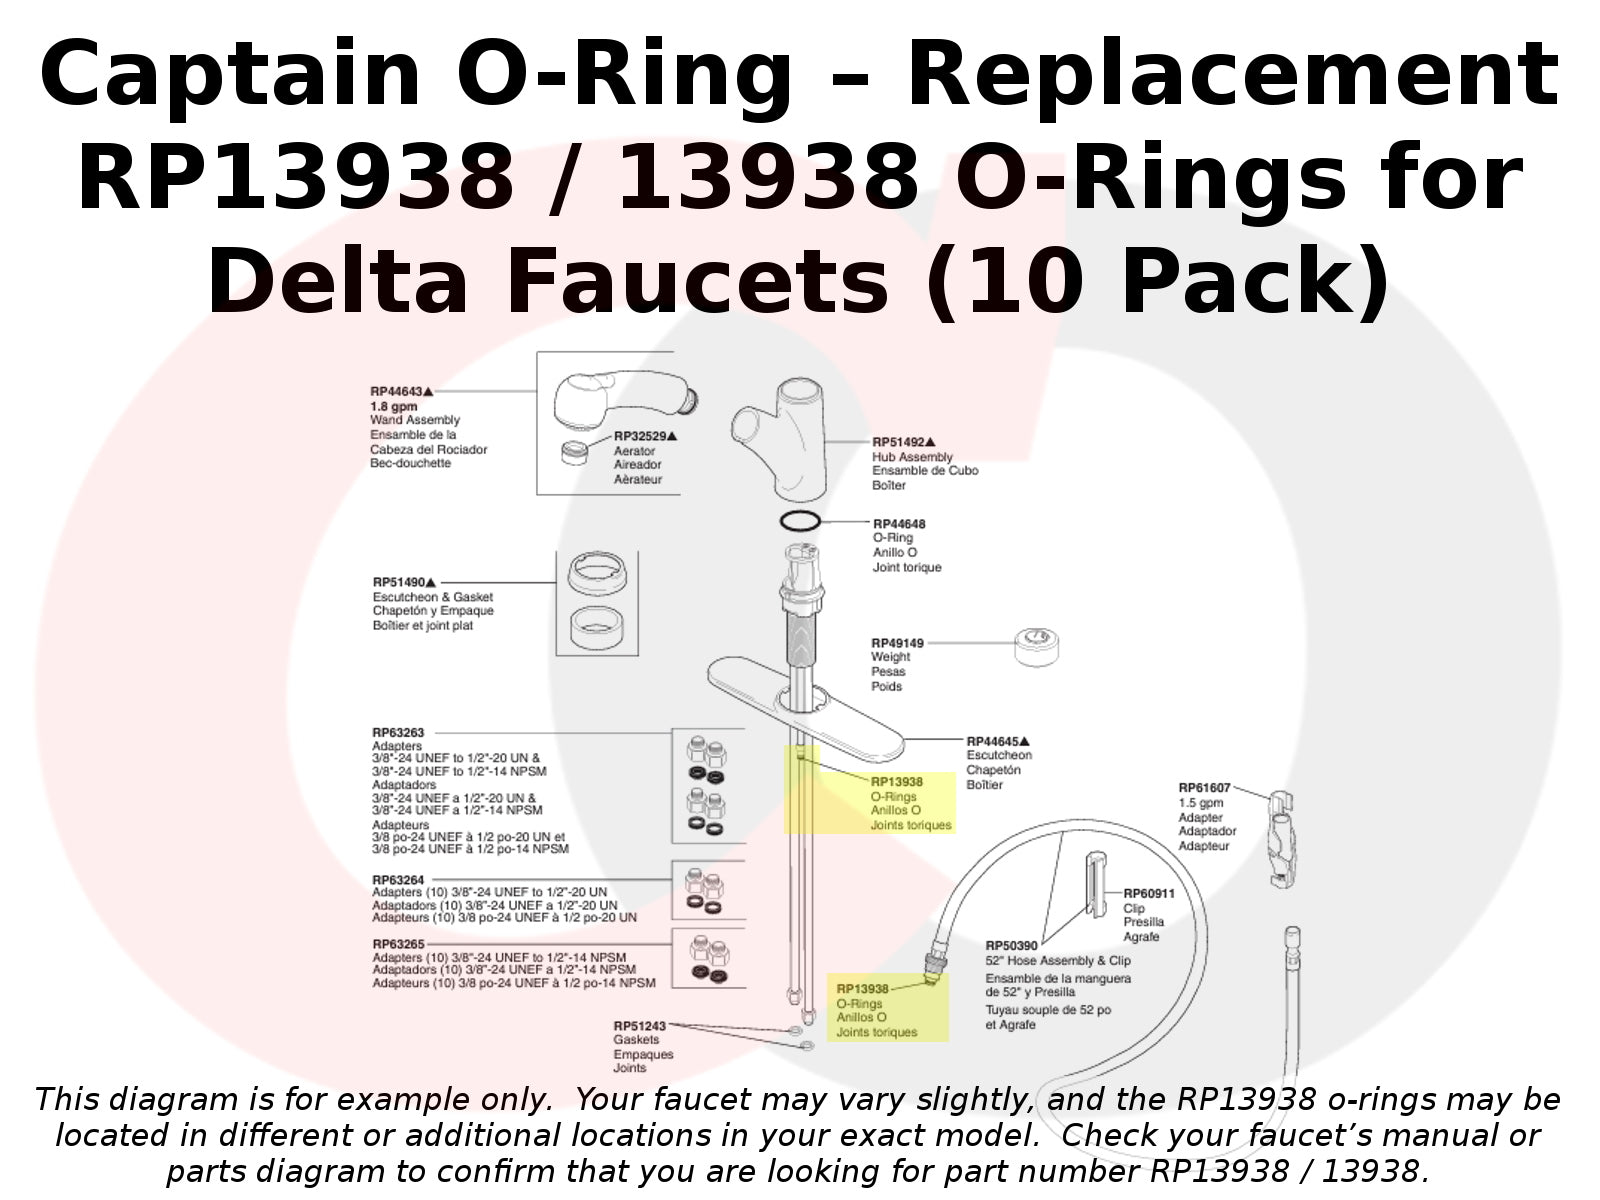
Before reattaching, confirm the brand. Moen, Delta, and Kohler handles are not interchangeable.
Check for markings on the spout, base, or underside. Look up the model number online or contact customer service. Take a photo of the exposed stem and any loose parts for reference.
Reassemble Internal Components
Many handles rely on a U-shaped adapter, white plastic piece, and metal mounting bar.
Align the flat edge of the handle with the flat side of the spindle. Slide on the adapter and secure with the Phillips or Allen screw. Ensure all parts are seated fully before tightening.
Use Warranty Replacement Parts
Moen offers a lifetime warranty on most faucet components. If parts are cracked or stripped, send a photo of the broken piece to Moen support and get free replacement parts shipped to your door.
Fix a Stiff or Hard-to-Turn Handle

If your handle resists turning or feels gritty, mineral buildup or lack of lubrication is likely the cause, especially in hard water areas.
Soak Parts in White Vinegar
Mineral deposits from hard water gunk up cartridges, O-rings, and ball assemblies.
Remove the handle and pull out the cartridge or ball. Soak in equal parts white vinegar and water for 15 to 20 minutes. Scrub with a soft toothbrush to remove scale. Rinse thoroughly with clean water.
Lubricate with Plumber’s Grease
Dry O-rings cause friction and stiffness.
Apply silicone-based plumber’s grease to O-rings, cartridge shaft, ball assembly, and stem threads. Use a pea-sized amount, as too much attracts debris. Never use WD-40, as it degrades rubber and plastic seals.
Reinstall with Proper Alignment
Misaligned cartridges cause binding.
For Kohler faucets, align the two pegs on the valve with the two depressions in the body. For Moen, ensure the cartridge slots into the guide rails. Hand-tighten the mounting nut, then give it a quarter to half turn with pliers.
Stop a Leaking Handle Base
Water pooling around the handle base means internal seals are failing. This is common in cartridge and ball-type faucets.
Replace Worn Seals by Faucet Type
For compression faucets, replace the washer and valve seat. For ball faucets, use a rebuild kit to replace the cam washer and inlet seals. For cartridge faucets, replace the O-rings or the entire cartridge. For ceramic disc faucets, replace the neoprene seals or the cylinder.
A single drip per second wastes over 3,000 gallons per year, making seal replacement both a practical and water-saving fix.
Fix a Spinning or Overshooting Handle
If your handle rotates past its stop points, you have lost directional control, meaning hot and cold mixing is unreliable.
Rotate the Spindle 180 Degrees
Many issues are caused by misaligned flats between the spindle and adapter.
Remove the handle. Rotate the spindle so the flat edge faces the opposite direction. Reattach the handle and test stop positions.
This simple fix has saved countless users from unnecessary part replacements.
Replace a Broken Stop Mechanism
If the handle still spins freely, the stop washer or cam may be cracked. Replace the cam washer in ball faucets or install a new cartridge if internal stops are worn.
Replace the Aerator to Restore Flow
Low water pressure is not always a handle issue. It could be a clogged aerator.
Remove and Clean the Aerator
Use pliers wrapped in cloth to unscrew the aerator from the spout. Soak in vinegar for one hour. Scrub the screen with a toothbrush. Reinstall after flushing the faucet for 30 seconds.
Replace if damaged, as cheap aerators crack easily. Upgrade to a metal version for durability.
Restore Water and Test the Faucet
After any repair, turn the water back on carefully to avoid pressure surges.
Turn On Water Slowly
Open shut-off valves under the sink gradually. Let water run for 2 to 3 minutes to flush out debris. Check for leaks at the handle base and spout.
Test Full Functionality
Move the handle from cold to hot. It should stop at both ends. Check for smooth operation with no binding or stiffness. Verify no drips after shut-off.
If a leak persists, recheck O-ring placement or cartridge alignment.
Prevent Future Handle Problems
Avoid repeat repairs with simple maintenance habits.
Clean and Inspect Every Six Months
Look for wobble, drips, or corrosion. Tighten set screws before they become loose. Replace worn washers early.
Install a Water Softener
Hard water destroys seals and cartridges. A softener extends faucet life by years.
Avoid Over-Tightening
Forcing the handle shut damages internal seals. Turn just until water stops.
When to Replace the Entire Faucet
Some situations call for a full replacement.
Consider replacing if the faucet is over 15 years old, the finish is pitted or corroded, no replacement parts are available, multiple components are failing, or leaks persist after repair.
Modern faucets are more efficient, easier to repair, and often come with lifetime warranties.
Final Checklist for Faucet Handle Repairs
Water supply shut off. Drain covered, towel in sink. Handle removed safely. Internal parts inspected and cleaned. Correct replacement parts installed. Components lubricated with silicone grease only. Proper alignment confirmed. Set screw tightened, cap replaced. Water turned on slowly. Faucet tested for leaks and smooth operation.
Frequently Asked Questions About Fixing a Faucet Handle
Why does my faucet handle keep getting loose?
The most common cause is a loose set screw inside the handle. Over time, thermal expansion and daily use cause the screw to loosen. Simply tightening it with a 5/64-inch Allen wrench usually solves the problem.
Can I fix a leaky faucet handle myself?
Yes, most leaky handle issues stem from worn O-rings, washers, or seals. These are inexpensive parts that you can replace with basic tools. Identify your faucet type first, then purchase the appropriate repair kit.
What tools do I need to fix a faucet handle?
You will need a 5/64-inch Allen wrench, flat-head screwdriver, Phillips screwdriver, adjustable wrench, and plumber’s grease. Having needle-nose pliers and a soft toothbrush handy helps with cleaning small parts.
How do I know if I need to replace the entire faucet?
Replace the faucet if it is over 15 years old, the finish is severely corroded, multiple components are failing, or repairs do not solve persistent leaks. Modern faucets often come with better warranties and easier repair options.
Does Moen offer free replacement parts?
Yes, Moen provides a lifetime warranty on most faucet components. You can contact their customer service with a photo of the damaged part and your model number to receive free replacements.
What should I do if my handle still won’t turn smoothly after cleaning?
If cleaning and lubrication do not resolve stiffness, the cartridge itself may be damaged or worn. Try replacing the cartridge with an exact model match. If the problem persists, the faucet may need professional inspection or full replacement.
Key Takeaways for Fixing Your Faucet Handle
Fixing a faucet handle is almost always a quick, low-cost DIY job. Whether you are tightening a screw, replacing a cartridge, or upgrading to a new lever, the tools and steps are simple. Use manufacturer warranties when available, keep a 5/64-inch Allen wrench on hand, and take photos during disassembly to remember how parts go back together. With this guide, you will save money, stop leaks, and keep your faucet working like new for years to come.


