
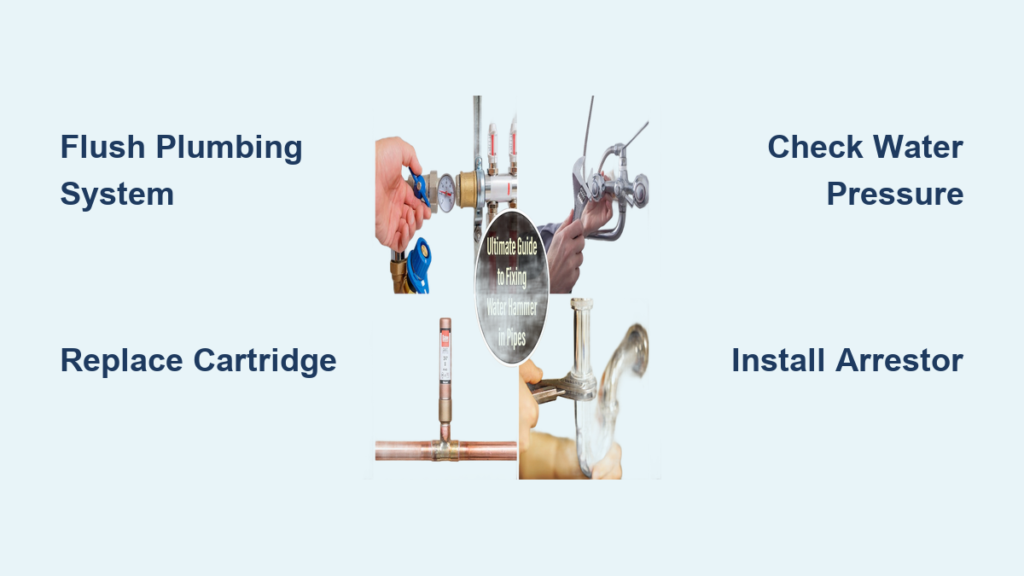
You turn the shower knob to adjust the temperature, and suddenly a loud bang shakes the wall. This jarring noise, known as faucet water hammer, happens when water flow stops abruptly, creating a shockwave that rattles your plumbing. If it occurs during temperature changes at a single-handle faucet, it is not random. It signals specific mechanical or systemic issues in your system.
Left unchecked, repeated water hammer can damage valves, joints, and pipes, leading to leaks or costly repairs. This guide walks you through proven solutions, from the easiest fix to targeted repairs, so you can silence the bang for good.
Diagnose the Source First
Before grabbing tools, identify what is causing the hammer. The timing and location of the noise tell you a lot about the root problem.
Identify Trigger Patterns
Only during warm-up? If the bang happens when moving the handle from cold to warm but not at full hot or cold, it likely points to turbulent flow in the mixing valve.
After plumbing work? Recent cartridge replacement or valve service may have disturbed air pockets or introduced a faulty part.
With multiple fixtures? Whole-house hammer suggests high pressure or waterlogged air chambers.
During water flow? A chattering or vibrating sound while water runs is often resonance, not true water hammer.
Pinpoint the Noise Location
Near the faucet? Focus on the cartridge, angle stops, or local piping.
In walls or basement? Loose pipes or failed shock absorption are likely culprits.
Only in one bathroom? Isolate the issue to that fixture is supply line.
Pro Tip: Turn off all water sources, then slowly open each faucet. Listen carefully. If the noise repeats only at one fixture, it is localized, not systemic.
Flush the Plumbing System
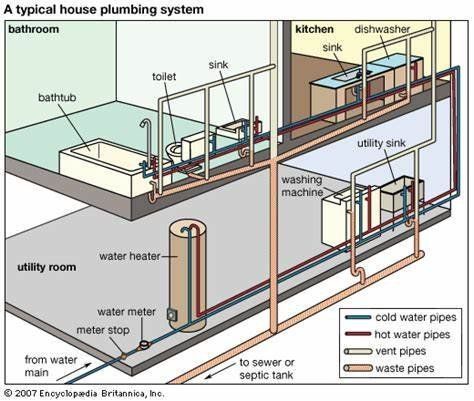
This is the number one fix for sudden-onset water hammer and should be your first step. When air chambers become waterlogged, they lose their ability to cushion pressure surges. A full system flush restores trapped air and often eliminates the problem completely.
Step-by-Step System Reset
- Shut off main water supply. Find the main valve in your basement, utility room, or near the meter.
- Open all faucets and spigots indoors and outdoors, hot and cold.
- Flush every toilet to empty tanks and bowls.
- Start from the highest point in your home, such as an upstairs bathroom, and work down.
- Wait at the lowest outlet, such as a basement drain or outdoor hose bib, until water stops flowing.
- Slowly reopen the main valve. Avoid introducing new surges.
- Keep the highest faucet open as air re-enters the system.
- Expect sputtering. This is normal as air pockets reform.
- Once steady flow returns at the top, close that faucet.
- Close lower faucets one by one, starting from the bottom up.
Result: In most cases, this restores shock-absorbing air cushions and stops the hammer. One homeowner reported permanent silence after a single flush with no tools and no cost.
Warning: If you have a tank water heater, drain it too, or prolonged dry operation can damage the tank.
Replace the Faucet Cartridge
If hammering occurs only during temperature mixing, the cartridge is likely the culprit. Worn, misaligned, or mineral-clogged cartridges disrupt smooth flow, especially in mid-position. Even a new cartridge can cause issues if improperly installed.
Remove and Inspect the Cartridge
- Turn off water at angle stops under the sink or behind the tub.
- Remove handle and trim to access the cartridge.
- Pull out the cartridge using a wrench or puller tool.
- Check for mineral buildup, cracks or warping, and misalignment or damaged seals.
Install Correctly
Use OEM parts only. Off-brand cartridges may not seal or move properly.
Lubricate with plumber is grease if recommended by the manufacturer.
Align tabs and slots precisely. Forcing the cartridge can crack the valve body.
Reassemble slowly and test before sealing.
Evidence: Multiple users resolved hammering after replacing cartridges. One needed a full faucet rebuild, including spout and showerhead, indicating hidden flow restrictions can compound the issue.
Pro Tip: If the problem returns after replacement, double-check alignment. A one-eighth-turn misalignment can cause turbulence.
Test and Regulate Water Pressure
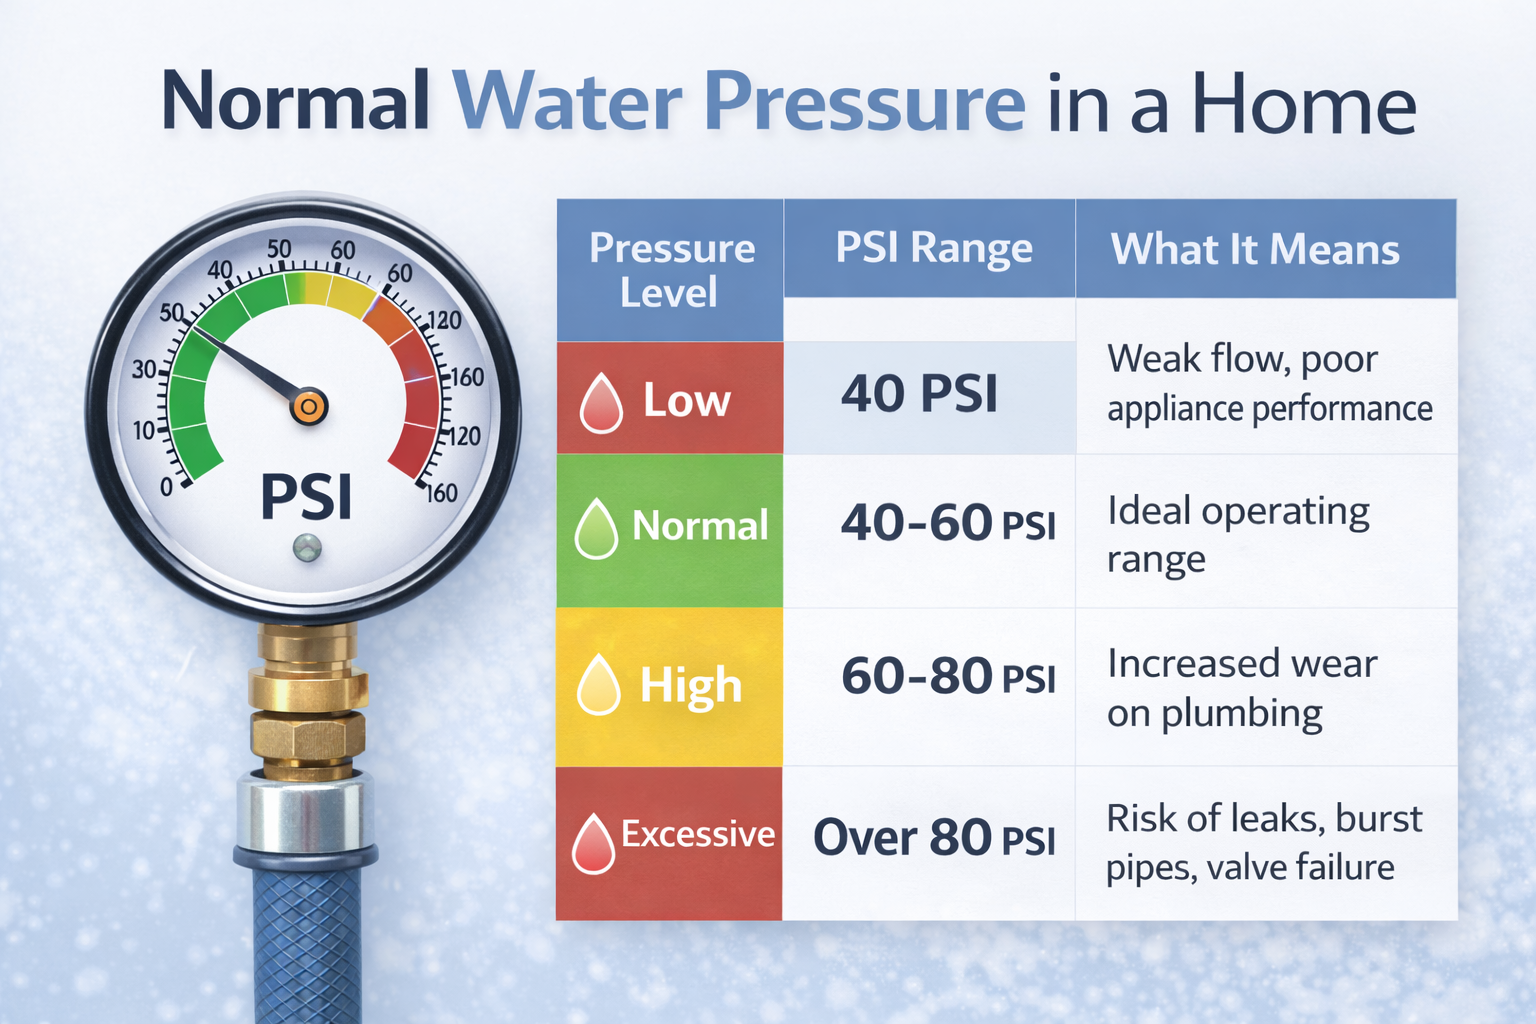
High pressure turns minor surges into loud bangs. Measuring and regulating your water pressure is essential for stopping water hammer.
Measure Static Pressure
- Attach a water pressure gauge to an outdoor spigot or washing machine valve.
- Ensure all fixtures are turned off.
- Open the valve fully and read the gauge.
Ideal Pressure Range
40 to 60 PSI is safe and effective.
60 to 80 PSI is acceptable but monitor closely.
Above 80 PSI is the danger zone and increases risk of damage.
Fix High Pressure
Adjust the pressure-reducing valve on the main line. Use a wrench to turn the adjustment screw clockwise to increase or counterclockwise to decrease pressure. Aim for 55 to 60 PSI.
Replace the PRV if it is non-adjustable or leaking.
Note: Municipal supply can exceed 100 PSI. A working PRV is essential in these areas.
Benefit: Lower pressure reduces hammer severity and extends fixture life.
Install a Water Hammer Arrestor
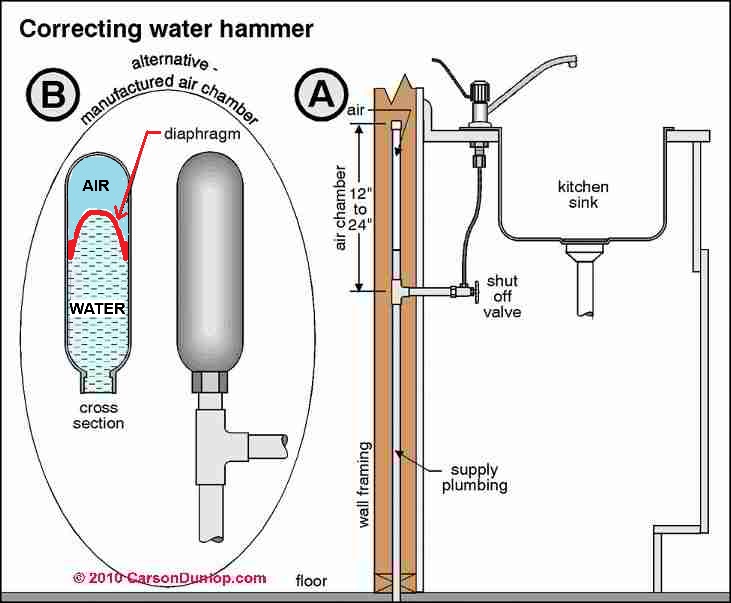
When air chambers fail or pressure spikes are frequent, a mechanical arrester is the best long-term fix. It contains a piston and air bladder that compresses to absorb shock, acting like a shock absorber in a car.
Install at the Fixture
- Shut off main water and drain the system.
- Cut into the hot or cold supply line near the faucet.
- Tee in the arrestor with one-half-inch NPT thread.
- Mount vertically. This is critical for performance.
- Restore water and test.
Cost: 10 to 25 dollars per unit.
Lifespan: 5 to 10 years. May need recharging if the internal bladder fails.
Pro Tip: Install arrestors on washing machines and dishwashers too. They are common hammer sources.
Secure Loose Pipes
Even with perfect pressure and cartridges, unanchored pipes can bang against framing. This creates noise that mimics water hammer.
Find and Fasten
- Turn off water.
- Access pipes in basement, crawlspace, or under sinks.
- Locate movement by tapping or visual inspection.
- Install rubber-backed pipe clamps every 4 to 6 feet.
- Use foam insulation sleeves for pipes in walls.
Warning: Hammering in walls may require opening drywall. Try other fixes first.
Sign it is working: Noise shifts from loud bangs to soft thuds or disappears entirely.
Clean or Replace Angle Stop Valves
Mineral buildup in shutoff valves causes jerky flow, triggering shockwaves. These angle stop valves are located under sinks or behind tubs.
Clean the Valve
- Shut off main water.
- Close angle stop and disconnect supply line.
- Disassemble the valve.
- Soak parts in vinegar to dissolve scale.
- Reassemble or replace.
Upgrade to Ball Valves
Replace old gate-style stops with quarter-turn ball valves. They offer smoother operation and less turbulence.
Cost: 10 to 15 dollars per valve.
Visual Cue: If the valve is stiff or drips when closed, replace it.
Recharge or Add Air Chambers
If your system lacks air cushions, add them or restore existing ones. Air chambers are vertical sections of pipe that trap air and act as shock absorbers.
Recharge Existing Chambers
Achieved via the full system flush described earlier. This only works if chambers are vertical and capped at the top.
Install New Chambers
- Cut into supply line near the fixture.
- Add a 6 to 12 inch vertical pipe.
- Cap the top with no valves or fittings.
- Ensure it is installed before the shutoff valve.
Limitation: Modern codes favor mechanical arrestors because air chambers can refill with water over time.
Fix Resonance (Jackhammering During Flow)
Not all noise is water hammer. A rapid chattering sound during flow is often resonance caused by debris or faulty valves, not true post-shutoff hammer.
Clean Toilet Fill Valves
Even toilet issues can affect faucet lines. This procedure works on Fluidmaster, Korky, and similar brands.
- Shut off water and flush the tank.
- Lift the float cup to expose the shaft.
- Turn the top cap one-eighth turn counterclockwise to unlock.
- Remove the cap and inspect the rubber seal.
- Cover the valve and turn the water on for 10 to 15 seconds to flush debris.
- Reinstall and lock clockwise.
Pro Tip: Replace the seal every 2 to 3 years to prevent buildup.
Upgrade Fixtures Strategically
Old or poorly designed faucets contribute to hammer. Upgrading to better components can eliminate the problem permanently.
Choose Anti-Hammer Designs
Gradual shut-off mechanisms reduce surge force.
Built-in flow regulators or ceramic disc valves offer smoother control.
Touchless faucets close slowly, minimizing shock.
Replace Entire Valve Assembly
If hammer persists, replace the cartridge, tub spout, showerhead, and diverter valve. One user replaced all components and the hammer disappeared completely, confirming that hidden restrictions in spouts or internal passages can disrupt flow balance.
Prevent Recurrence
Water hammer can return. Stay ahead with simple maintenance to keep your pipes silent.
Annual System Flush
Do this every winter or after plumbing repairs. It takes 30 minutes and costs nothing.
Quarterly Pressure Checks
Use a 10 dollar gauge on an outdoor spigot. Catch pressure spikes early.
Replace Cartridges Proactively
Replace every 5 to 7 years or when the handle feels stiff. Always use OEM parts.
Install Point-of-Use Arrestors
Install on high-flow fixtures such as the kitchen faucet, shower, and washing machine. This provides one-and-done protection.
Check Thermal Expansion Tank
If you have a closed-loop system with a tank water heater and check valve, pressure can build. A failed expansion tank mimics high-pressure symptoms.
Key Takeaways for Fixing Faucet Water Hammer
The drain-and-refill method resolves most sudden-onset faucet water hammer cases. If it does not work, combine cartridge replacement with pressure checks and arrester installation. Address both the fixture and the system to eliminate noise, prevent damage, and avoid costly repairs. By restoring air cushions, reducing pressure, and maintaining fixtures, you can silence your pipes for good and save hundreds over time.
Frequently Asked Questions About Faucet Water Hammer
What causes water hammer when I adjust my faucet temperature?
Water hammer during temperature adjustment typically occurs because of a faulty or worn cartridge in single-handle mixing faucets. The cartridge controls water flow and mixing, and when it is worn or mineral-clogged, it creates turbulent flow that triggers shockwaves.
Can I fix water hammer without professional help?
Yes, most cases of faucet water hammer can be fixed with DIY methods. The system flush is the easiest fix and requires no tools. Other solutions like cartridge replacement and arrestor installation are moderate difficulty but doable by homeowners.
How do I know if my water pressure is too high?
Attach a water pressure gauge to an outdoor spigot or washing machine valve. If the reading exceeds 80 PSI, your pressure is too high and needs regulation. The ideal range is 40 to 60 PSI.
How long does a water hammer arrestor last?
Water hammer arrestors typically last 5 to 10 years. Over time, the internal air bladder can become waterlogged and lose effectiveness. You may need to recharge or replace the unit.
Is water hammer dangerous to my plumbing?
Yes, repeated water hammer can stress pipe joints, wear out valves and seals, and potentially cause leaks or ruptures. It can also damage water heaters and appliances. Addressing the issue promptly prevents costly repairs.







