

Is your utility sink faucet dripping, corroded, or just outdated? Replacing a utility sink faucet is a smart, DIY-friendly upgrade that boosts functionality in laundry rooms, garages, and workshops. Whether you’re tired of battling leaks or want a modern pull-down sprayer for mopping and bucket-filling, this guide walks you through every step.
You’ll learn the right tools to use, common mistakes to avoid, and when repair might be better than replacement. With clear instructions and pro tips, you’ll have your sink working like new in under an hour.
Prepare for Faucet Replacement
Shut Off Water Supply
Before touching any tools, turn off the water. Locate the hot and cold shutoff valves under the sink and turn them clockwise until tight. If the valves are stuck, corroded, or missing, shut off the main water supply to the house. After shutting off the water, open the faucet handles to release pressure and drain leftover water from the lines.
Drain Residual Water
Place a bucket or towel under the sink to catch drips. Disconnect the supply lines from the faucet tailpieces or shutoff valves. Expect some water to drain out. If you turned off the main supply, open the highest faucet in your home to help drain the system faster and reduce water hammer when you restart the water.
Clear and Clean Work Area
Utility sink cabinets are often cluttered. Remove cleaning supplies, tools, or stored items to create space. Clean the sink deck and surrounding area to ensure a proper seal for the new faucet. If the old faucet has corroded mounting nuts, spray them with penetrating oil and let it soak for 10 minutes. This loosens rust and makes removal much easier.
Remove Old Faucet Safely
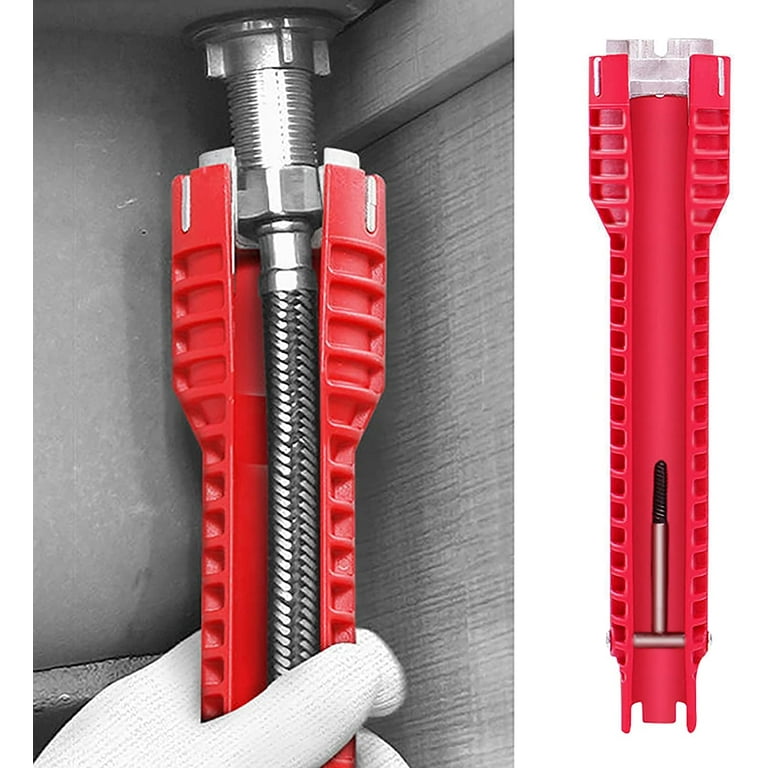
Loosen Mounting Nuts
Access the underside of the sink. Use a basin wrench to loosen the lock nuts securing the faucet. This tool is essential for tight spaces under sinks. If you do not have one, channel-lock pliers can work as an alternative, but a basin wrench gives better reach. If the nuts are severely rusted and will not budge, consider removing the sink for better access. Never force it. Stripped threads can cause leaks later.
Disconnect Supply Lines
Once the mounting nuts are off, disconnect the supply lines from the faucet tailpieces and shutoff valves. If you have rigid copper lines, cut them cleanly with a tubing cutter or hacksaw, leaving enough pipe to connect to the new faucet. Label hot and cold lines to avoid confusion during reinstallation. Taking a quick photo before disconnecting helps.
Remove Old Faucet and Clean Deck
Lift the old faucet straight up and remove it from the sink. Scrape off the old gasket, plumber’s putty, or silicone with a plastic scraper or putty knife to avoid scratching the sink surface. Wipe the mounting area with mineral spirits to remove residue, then dry with a lint-free cloth. A clean, dry surface ensures a watertight seal for the new faucet.
Choose the Right Replacement Faucet
Match Sink Hole Configuration
Most utility sinks have single-hole or three-hole configurations. Verify your sink’s layout before buying a new faucet. Some models support single-hole installation without a deckplate. If your sink has extra holes from an old faucet, you can either use a deckplate to cover them or seal them with plumber’s putty, silicone, or metal plugs.
Upgrade to Modern Features
Replace outdated double-handle faucets with a single-handle model featuring a pull-down or pull-out sprayer for better reach. Look for a high-arc spout to fit large buckets and tools. Durable brass or stainless steel construction outlasts plastic-bodied retail models, especially in high-use areas. Consider finishes like spot-resistant or fingerprint-proof to reduce cleaning time.
Test for Compatibility
Some older faucets use union fittings with large metal nuts. If the old faucet is intact, you may reuse the union nuts with a compatible new model. Bring the old faucet to a plumbing supply store to test-fit the new one. Ensure threads and seating surfaces match. Big-box stores often sell lower-grade faucets. Plumbing supply shops offer commercial-grade options built to last decades.
Install the New Faucet
Seal the Faucet Base
Apply a thin, continuous bead of silicone sealant around the base flange of the new faucet. Silicone is preferred by most manufacturers because it creates a flexible, waterproof seal. Avoid plumber’s putty unless specified. Some finishes can be damaged by petroleum-based putty. Read the manufacturer’s instructions before applying any sealant.
Insert and Position Faucet
Insert the faucet into the mounting hole or holes, ensuring correct orientation. Hot side on the left, cold on the right is the standard configuration. For center-hole models, insert the spout into the central opening. Make sure the faucet sits flat and aligned before tightening. A misaligned faucet can cause premature wear.
Secure from Underneath
Slide the lock nut and washer onto the tailpieces from below. Hand-tighten first to avoid warping. Then use a basin wrench or faucet installer tool for final tightening. Do not overtighten. Hand-tighten plus a quarter to half turn with a wrench is enough. Over-tightening can crack seals or damage plastic components.
Connect Supply Lines and Piping

Replace Old Supply Lines
Always install new braided stainless steel supply lines, even if the old ones look fine. Rubber or plastic lines degrade over time and can burst. Braided steel lines are durable, kink-resistant, and less likely to leak. Hand-tighten connections first, then finish with a wrench. Avoid over-tightening, which can damage the fitting.
Modify Copper Pipes If Needed
If extending or replacing copper lines, cut cleanly with a tubing cutter, then deburr the ends. Clean surfaces to bare metal before soldering. Install coupling nuts on the pipe before soldering. Forgetting this means you cannot tighten the joint later. Use threaded adapters for quarter-inch lines. Consider SharkBite push-to-connect fittings for no-solder repairs or adjustments.
Install Accessories
Add a Soap Dispenser
If your faucet includes a soap dispenser, disassemble the unit and fill the reservoir with liquid soap. Insert the pump into the designated hole. Secure it from underneath with a mounting nut. Test the pump to ensure smooth operation before using it with soapy hands.
Connect Pull-Down Spray
For faucets with a pull-down or pull-out sprayer, feed the hose through the spout body. Connect it to the internal valve using a quick-disconnect coupling. Attach the hose weight to help the hose retract smoothly. Push the connector fully until it clicks. Listen for the lock. Test extension and retraction to ensure no kinking.
Test for Leaks and Finish
Restore Water Supply
Slowly open the shutoff valves or main supply. Opening too fast can cause water hammer, which stresses pipes and fittings. Let water flow gradually to pressurize the system. Sudden pressure spikes can damage new seals and cause leaks where there were none.
Check All Connections
Inspect every joint. Faucet base, supply line connections, shutoff valves, and underside fittings all need attention. Wipe each with a dry rag. Moisture will show up immediately on a dry cloth. A small drip from the valve stems after first use is normal and often stops after slight tightening.
Run Final Tests
Turn on both hot and cold water to flush out air and debris. Test the full range of motion. Swivel the spout, pull down the spray, and check hot and cold mixing. If you have a soap dispenser, test it with wet hands. Ensure the spray head retracts fully and the hose does not bind.
Repair vs. Replace: Know the Difference
Fix a Dripping Faucet First
Before replacing, consider repair, especially if you have a durable cast brass faucet. Dripping is often caused by a worn washer in compression-style faucets. Remove the handle and packing nut, pull out the valve stem, and replace the washer. A ten-dollar washer kit can extend the life of a fifty-year-old faucet.
Clean Mineral Buildup
Hard water causes calcium and lime buildup. Remove the faucet and soak it in CLR or vinegar for twelve hours. This clears clogs and restores function. Use commercial descalers for tough buildup. Rinse thoroughly before reinstalling. Regular descaling keeps your faucet working smoothly for years longer.
Avoid Common Installation Mistakes
Do Not Overtighten Fittings
Over-tightening is the number one cause of leaks. It cracks seals, warps plastic, and damages threads. Always hand-tighten first, then use a wrench for a final quarter to half turn. If a joint leaks, try reseating it before tightening further. More pressure is not the solution.
Use Teflon Tape Correctly
Apply plumber’s tape to threaded joints like shutoff valves or adapters. Wrap it clockwise, three to five layers, to ensure it does not unravel when you screw the fitting in. Never use tape or pipe dope on compression fittings. They seal via metal-to-metal contact, and sealants can cause leaks instead of preventing them.
Install Coupling Nuts Before Soldering
A common rookie mistake is soldering copper pipe without first sliding on the coupling nut. Once soldered, you cannot add it. Always place nuts on the pipe before heating. This simple step saves hours of rework and prevents damaged pipes.
Replace Supply Lines Every Time
Reusing old supply lines is a gamble. Even if they look fine, internal degradation can lead to sudden bursts. Always install new braided stainless steel lines. They are inexpensive and far safer than risking water damage from a failed line.
Pro Tips for Long-Term Success
Use Penetrating Oil on Rust
If removing a corroded faucet, spray penetrating oil on mounting nuts and let it sit. The long straw reaches tight spots. Wait ten minutes, then try loosening. Repeat if needed. Patience with penetrating oil beats forcing rusted fittings.
Bring Old Faucet to Store
Plumbing compatibility is not always obvious. Bring the old faucet to the store and test-fit it with the new model. Staff at plumbing supply shops can help verify union nut and thread compatibility. This step prevents frustrating returns and multiple trips.
Choose Commercial-Grade Over Retail
Faucets from home improvement stores are often plastic-bodied and fail within five to ten years under heavy use. Invest in a commercial-grade faucet from a plumbing supply house. They are built to last decades in laundry rooms and workshops. The extra cost pays off over time.
Schedule Annual Maintenance
Check supply lines every year for bulges or leaks. Clean the aerator and spray head to prevent clogging. Reapply silicone if water pools around the base. In hard water areas, descaling with vinegar once a year keeps internals clear.
Frequently Asked Questions About Replacing a Utility Sink Faucet
How long does it take to replace a utility sink faucet?
Most replacements take twenty-five to sixty minutes for experienced DIYers. Beginners should allow up to four hours, especially if dealing with corrosion or limited access. Having all tools and materials ready before starting saves significant time.
Can I replace a utility sink faucet myself, or do I need a plumber?
This is a DIY-friendly plumbing task for most homeowners. If you are comfortable with basic tools and have functional shutoff valves, you can handle the replacement. Call a plumber if you lack shutoff valves, have severe corrosion, or feel uncomfortable with the process.
What tools do I need to replace a utility sink faucet?
Essential tools include a basin wrench, adjustable wrench, channel-lock pliers, and a bucket or towels. You may need a tubing cutter or hacksaw if cutting copper lines. Penetrating oil helps with corroded fittings. Having a flashlight improves visibility under the sink.
Should I repair my faucet first or replace it entirely?
Repair first if the faucet is durable and the problem is simple, like a worn washer. Replacement makes sense for outdated designs, persistent leaks, or when upgrading features like pull-down sprayers. A ten-dollar washer kit can save the cost of a new faucet.
What type of replacement faucet should I buy for a utility sink?
Choose a single-handle model with a pull-down or pull-out sprayer. Look for brass or stainless steel construction. A high-arc spout accommodates large buckets. Spot-resistant finishes reduce cleaning. Commercial-grade faucets from plumbing supply stores outperform retail models in durability.
How do I prevent leaks after installing the new faucet?
Apply silicone or plumber’s putty around the base as instructed. Hand-tighten all connections first, then use a wrench for a final quarter turn. Avoid over-tightening, which damages seals. Replace supply lines with new braided stainless steel. Test all connections before leaving the job.
Key Takeaways for Replacing Your Utility Sink Faucet
Replacing a utility sink faucet is a DIY win. It improves function, saves water, and upgrades your space in under an hour. With the right tools and this guide, you will avoid leaks, save money, and gain confidence in home maintenance.
Remember to repair first if the faucet is solid. A simple washer replacement or descaling can extend its life for years. When it is time to upgrade, choose durability and smart features. Your utility sink works hard. Give it a faucet that can keep up.
Gather your tools, shut off the water, and get started. The satisfaction of a job well done and a leak-free sink is worth the effort.







