
A dripping outdoor faucet isn’t just annoying, it is costly. A single drop per second wastes over 3,000 gallons of water per year, drives up your utility bill, and can even cause foundation damage or frozen pipes in winter. The good news? Most outdoor faucet leaks are simple DIY fixes that take under an hour and cost less than $10. Whether your faucet drips from the spout, leaks around the handle, or seeps behind the wall, the root cause is usually a worn washer, corroded seat, or failed seal. This guide walks you through exactly how to diagnose, repair, and prevent outdoor faucet leaks using proven steps, tools, and real-world tips.
You will learn to identify your faucet type, replace critical seals, clean mineral buildup, and know when to call a professional. By the end, you will have the confidence to fix most leaks yourself and prevent future problems.
Identify Where Your Faucet Leaks
Before grabbing tools, observe where and when the leak happens. This tells you which part is failing without guessing.
Spout Drips When Turned Off
Water trickles from the spout after shutoff? This means the main rubber washer is not sealing against the valve seat. It is the most common issue, especially in older faucets, and usually fixed by replacing the washer.
Handle Leaks Only When On
If water sprays from the handle or stem base only when the faucet is open, the packing washer or O-ring is failing. This seal keeps pressurized water from escaping around the moving stem. It will not leak when off, so do not confuse it with a spout drip.
Water Behind Faucet or Inside Wall
This signals a deeper problem. In frost-proof models, a crack in the stem or a failed solder joint can leak inside the wall or basement. This requires professional repair. Do not ignore it.
Leak Only with Hose Attached
Remove the hose. If the drip stops, the issue is not the faucet. It is a bad washer in the hose, Y-splitter, or vacuum breaker. Replace those first before disassembling the faucet.
Pro Tip: A few drips from a frost-proof faucet after shutoff are normal. Residual water drains from the long stem and should stop within 10 to 30 seconds.
Know Your Faucet Type Before Starting
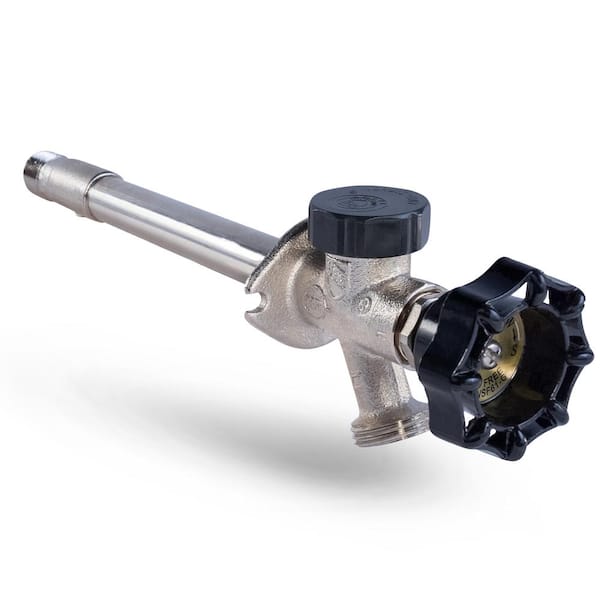
Different models fail in different ways. Identifying yours prevents wasted time on the wrong repair.
Standard Compression Faucet
These have a short stem with the shutoff near the spout. They use a rubber washer pressed against a metal seat. They are the most common type in older homes and are easy to repair with basic tools.
Frost-Proof Faucet
Frost-proof models have a long stem, 10 to 12 inches, that extends into the house. The shutoff happens inside, preventing freezing. They must slope 10 to 15 degrees downward to drain fully. They are repairable if threaded, but may need a professional if soldered.
Anti-Siphon Faucet
These have a vented cap to prevent backflow. A small weep hole may drip during use, which is normal. If it leaks continuously, the anti-siphon valve is failing and needs attention.
RV or Mobile Home Faucet
Built for portability, not durability. They experience faster wear due to vibration and untreated water. Follow standard repair steps but flush the system after fixing.
Gather Tools and Replacement Parts
You do not need a full toolbox, just a few essentials. Having everything ready makes the job go faster.
Tools You Will Need
- Adjustable wrench
- Pipe wrench or channel locks to hold the body steady
- Phillips screwdriver
- Utility knife to remove old washers
- Wire brush for cleaning deposits
- Bucket or towel to catch water
- Penetrating oil for stuck nuts
Replacement Parts to Buy
- Rubber washers. Bring the old one to match the size. The most common is ½-inch inner diameter, ¾-inch outer diameter.
- Packing washer or O-ring for the stem seal
- Plumber’s Teflon tape
- Spare washers for hoses and splitters
Smart Move: Buy a washer kit like Danco. It includes multiple sizes and spare O-rings, all for under $5.
Shut Off Water Supply Safely
Never work on a pressurized faucet. Turning off the water first prevents flooding and pipe damage.
For City Water Systems
Turn off the main indoor shutoff valve. It is usually in the basement, utility room, or near the water meter. Open the outdoor faucet to drain remaining water.
For Well Systems
Turn off the circuit breaker to the well pump. Open the lowest indoor faucet to relieve pressure.
Final Preparation Steps
Remove all hoses, splitters, and vacuum breakers. Place a towel or bucket under the faucet to catch any residual drips.
Warning: Attempting repair with water pressure still on can damage pipes or cause flooding.
Disassemble the Faucet Carefully
Work slowly to avoid breaking corroded parts. Rushing leads to bigger problems.
Hold the Faucet Body Steady
Use a pipe wrench on the hex base or body. This prevents twisting the indoor pipe, especially if it is copper or galvanized.
Remove the Handle
Pop off the decorative cap if present. Use a Phillips screwdriver to remove the handle screw. Lift the handle off to expose the bonnet nut.
Loosen the Bonnet Nut
Use an adjustable wrench to turn the nut counterclockwise. If it is stuck, spray penetrating oil and wait 5 to 10 minutes. As it loosens, residual water may drain. This is normal.
Pull Out the Valve Stem
Slide the entire stem out by hand or with pliers. For frost-proof models, expect a 10 to 12 inch stem. Clear space first so nothing gets damaged. Note the depth and orientation for reassembly.
Replace the Main Washer to Fix Spout Drips

This single step fixes 80% of all leaks. It is the most effective repair you can make.
Remove the Old Washer
At the end of the stem, find the rubber washer held by a screw. Use a screwdriver to unscrew counterclockwise. Inspect the washer for cracks, flattening like a pancake, tearing, or hardening.
Do not throw the old washer away. Use it to match the size at the store.
Install the New Washer
Place the new rubber washer over the screw. Insert the screw through the washer and into the stem. Tighten just enough to hold it flat. Do not overtighten. Over-tightening distorts the washer and causes early failure.
Best Choice: Use a ½-inch ID, ¾-inch OD flat washer. It is standard for most outdoor faucets.
Replace Packing Washer or O-Ring for Handle Leaks
If water leaks around the handle when the faucet is on, this is your fix.
Locate the Seal
Check inside the bonnet nut or around the stem where it passes through the body. Look for a small rubber ring or washer.
Remove and Replace
Pop out the old packing washer or O-ring. Install a new one of the same size, or slightly larger if the old one is worn. Ensure it sits flat in its groove with no twisting or pinching.
Pro Tip: Lubricate lightly with plumber’s grease to extend the seal’s life.
Clean Threads and Valve Seat Thoroughly
Mineral buildup prevents proper sealing. Cleaning before reassembly makes the difference between a temporary fix and a permanent solution.
Scrub All Threads
Use a wire brush on the stem threads, faucet body threads, and washer contact points. Brush until metal shines and deposits are gone.
For Tough Buildup
Soak with acetone or nail polish remover. Wipe clean with a dry cloth afterward.
Check the Valve Seat
Shine a flashlight into the faucet body. Look for pitting, grooves, or corrosion. If damaged, a new washer will not seal. You will need to use a valve seat grinder tool or replace the entire faucet.
Apply Plumber’s Tape Correctly
Tape seals threads and prevents future leaks. It is a small step that makes a big difference.
Wrap the Stem Threads
Use white Teflon tape. Wrap 3 full turns around the stem threads. Wrap clockwise, as viewed from the end, so the tape tightens when screwed in.
Why It Matters: Tape fills tiny gaps, prevents seepage, and makes future disassembly easier.
Reassemble Without Rushing
Reverse the disassembly steps, but take your time. Rushing introduces the very problems you are trying to fix.
Insert the Stem
Slide the stem fully back into the faucet body. Align it straight. Do not force it or cross-thread.
Hand-Tighten the Bonnet Nut
Start by hand to avoid cross-threading. Then use the wrench on the nut and the pipe wrench on the body. Tighten clockwise until snug. Stop when resistance increases. Do not overtighten. Overtightening cracks the faucet or crushes seals.
Reattach the Handle
Slide the handle back on. Secure with the screw and replace the cap.
Reconnect All Accessories
Reattach the hose, splitter, or vacuum breaker. Ensure hose washers are intact. A bad washer here causes leaks that look like faucet problems.
Test the Repair Thoroughly
Turn water back on and check every connection. A thorough test saves callbacks.
Restore Water Supply
Open the main shutoff valve or reset the circuit breaker.
Open Faucet Slowly
Let water flow. It should be smooth, not sputtering. Sputtering means trapped air or debris.
Close and Observe
Shut the faucet completely. Watch for drips from the spout. A few drops are normal, especially on frost-proof models. Continuous drip means the washer or seat is still faulty. Turn on and check the handle area for leaks.
Success: No drip after 30 seconds, no seepage at stem, and smooth operation.
Troubleshoot Persistent Leaks
If it still leaks after your repair, these checks will find the problem.
Drip Continues After Washer Replacement
The cause is a pitted or corroded valve seat. Use a seat grinder tool or replace the faucet.
Leak at Handle After Reassembly
The cause is a missing or damaged packing washer. Disassemble and replace the seal. Make sure the nut is snug.
Faucet Leaks Only with Hose Attached
The cause is a bad washer in the hose or splitter. Replace the hose washer and tighten with channel locks.
Water Inside Wall on Frost-Proof Models
The cause is a cracked stem or failed solder joint. Call a plumber. Do not risk water damage.
Low Pressure After Repair
The cause is debris in the spout, vacuum breaker, or Y-splitter. Remove and clean these parts.
When to Replace the Entire Faucet
Some faucets are not worth repairing. Knowing when to replace saves time and money.
Replace If the Faucet Is
- Old, corroded, or seized
- Stem will not come out due to mineral lock
- Bonnet nut cracks during removal
- Wall gasket or pipe is damaged
- You have replaced the washer twice and it still leaks
How to Replace It
- Shut off water and drain lines.
- Use a pipe wrench to unscrew the old faucet from the indoor pipe.
- Clean the pipe threads.
- Wrap new faucet threads with Teflon tape.
- Screw on by hand, then tighten with a wrench.
- Restore water and test.
No soldering needed for threaded replacements. Modern faucets come with pre-installed washers.
Prevent Future Leaks With Maintenance
A little maintenance prevents big repairs. Annual attention extends faucet life significantly.
Annual Inspection
Check for drips, handle wobble, or corrosion before winter. Replace washers every 1 to 2 years, even if not leaking.
Cold Climate Preparation
Disconnect hoses before freezing weather. Ensure frost-proof faucets slope downward. Use insulating covers for extra protection.
After Any Repair
Always use Teflon tape on threads. Keep a washer kit in your toolbox. Check tightness after temperature swings.
Detect Hidden Leaks in Your System
Fixing the visible drip does not mean the system is leak-free. Hidden leaks waste thousands of gallons.
Water Meter Test
Turn off all water indoors and outdoors. Check the meter’s flow indicator. If it moves, you have a hidden leak. Call a plumber.
Visual Check
Look for damp soil, pooling water, or sunken ground near the faucet.
Flow Interruption Test
Cover the spout with your hand while the faucet is on. If flow slows, there is a restriction or upstream leak.
Warning: Hidden leaks waste thousands of gallons and can damage your foundation.
When to Call a Professional Plumber
DIY has limits. Some situations require expert help.
Call a plumber if water leaks inside the wall or basement, the faucet is soldered and cannot be unscrewed, you have tried multiple repairs and it still leaks, there is indoor water damage or moisture, or you are unsure about shut-off valves or pipe layout.
Cost Note: DIY repair costs $2 to $10. Professional service costs $100 to $300.
Key Takeaways for Fixing Your Leaking Outdoor Faucet
Most outdoor faucet leaks stem from three simple causes: a worn rubber washer at the stem tip, a failed packing washer or O-ring around the valve stem, or mineral buildup on the valve seat. Identifying where your faucet leaks, spout or handle, tells you exactly which part to replace.
Start with the washer. It fixes over 80% of all spout leaks. For handle leaks, replace the packing washer or O-ring. Clean all threads and the valve seat before reassembly. Use plumber’s tape on every threaded connection. Tighten until snug, never overtighten.
If a new washer does not stop the drip, the valve seat is damaged and needs attention. Some faucets are too old or corroded to repair. In that case, replacing the entire faucet is the smarter choice.
Most repairs take less than an hour and cost under $10. The tools and parts last for years. Fix it today, and your outdoor faucet will run smoothly for seasons to come.
Frequently Asked Questions About Fixing a Leaking Outdoor Faucet
Why does my outdoor faucet drip even after I replace the washer?
The valve seat may be pitted or corroded. Even a new washer cannot seal against a damaged seat. You need to either resurface the seat with a grinder tool or replace the faucet entirely.
How do I know if my frost-proof faucet is installed correctly?
Frost-proof faucets must slope 10 to 15 degrees downward toward the spout. This allows water to drain and prevents freezing. If it is level or slopes upward, water collects inside and can crack the valve.
Can I fix a leaking outdoor faucet without turning off the main water?
No. Working on a pressurized faucet is dangerous and can cause flooding. Always shut off the main water supply or well pump before starting repairs.
Why does my faucet only leak when the hose is attached?
The problem is likely a bad washer in the hose, Y-splitter, or vacuum breaker, not the faucet itself. Remove the hose and test. If the drip stops, replace the hose washer or accessory.
How often should I replace outdoor faucet washers?
Inspect and replace washers every 1 to 2 years, even if there is no visible leak. Proactive replacement prevents sudden failures and water waste.







