
A dripping bathtub faucet wastes water, drives up utility bills, and can cause mold or structural damage over time. If your tub spout leaks when off, the handle feels stiff, or water temperature fluctuates unexpectedly, the problem likely lies in the faucet valve. Most valve issues are fixable without replacing the entire fixture, saving you hundreds in plumber fees.
This guide covers the three most common bathtub valve types: Moen Posi-Temp, Delta ball valve, and generic compression systems. You’ll learn how to diagnose the issue, replace worn components, and reassemble with professional results. Whether it’s a persistent drip or a seized handle, we’ll walk you through every step.
Identify Your Bathtub Valve Type
Before grabbing tools, determine your faucet’s internal mechanism. Repair methods vary drastically by brand and design.
Moen Posi-Temp Cartridge
Single-handle Moen tub faucets use a brass-stemmed cartridge (model 1222 or 1222B) that controls both flow and temperature. Key identifiers include:
• No visible dome nut
• Set screw under a removable “H/C” cap
• U-shaped retaining clip on top
• H/C markings on cartridge base
Tip: If turning the handle clockwise gives hot water first, the cartridge may be installed backward.
Delta Monitor Ball Valve
Delta’s older Monitor series uses a stainless steel ball with internal ports to mix hot and cold water. Look for:
• Dome-shaped cover over valve
• Single lever handle with brooch-style stem
• Repairable with a rebuild kit (ball, cam, cups, springs)
Note: Delta’s newer MultiChoice cartridges differ from this guide’s classic ball valve repair.
Compression or Generic Cartridge Valves
Found in older or budget fixtures, these may have:
• Two separate handles (hot/cold)
• Stem assemblies with rubber washers
• Plastic or brass cartridges needing full replacement
Warning: Misdiagnosing the valve type leads to wrong parts and failed repairs.
Shut Off Water and Drain the System
Never skip this step. Working on live plumbing risks flooding and injury.
Turn Off Main Supply
- Locate your main water shutoff valve (usually in basement, crawlspace, or utility room).
- Turn the handle clockwise to close completely.
- For added safety, shut off hot water heater supply if accessible.
Release Pressure and Drain Lines
- Open kitchen and bathroom faucets to release trapped water.
- Flush toilets to empty tanks.
- For Moen valves: Rotate handle fully clockwise (off) before disassembly.
Critical: Residual pressure can cause sudden water bursts during removal. Always drain the system first.
Remove Handle and Access the Valve
Moen: Take Off the Handle
- Pry off the decorative “H” or “C” button with a flat-head screwdriver.
- Insert a 7/64″ Allen wrench into the set screw.
- Turn counter-clockwise to remove the handle.
- Slide off the metal collar.
Pro Tip: Place a rag over the drain to catch dropped screws and small parts.
Delta: Remove the Lever Handle
- Pop off the decorative cap.
- Unscrew the Phillips screw beneath.
- Pull the handle straight off. Note the brooch (offset) shape for correct reinstallation.
General: Remove the Escutcheon Plate
- Unscrew the center screw holding the cover plate.
- Cut through old caulk with a razor knife if needed.
- Gently pry the plate off without covering the weep hole (small divot at bottom).
Weep hole must stay open. It allows moisture to escape and prevents mold growth behind walls.
Extract and Inspect Internal Components
Moen: Pull Out the Cartridge
- Lift the U-shaped retaining clip straight up.
- Try pulling the cartridge with pliers.
- If stuck, use a Posi-Temp cartridge puller:
• Screw the tool into the brass stem
• Tighten the collar and rotate slightly to break the seal
• Pull straight out without twisting
Never force a stuck cartridge. Damaging the valve body requires full replacement.
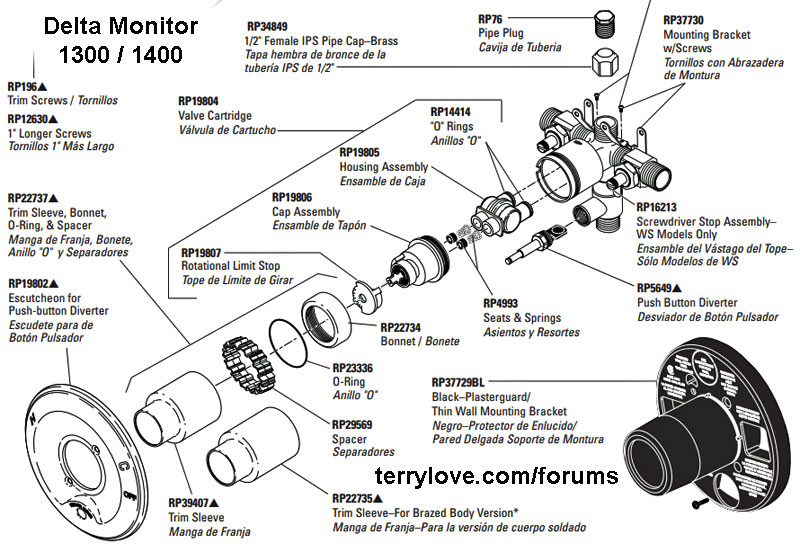
Delta: Remove Ball and Seals
- Loosen the dome nut with channel-lock pliers.
- Remove in order:
• Stainless steel ball (inspect for pitting)
• Cam (plastic piece with notch)
• Two rubber cups and springs
• Bonnet gasket - Use a screwdriver to pop out two valve seals at approximately 11:00 and 1:00 positions.
Replace all seals and springs, even if only one looks worn. Old springs lose tension and cause premature failure.
Replace Worn Parts Correctly
Install Moen 1222B Cartridge
- Check H/C orientation on the old cartridge. If H/C was on the bottom, install new one H/C down. If on top, install H/C up.
- Apply silicone grease to all O-rings and rubber seals.
- Insert new cartridge straight in until fully seated.
- Ensure notch faces down. This keeps the valve closed when water returns.
Use OEM Moen 1222B only. Aftermarket versions fail within 6 to 18 months, while OEM lasts 10+ years.
Rebuild Delta Ball Valve
- Replace these components:
• Stainless steel ball (avoid plastic versions)
• Cam
• Cups, springs, and bonnet gasket - Lubricate all parts with food-grade silicone paste (e.g., Wolverine Slick and Slide).
- Reinsert ball with port facing the same direction as the old alignment.
- Reinstall cam with notch aligned to brooch.
Proper lubrication prevents grinding and extends valve life by 3 to 5 years.
Fix Compression Valves
- Remove stem and inspect the rubber washer.
- Replace if cracked, flattened, or missing.
- Swap out the seat inside the valve body:
• Use a flat-head screwdriver to push new seat in firmly - Use a shorter spring unless the original was longer.
Reassemble Without Leaks

Reinstall Retaining Clip or Dome Nut
• Moen: Slide clip fully into the backstop until it clicks.
• Delta: Hand-tighten dome nut, then add a quarter turn with pliers. Do not overtighten.
Reattach the Handle
• Align brooch (Delta) or insert set screw (Moen).
• Secure with screw. Do not strip the threads.
Seal Escutcheon Plate
- Apply white silicone or DAP caulk around the edge.
- Press the plate back into place.
- Leave the weep hole exposed. Do not seal it.
Caulk prevents water intrusion, but the weep hole protects against trapped moisture.
Restore Water and Test for Leaks
Turn On Main Supply
- Close all faucets first.
- Slowly open the main water valve.
- Open all house faucets to bleed air. Expect sputtering for 1 to 2 minutes.
Check for Leaks
Inspect these areas:
• Tub spout
• Showerhead
• Handle base
• Escutcheon plate
Test for:
• Full range of motion
• Complete shut-off
• Temperature control
Fix Common Post-Repair Issues
Dripping after repair: Cause is misaligned cartridge or damaged seat. Reopen, verify orientation, and replace seat or spring.
Handle won’t turn: Cause is lack of lubrication or debris. Disassemble, clean the bore, and re-lube all parts.
Hot water comes first (Moen): Cause is wrong cartridge H/C orientation. Rotate cartridge 180 degrees from off position.
Water hammer (loud bang): Cause is failed or missing hammer arresters. Install arresters during full valve replacement.
When to Replace the Entire Valve
Repair isn’t always possible. Here’s how to know when a full swap is necessary.
Signs You Need Full Replacement
• Pinholes or corrosion in brass body
• Retaining clip broken or inaccessible
• Repeated cartridge failures
• Renovating or opening the wall
Steps for Full Valve Swap
- Remove tub spout, handle, and escutcheon.
- From adjacent room, drill through drywall to locate valve.
- Cut a 12-inch by 12-inch access hole.
- Cut copper supply lines with pipe cutters.
- Install new valve:
• Level and centered
• Solder joints with flux and torch
• Remove cartridge before soldering - Add hammer arresters to prevent water hammer.
- Reconnect spout and shower arm with Teflon tape and pipe dope.
Total cost: $150 to $400 for parts, but future-proofs your plumbing for decades.
Prevent Future Valve Problems
Maintenance That Lasts
• Cycle valves monthly if rarely used.
• Lubricate every 3 to 5 years with food-grade silicone.
• Replace cartridges proactively every 7 to 10 years.
• Install a whole-house water softener in hard water areas.
Invest in Quality Parts
| Part | OEM Quality | Aftermarket |
|---|---|---|
| Moen 1222B | $22 to $30 (lasts 10+ years) | $12 to $18 (fails in 6 to 18 months) |
| Delta Repair Kit | $25 to $40 (stainless steel ball) | $15 to $20 (plastic ball, shorter life) |
User data shows 90% of DIY repairs succeed when using OEM parts and proper tools.
Key Takeaways for Fixing Your Bathtub Faucet Valve
Fixing a bathtub faucet valve isn’t just about stopping a drip. It’s about restoring reliability, saving money, and avoiding water damage. The three most common valve types (Moen Posi-Temp, Delta ball, and compression) each require specific repair approaches, but all share common steps: identify the type, shut off water, replace worn components with OEM parts, and test thoroughly.
Most repairs take under an hour, cost less than $40 in parts, and deliver decade-long results when done correctly. Always use OEM cartridges (Moen 1222B) or stainless steel rebuild kits (Delta), preserve H/C orientation during installation, and leave the weep hole unsealed. If corrosion, repeated failures, or wall access issues arise, a full valve replacement ($150 to $400) future-proofs your plumbing.
With this guide, you’re equipped to handle Moen, Delta, or generic systems like a pro. Save the plumber fees, protect your home, and enjoy a leak-free bathroom.
Frequently Asked Questions About Bathtub Faucet Valve Repair
How do I know if my bathtub faucet valve needs repair or replacement?
Signs you need repair include dripping from the tub spout or showerhead when off, handle stiffness, inconsistent water temperature, and water hammer sounds. You need replacement if the valve body shows corrosion or pinholes, the retaining clip is broken, or you’ve experienced repeated cartridge failures.
Can I repair my bathtub faucet myself, or do I need a plumber?
Most bathtub faucet valve repairs are DIY-friendly for homeowners with basic tools. The key is identifying your valve type correctly, using OEM replacement parts, and following proper orientation during reassembly. User data shows 90% success rate for DIY repairs when done correctly.
How long does a bathtub faucet valve repair take?
Most valve repairs take 30 to 60 minutes for experienced DIYers. First-time repairs may take 90 minutes to two hours. Full valve replacement with wall access takes three to four hours.
Why does my Moen bathtub faucet drip even after replacing the cartridge?
A drip after cartridge replacement usually means the cartridge is misaligned or the seat is damaged. Reopen the valve, verify the H/C orientation is correct, and inspect the seat inside the valve body. Replace the seat and spring if worn.
What causes water hammer in bathtub faucets?
Water hammer (loud bang after shut-off) occurs when pressure surges have no way to absorb. This happens when hammer arresters fail or are missing. Install hammer arresters on the valve body or at the main supply to fix this issue.







