
A wall hung sink is one of the smartest upgrades you can make when floor space is limited. Whether you’re fitting out a small bathroom, adding a utility station to your garage, or designing a modern powder room, this space-saving fixture delivers both style and function. The installation process involves precise wall mounting, secure plumbing connections, and careful alignment, but with the right preparation, most DIYers can finish the job in under two hours.
Below you’ll find every critical step for installing a wall hung sink, from marking mounting locations and drilling into different wall types, to connecting water supply lines and performing a thorough leak test.
Mark Mounting Locations Accurately

Accurate marking is the foundation of a successful wall hung sink installation. Getting the position right the first time prevents costly mistakes like misaligned bolts or crooked fixtures.
Set Ideal Sink Height
Position the sink between 32 and 36 inches from the floor for standard adult use. Adjust this based on the primary user’s height or accessibility needs. Hold the sink against the wall temporarily to visualize the final placement before committing to marks.
Level and Trace the Outline
Use a level to draw a horizontal reference line where the sink base will sit. Place the sink (or its template) against the wall, align it with the line, and trace the top edge. Mark the center points of the two mounting holes visible through the mounting flange, then verify both marks are at equal height and correctly spaced for your hardware.
Confirm Clearance and Access
Make sure there’s enough room behind the sink for plumbing connections and future maintenance. Avoid placing the sink directly over baseboard heaters, electrical outlets, or other obstacles. If water supply lines aren’t already roughed in, plan their route now to minimize wall damage later.
Drill Holes with Progressive Technique
Drilling correctly protects your wall from cracks and ensures clean, accurate holes for the mounting hardware.
Choose the Correct Drill Bit Size
Match the final hole diameter to your expansion bolts’ specifications, typically 1/4 inch or 5/16 inch for standard anchors. Start with a smaller pilot bit (around 1/8 inch) to guide the larger bit and reduce stress on the wall.
Drill Pilot Holes Before Final Holes
Insert the small bit into the marked points and drill about 1 inch deep. Switch to the larger bit and re-drill the same spots, going deep enough for full bolt insertion (usually 1.5 to 2 inches). Keep the drill perpendicular to the wall to ensure straight, properly aligned holes.
Adjust for Different Wall Types
Different wall materials require different approaches. Use heavy-duty toggle bolts on drywall when studs aren’t available. For tile, use a carbide-tipped or diamond drill bit with light pressure at low speed to avoid cracking. On concrete or block, use a masonry bit with hammer drill mode and wear safety gear. When hitting wood studs, pre-drilling prevents splitting and screws may suffice without expansion bolts.
Install Expansion Bolts Securely
Expansion bolts provide the structural support needed to hold the sink, water, and any items placed in the basin, often exceeding 50 pounds when fully loaded.
Insert and Seat Anchors Fully
Tap the expansion bolts into the drilled holes with a hammer until flush with the wall. Make sure they’re straight and not angled. For twist-type anchors, tighten the bolt slightly to expand the sleeve inside the wall and lock it in place.
Test Anchor Stability
Gently tug on each bolt to confirm it doesn’t spin or pull out. If an anchor feels loose, remove it and either use a larger size or relocate the hole slightly to a more solid section of wall.
Match Hardware to Sink Weight
Always check the manufacturer’s weight rating before installation. Standard ceramic sinks require heavier-duty anchors than lightweight stainless steel models. When in doubt, overbuild the support, especially in drywall-only installations where failure isn’t an option.
Mount the Sink to the Wall Correctly
With anchors firmly in place, attaching the sink must be quick, accurate, and perfectly level.
Align Sink with Mounting Bolts
Lift the sink and align its mounting flange holes with the installed bolts. Have a helper hold it steady while you verify positioning before fastening.
Fasten with Screws and Washers
Slide washers over the bolts and secure with nuts or screws. Tighten gradually on both sides to maintain even pressure across the fixture. Leave the fasteners slightly loose at this stage to allow for minor adjustments.
Check for Level Before Finalizing
Place a level across the sink’s rim. If it’s off, loosen one side slightly and reposition. Once perfectly level, fully tighten all fasteners. Gently shake the sink to test for movement. Any wobble indicates the bolts aren’t seated properly or the wall needs additional reinforcement.
Install the Faucet Before Mounting (If Required)
Some faucets must be installed before the sink goes on the wall, especially wall-supplied or single-lever models with limited access.
Attach Faucet to Sink Deck
Insert faucet stems through the sink’s pre-drilled holes from above. Underneath, slide washers and nuts onto the stems and tighten securely with a wrench. Avoid over-tightening, which can crack porcelain or ceramic sinks.
Use Plumber’s Tape on Threads
Wrap faucet inlet threads with plumber’s tape to prevent leaks at the connection points. Apply 2 to 3 layers clockwise so the tape doesn’t unravel when you tighten the fittings.
Allow Clearance for Connections
Ensure faucet tailpieces extend far enough below the sink to connect easily to the supply lines. Trim excess length only if the manufacturer specifies doing so.
Connect the Drain System with P-Trap

A properly installed drain prevents clogs and stops dangerous sewer gases from entering your space through the plumbing.
Assemble the Sink Drain Strainer
Insert the strainer into the sink’s drain hole from above. From underneath, attach the gasket and locknut, then tighten with pliers followed by a quarter turn by hand. Don’t over-tighten, as this can deform the rubber seal and cause leaks.
Link Drain to P-Trap
Connect the sink’s tailpiece to the P-trap’s top inlet using a slip nut and washer. Then connect the P-trap’s outlet to the wall or floor drain pipe. Ensure all joints are aligned and hand-tightened before final securing.
Verify P-Trap Orientation
The P-trap must form a “P” shape with the curved section pointing downward. It should sit directly under or slightly offset from the sink drain. Maintain at least 2 inches of vertical drop from the sink to the trap for a proper water seal that blocks sewer gases.
Route and Secure the Drain Hose
Flexible drain hoses simplify installation but require careful routing to avoid kinks and drainage problems.
Avoid Sharp Bends
Keep the hose as straight as possible between connections. Sharp bends restrict flow and cause slow drainage or backups over time.
Support Long Runs
If the drain hose spans more than 18 inches, use a strap or clip to prevent sagging. Sagging creates low spots where water pools and debris collects, leading to clogs.
Seal Joints with Plumber’s Tape
Apply plumber’s tape to threaded slip joints before tightening. This reduces the risk of seepage at connection points and adds an extra layer of leak protection.
Connect Water Supply Lines
Hot and cold supply lines must connect securely to prevent leaks and provide easy shutoff capability for future maintenance.
Identify Supply Valves
Locate shut-off valves for hot and cold water near the installation site. Turn them off completely before making any connections.
Attach Flexible Supply Hoses
Connect one end of each braided stainless steel hose to the faucet tailpieces, matching hot to hot and cold to cold. Hand-tighten first, then give a quarter turn with an adjustable wrench. Over-tightening can damage the fittings and cause future leaks.
Link to Water Source
Attach the other ends of the hoses to the shut-off valves using the same technique. Make sure hoses aren’t twisted or stretched, which can weaken connections over time.
Test for Leaks Thoroughly
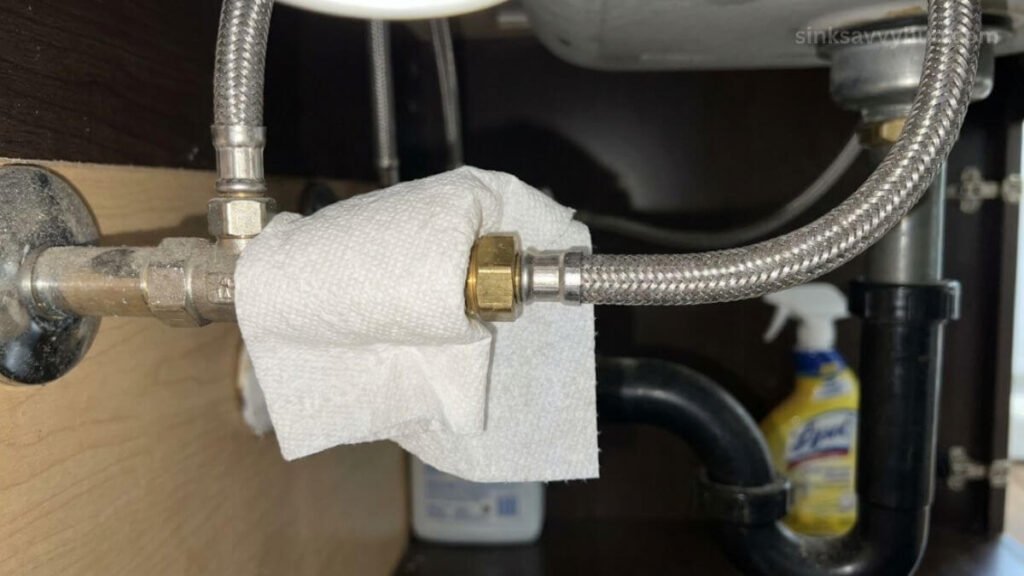
A proper leak test catches problems early and prevents water damage to walls, floors, and surrounding structures.
Turn On Water Supply Slowly
Open both shut-off valves gradually. Sudden pressure surges can dislodge connections that aren’t fully secured.
Inspect All Connection Points
Check every joint carefully, including the faucet base, supply line connections, shut-off valve joints, drain strainer, P-trap slip nuts, and drain hose fittings. Look for drips, mist, or pooling water. Feel connections with a dry hand or paper towel to catch slow seeps that aren’t visible.
Run Water and Monitor Drainage
Turn on the faucet and let both hot and cold water run for 2 to 3 minutes. Watch for leaks under sustained pressure. Flush the drain to ensure smooth flow with no gurgling or backup indicating a venting or clog issue.
Fix Leaks Immediately
If a joint leaks, turn off the water, disconnect the fitting, add more plumber’s tape or replace the washer, then reassemble. Retest until every connection is completely dry.
Finalize Installation with a Stability Check
Before declaring the job complete, verify long-term safety and performance with a final inspection.
Recheck Mounting Screws
After testing, inspect the wall-mounted bolts and screws. Vibration from water flow can loosen them slightly over time, so retighten if needed.
Confirm Sink Remains Level
Water sitting in the basin should be evenly distributed across the bottom. If it pools to one side, the sink is tilted and needs loosening, re-leveling, and retightening.
Clean and Polish the Fixture
Wipe down the sink and faucet with a soft cloth. Remove any drill dust, fingerprints, or smudges for a clean, professional finish.
Frequently Asked Questions About Wall Hung Sink Installation
What height should a wall hung sink be installed?
Standard installation height is between 32 and 36 inches from the floor for adult use. Adjust higher for taller users or accessibility needs, and lower for children’s bathrooms or custom ergonomic requirements.
Can I install a wall hung sink on drywall?
Yes, but you must use heavy-duty toggle bolts or anchor into studs whenever possible. Standard drywall anchors aren’t sufficient for the weight of a filled sink. When studs aren’t available, use toggle bolts rated for at least 100 pounds.
Do I need a P-trap for a wall hung sink?
Yes, a P-trap is required for virtually all plumbing installations. It retains water that blocks sewer gases from entering your living space. Most building codes mandate P-trap installation on all sink drains.
How long does it take to install a wall hung sink?
Most DIYers complete the installation in 1 to 2 hours, including preparation, drilling, mounting, and testing. Complex wall materials like tile or concrete can extend this timeline, as can rerouting existing plumbing.
What tools do I need to install a wall hung sink?
Essential tools include a drill with multiple bit sizes, a level, a wrench, adjustable pliers, measuring tape, a pencil, safety glasses, and plumber’s tape. You may also need a hammer, masonry bits, or specialized tile bits depending on your wall type.
How do I know if my wall can support a wall hung sink?
Check the wall material and use appropriate anchors rated for the sink’s weight plus water capacity. Concrete, brick, and wood stud walls offer the strongest support. Drywall requires heavy-duty toggle bolts or stud mounting. Always verify the manufacturer’s weight rating before installation.
Key Takeaways for Installing a Wall Hung Sink Successfully
A properly installed wall hung sink delivers years of reliable service when you follow the critical steps: accurate marking, progressive drilling, secure anchoring, level mounting, and thorough leak testing. Choose mounting hardware rated for your specific wall type and sink weight, and never skip the final stability and leak checks. With careful preparation and attention to detail, you can achieve a professional-quality installation that maximizes space and adds lasting value to your home or workspace.







