If you’ve ever wrestled with a slow-draining sink or spent an afternoon on your back under the vanity pulling out a soggy clump of hair, your bathroom sink stopper type deserves some blame. Not all stoppers handle hair, cleaning, and durability the same way. The three main bathroom sink stopper types—pop-up, push-button, and hair-trap—each come with real trade-offs that affect your daily routine. For households with long hair especially, the right choice can save hours of frustration every year.
This guide explains how each stopper type works, how easy it is to maintain, and which one delivers the best results in real homes. You’ll learn why push-button stoppers are gaining ground as the easiest option, where traditional pop-up systems fall short, and what to consider before upgrading your sink.
Pop-Up Stopper: How It Works
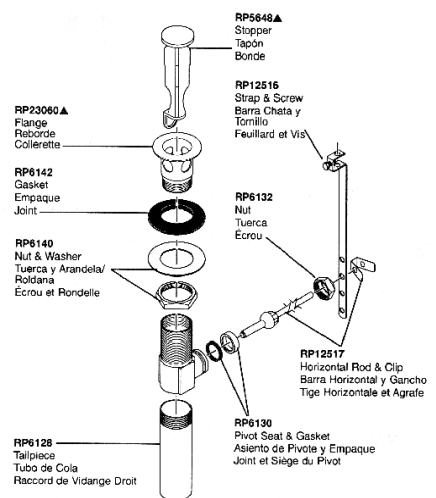
The pop-up stopper is a familiar sight in many bathrooms, especially those with traditional faucet designs. It relies on a hidden mechanical system beneath the sink to open and close the drain.
Pivot Rod and Linkage System
When you lift or push the faucet handle, a linkage arm connected to a pivot rod raises or lowers the stopper. The mechanism works behind the scenes, so the stopper appears to move on its own. While this looks clean and simple on the surface, the system depends on multiple parts that can wear down or shift out of place.
Key Components to Know
- Stopper body: The visible piece that seals the drain opening
- Linkage arm: Transfers motion from the handle to the stopper
- Pivot rod: Runs horizontally through the drainpipe
- Retaining nut: Secures the drain assembly to the sink
- Sink trap: The curved pipe below the sink that must come off for deep cleaning
Why Hair Clogs Are Almost Guaranteed
Hair catches easily on the pivot rod and linkage parts. As water flows through, strands wrap around the rod and collect in the trap. Even with careful rinsing, buildup happens fast. Over time, this causes slow drainage or full blockages.
Cleaning Takes Real Effort
To clear a clogged pop-up stopper, you need to:
- Shut off the water supply
- Remove the sink trap
- Disconnect the pivot rod
- Pull out the stopper
- Clean each part by hand
The whole process requires lying on your back under the sink. Most people put this off until the drain is completely blocked.
Push-Button Stopper: Simpler and Smarter
The push-button stopper drops the linkage system entirely, giving you a cleaner, more straightforward experience.
Direct Action With No Linkages
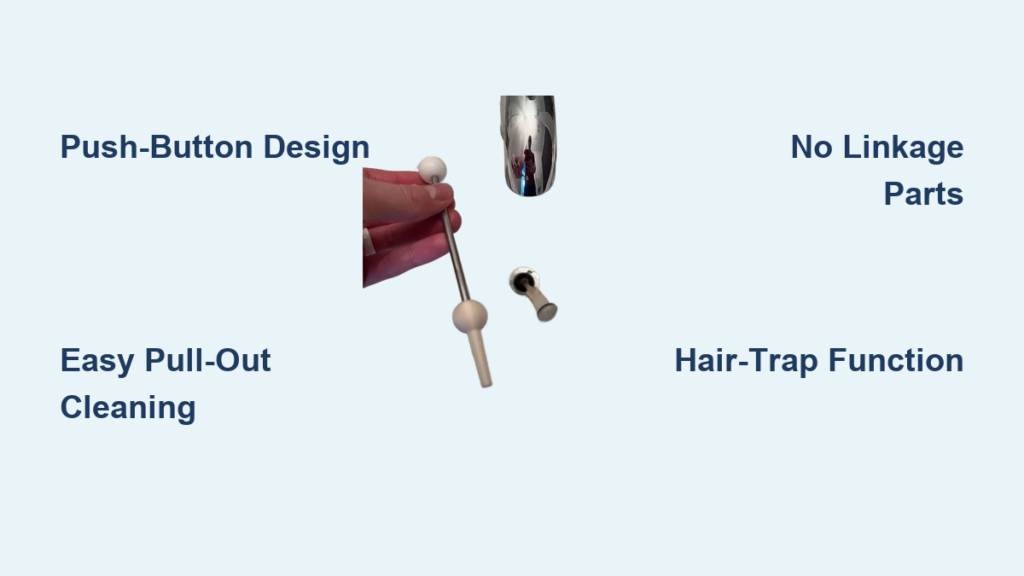
Instead of connecting to a handle, the push-button stopper works right at the drain. Push down to close the drain and hold water. Push up to release it. Many models also let you pull the entire stopper out by hand for fast cleaning. No tools, no disassembly.
Fewer Parts, Fewer Problems
Without a pivot rod or linkage arms, you get:
- Fewer failure points
- Less chance of misalignment
- No under-sink access needed for routine upkeep
This makes push-button stoppers more reliable over the life of the faucet.
Effortless Cleaning Routine
To clean:
- Pull the stopper straight out of the drain
- Rinse off hair and debris under the faucet
- Drop it back in place
That’s it. No trap removal. No tools. No kneeling on a hard floor. For daily upkeep, this is hard to beat.
Real-World Performance: Moen Test Results
A two-week evaluation of a Moen push-button faucet showed strong results:
- Zero leaks during the test period
- Smooth operation with no sticking or jamming
- Easy pull-out cleaning in seconds
- Spot-resistant finish that held up well
- Quick hair removal with a simple rinse
Users reported the system made sink maintenance feel almost effortless.
Hair-Trap Stopper: Stop Clogs Before They Start
Hair-trap stoppers take a different approach by catching hair before it reaches the drainpipe.
A Built-In Catching System
These stoppers include a small basket or mesh that collects strands on the surface. You lift the stopper, throw away the hair, and you’re done. No internal cleaning required.
Fit Matters More Than You’d Think
One tested model failed to fit a standard drain. A second model with adjustable bottom flanges fit perfectly. This shows that compatibility varies widely. Always check your drain size before buying.
Still Being Evaluated
Long-term testing wasn’t complete when the source data was gathered, but early results were promising. The hair-trap stopper caught hair effectively without slowing water flow.
Pop-Up vs. Push-Button: Key Differences

| Feature | Pop-Up Stopper | Push-Button Stopper |
|---|---|---|
| Ease of cleaning | Low (full disassembly) | High (pull-out design) |
| Hair catch efficiency | Moderate (clogs easily) | Good (especially with hair traps) |
| Installation complexity | High (linkage alignment) | Low (drop-in install) |
| Durability | Moderate (parts wear out) | High (fewer moving parts) |
| Best for long hair? | No | Yes |
Mechanical Simplicity Wins
Push-button stoppers have fewer moving parts, which translates to:
- Less wear and tear over time
- Lower risk of leaks or jams
- Easier DIY installation
Pop-up systems need precise linkage alignment. Getting it right takes patience, and small misalignments cause problems later.
Maintenance Comparison
- Pop-up: Requires trap removal and under-sink work
- Push-button: Clean in seconds with a pull and rinse
If plumbing tasks aren’t your thing, the push-button is the clear winner.
How to Install a New Sink Stopper
Upgrading your stopper often means replacing the full faucet and drain assembly. Here’s how to handle it.
Step 1: Prepare the Workspace
- Shut off the water supply valves under the sink
- Drain any leftover water into a bucket
- Lay down a towel or mat for comfort
Step 2: Remove the Old Faucet
- Disconnect the hot and cold supply lines
- Unscrew the mounting nut holding the faucet
- Lift the old unit out
- Clean the sink deck and scrape off old putty
Step 3: Install the New Faucet
- Place the new faucet with its gasket and mounting plate
- Secure it with the long mounting nut (use the included tool)
- Reconnect supply lines:
- Hot on the left
- Cold on the right
Step 4: Replace the Drain Assembly
- Remove the old stopper and retaining nut
- Apply the correct sealant to the new gasket (see below)
- Insert the drain into the sink opening
- Tighten the retaining nut from below
Step 5: Reattach the Trap and Cure the Sealant
- Reconnect the sink trap
- Wait 24 hours for silicone to cure before running water
Choose the Right Sealant

Using the wrong sealant can crack your drain. Match the product to your drain material:
| Drain Type | Recommended Sealant | Why It Matters |
|---|---|---|
| Plastic | Silicone sealant | Prevents cracking |
| Metal | Plumber’s putty | Creates a strong, flexible seal |
Warning: Never use plumber’s putty on plastic drains. It can cause cracks and leaks over time.
Who Should Use Push-Button Stoppers?
Ideal for These Households
- Long-haired users: Easy hair removal without taking anything apart
- DIYers: Simple installation, no tricky linkages
- Low-maintenance seekers: Clean in seconds
- Mobility-limited users: No under-sink work required
When Pop-Up Might Still Work
- You prefer the look of handle-operated systems
- Your faucet design requires a linkage mechanism
- You rarely deal with clogs
Even so, if you’re replacing a faucet anyway, the push-button upgrade is worth considering.
Maintenance Tips for All Stopper Types
Keep your sink running smoothly with these habits.
Routine Cleaning by Type
- Push-button: Pull out and rinse weekly
- Pop-up: Full disassembly every 1–2 months
- Hair-trap: Empty collected hair after each use as needed
Preventive Measures
- Use a sink mat during maintenance for comfort
- Keep both silicone sealant and plumber’s putty on hand, but use the right one
- Address slow drainage right away to avoid full clogs
Frequently Asked Questions About Bathroom Sink Stopper Types
What is the easiest bathroom sink stopper type to clean?
The push-button stopper is the easiest to clean. You simply pull it out by hand, rinse off hair and debris, and drop it back in. No tools or under-sink work needed.
Do pop-up sink stoppers always clog with hair?
Pop-up stoppers are highly prone to hair clogs. Hair wraps around the pivot rod and linkage system, building up in the trap. Even with regular rinsing, clogs are common.
Are hair-trap stoppers worth it?
Hair-trap stoppers can be worth it for households with long hair. They catch strands before they enter the drain, reducing clogs. However, fit varies by model, so check your drain size before buying.
How much does a push-button sink stopper cost?
A Moen push-button faucet with a built-in stopper was purchased from Costco for $50. This is considered a good value for a modern, low-maintenance design.
Can I install a push-button stopper myself?
Yes. Push-button stoppers are designed for simple drop-in installation with fewer parts and no linkage alignment. Most DIYers can handle the swap without professional help.
What sealant should I use on a plastic sink drain?
Use silicone sealant on plastic drains. Plumber’s putty can crack plastic over time and cause leaks. Always match the sealant to your drain material.
Final Thoughts on Choosing the Best Bathroom Sink Stopper Type
The push-button sink stopper stands out as the best choice for most modern bathrooms, especially those dealing with frequent hair clogs. It outperforms traditional pop-up systems in every key area:
- Easier cleaning with a simple pull-out design
- Fewer clogs thanks to less hair-catching hardware
- Simpler installation with fewer parts to align
- Greater durability over time
If you’re tired of constant clogs or dreading under-sink cleaning, start by checking your faucet type and drain size. From there, a quick switch to a push-button or hair-trap model can save you time and frustration every single week.