You open your cabinets and find that awkward corner space gathering dust, while counter space near the stove feels cramped. Corner kitchen sink ideas offer a practical fix by turning that underused angle into the kitchen’s hardest-working zone. The right design opens up storage, smooths your workflow, and adds a striking visual element to your layout.
This guide walks you through layout strategies, configuration choices, material options, and installation tips. You’ll also find maintenance advice and styling tricks to help your corner sink perform beautifully for years.
Maximize Space with Corner Placement

Tucking a sink into the corner frees up linear counters and reshapes how you move through the kitchen.
Why a Corner Sink Works
A corner kitchen sink removes the dead zone where two walls meet and gives you prep space on both sides. This setup reduces congestion in galley or open-plan layouts. In L-shaped or U-shaped kitchens, the corner position places you centrally, so ingredients, tools, and appliances stay within easy reach.
Improve Workflow Efficiency
Place the stove on one wall and the refrigerator on the other to create a balanced work triangle. This arrangement cuts down on steps during meal prep and cleanup. Many corner designs also allow for deeper basins, giving you room to wash large pots and sheet pans without losing cabinet space.
Avoid Common Layout Mistakes
Keep the area in front of the sink clear with at least 24 inches of clearance. Don’t position the basin directly under a narrow window unless it fits the frame, since faucets and drying racks may bump the sill. For deep corner cabinets, choose lazy Susans or pull-out trays so the sink base never blocks access.
Choose the Right Sink Configuration
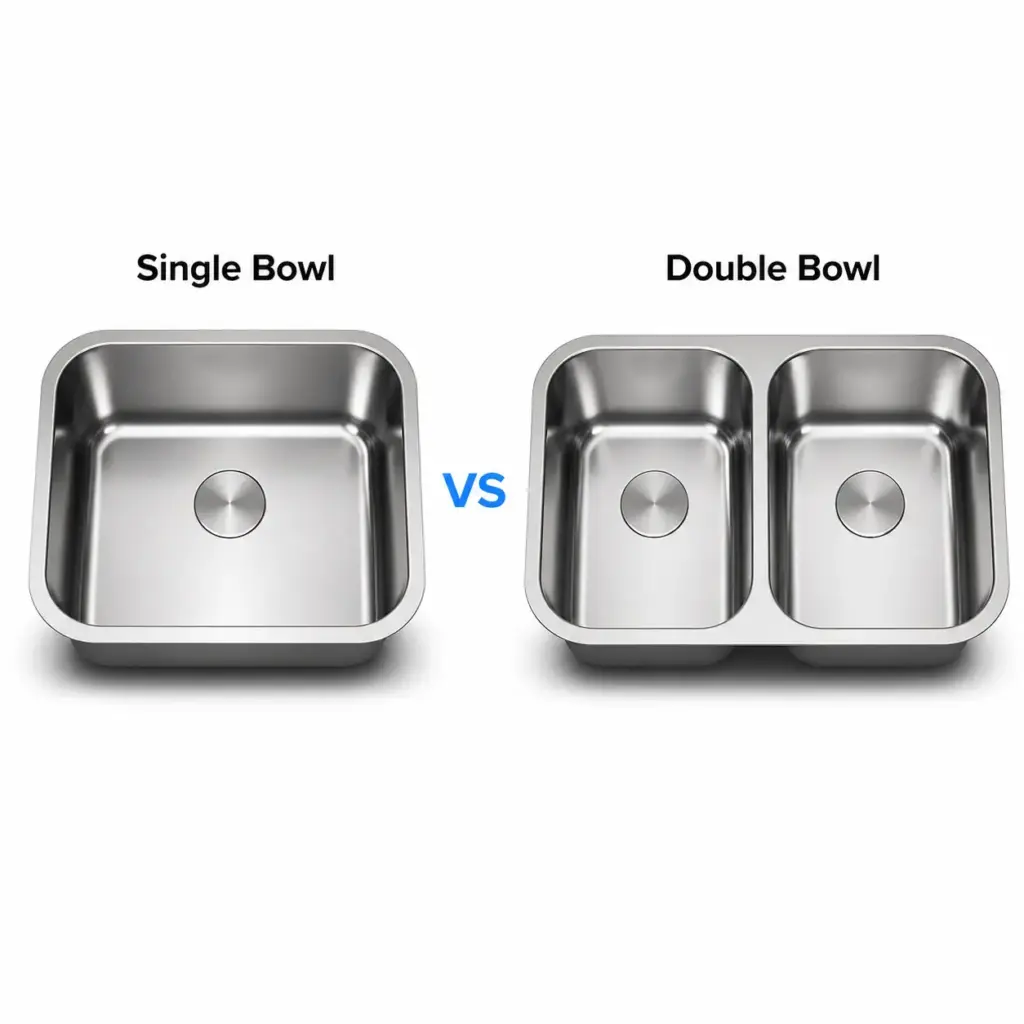
The bowl shape you pick shapes both daily comfort and visual style.
Single-Bowl for Modern Simplicity
A single-bowl corner sink delivers uninterrupted space, which is ideal for oversized cookware. Asymmetric designs maximize interior depth while fitting into a 90-degree angle. Some models accept matching cutting boards or drying racks that sit across the basin, creating extra counter room when the sink is idle.
Double-Bowl for Functional Flexibility
A double-bowl corner sink lets you rinse produce in one side while stacking dishes in the other. Corner double bowls usually come in unequal sizes, with one deep basin for washing and a smaller one for prep or drying. Confirm your cabinet measures 36 inches or wider so both bowls fit without crowding.
Deep-Dish for Heavy-Duty Use
Deep-dish corner sinks (8 inches or more) limit splashing and handle tall stock pots with ease. You’ll find them in stainless steel or fireclay, and they work well in busy kitchens. Check vertical clearance in the cabinet and make sure the faucet arc reaches high enough to fill large vessels.
Pick Durable, Stylish Materials

Your sink material influences how it wears, cleans, and looks over time.
Stainless Steel for Durability
Stainless steel corner sinks resist heat, stains, and impact. Finishes range from brushed to satin to polished, so they blend with most kitchen styles. Choose 16- to 18-gauge steel for quieter performance and long life. Many models include sound-dampening pads. Skip abrasive scrubbers to avoid fine scratches.
Ceramic for Classic Charm
Ceramic corner sinks bring timeless appeal to farmhouse and traditional kitchens. The glazed fired-clay surface resists stains but can chip from heavy impacts. Clean with a soft cloth and mild soap. Because ceramic weighs more, reinforce the cabinetry during installation.
Composite for Low Maintenance
Composite sinks blend granite or quartz with resin for a tough, attractive surface. They resist scratches, heat, and discoloration, and they hide water spots better than stainless steel. Stick to soapy water for cleaning and avoid bleach to protect the finish.
Install with Precision and Care
Accurate measuring and careful mounting protect your sink for the long run.
Measure Twice, Cut Once
Standard corner cabinet openings run 30 to 36 inches wide. Measure the wall angles because not every corner is a perfect 90 degrees; a framing square helps confirm alignment. Check plumbing locations too, since existing supply and drain lines may need rerouting in a retrofit.
Align with Cabinetry Seamlessly
Match the sink style to your cabinet plan: undermount, top-mount (drop-in), or apron-front. Undermount corner sinks deliver a clean look and let you wipe crumbs straight into the basin, but they need solid-surface counters and pro installation. Drop-in models are friendlier to DIY projects.
Seal and Support Properly
Reinforce the cabinet base to carry the weight of ceramic or composite sinks. Apply waterproof silicone sealant around the rim to block moisture. For undermount installs, use mounting clips and verify levelness before the seal sets. Run water through the plumbing afterward to check for leaks.
Enhance Functionality with Smart Accessories

The right add-ons make a corner sink easier to use every day.
Install Corner-Friendly Faucets
A gooseneck or pull-down faucet with 360-degree swivel reaches every part of the basin. A pull-down sprayer rinses produce and cleans deep pots without splashing. Mount the faucet on the outer edge so it clears the wall corner.
Add Drying Racks and Cutting Boards
Look for corner sink accessories like foldable drying racks or reversible cutting boards sized to the basin. Magnetic or inset trays keep the counter clear. Some sinks include built-in colanders or soap dispensers to reduce clutter.
Use Pull-Out Organizers Below
Outfit the corner cabinet with pull-out trays or rotating lazy Susans to store cleaning supplies, trash, or recycling bins. Soft-close hardware keeps operation smooth and quiet.
Maintain Your Sink for Longevity
Routine care keeps the finish bright and the plumbing trouble-free.
Clean Daily to Prevent Buildup
Wipe the sink after each use to stop water spots and food residue. Stainless steel responds well to a microfiber cloth with mild dish soap. Rinse and dry to prevent mineral deposits in hard water areas.
Avoid Harsh Cleaners
Skip steel wool, bleach, and abrasive powders; they scratch or dull the surface. For stubborn stains on composite or ceramic, use a baking soda and water paste. Stainless steel shines again with a 1:1 vinegar and water mix.
Inspect Seals and Drains Monthly
Check the drain assembly and the seal around the rim for leaks or mold. Clean the strainer often and freshen the disposal if your sink has one. Reapply silicone sealant every few years if you spot gaps or moisture under the counter.
Style Tips for Visual Appeal

Turn the corner sink into a design feature rather than a hidden utility.
Match Finish to Fixtures
Coordinate the sink finish with the faucet, cabinet hardware, and lighting. Brushed nickel pairs smoothly with matching pulls. A black composite sink pops against white cabinets, while white ceramic blends into classic settings.
Frame with Backsplash
Extend the backsplash behind the sink to guard the walls and add texture. Patterned tile, subway brick, or stone veneer draws the eye to the corner. Make sure the backsplash reaches into the angle to block water.
Illuminate the Area
Add under-cabinet lighting to brighten the sink zone. LED strips or puck lights improve visibility for washing and prep. If layout allows, a small pendant above the corner adds a luxe touch.
Frequently Asked Questions About Corner Kitchen Sinks
Are corner kitchen sinks practical for small kitchens?
Yes. A corner sink frees up counter space on both adjoining walls, which is a major advantage in compact or galley kitchens. The layout also improves traffic flow by removing the sink from a main pathway.
What is the standard size for a corner kitchen sink?
Most corner sinks fit cabinet openings between 30 and 36 inches wide. Bowl depth often runs 8 to 10 inches. Always measure your specific cabinet before buying, since wall angles and plumbing locations can vary.
Which material is best for a corner kitchen sink?
Stainless steel offers the best balance of price, durability, and noise control. Ceramic suits traditional designs but requires careful handling. Composite blends resist scratches and stains and come in many colors.
Can I install a corner sink myself?
Drop-in corner sinks are manageable for experienced DIYers. Undermount and apron-front models usually need professional installation because they require precise countertop cutting and heavy reinforcement.
How do I prevent leaks around a corner sink?
Apply a continuous bead of waterproof silicone sealant around the rim and check it yearly. Tighten the drain assembly and inspect supply lines for drips. Reinforce the cabinet base so the sink weight does not warp the seal.
Do corner sinks work with garbage disposals?
Yes. Most corner sinks accept standard disposals, though the tight angle can make installation trickier. A plumber can confirm clearance and reroute plumbing if needed.
Key Takeaways for Choosing the Best Corner Kitchen Sink
The smartest corner kitchen sink ideas start with honest measurements of your cabinet, walls, and plumbing. Match the sink configuration to your cooking style: single-bowl for oversized pans, double-bowl for multitasking, or deep-dish for heavy use. Pick a material that fits your maintenance routine and design goals, then invest in careful sealing and cabinet reinforcement during install. Add a swivel faucet and pull-out organizers to make the corner feel effortless.
Your next step is simple: measure your corner cabinet today, sketch your ideal sink placement, and shortlist two or three configurations that match your workflow. With a clear plan, you’ll turn that awkward angle into the most efficient spot in your kitchen.